When we render a new Quarto site, it converts all of our markdown into HTML and applies a pre-built CSS stylesheet (the Bootswatch Cosmo theme).
We can modify the appearance of our website in a number of ways:
Editing the index.qmd YAML – you can apply a pre-built template to give your landing page a sleek and professional appearance (we can further modify this later with some CSS).
Editing the _quarto.yml file – this is our website configuration file, where we can easily update our website’s navigation (e.g. add new pages), add a page footer, a favicon, and much more. We can also switch the default theme to a different pre-built Bootswatch theme (by replacing cosmo with an alternative theme name).
Defining CSS rules in the styles.css file that comes with every new Quarto site. This allows you to fine-tune the appearance of your site.
Creating a .scss file(s) that contains Sass variables to quickly customize your website’s theme – these take the form of $var-name: value; and you can find a list of them in the Quarto documentation.
Or…
TL;DR
Combine all of the above!
Approaching this in the following order worked best for me:
First, add a pre-built template to index.qmd and adjust website configurations by editing _quarto.yml – this is the easiest way to add some really cool features with minimal effort.
Next, create a styles.scss file, link to it in _quarto.yml (this applies your styles to your Quarto site), and define your Sass variables.
Finally, make fine-tuned adjustments by defining CSS rules directly in your styles.scss file (you can write CSS in .scss files, but not Sass in .css files).
Working on branches is recommended!
I almost always work on a branch when making changes to my website – this way I can safely test changes before deploying them to my live site.
To create a branch, first ensure that you’re on main by typing either git branch into the Terminal (either will tell you which branch you’re currently on). If you’re not on main, you can switch by running git checkout main.
Create a local git branch from main by running the following in your Terminal:
Terminal
git checkout -b my-new-branch
Push your new local branch to GitHub by running the following in your Terminal:
Terminal
git push -u origin my-new-branch
You’re now ready to work as normal! Once satisfied with your changes, you can git add, git commit -m "my commit message", and git push (or use the IDE GUI buttons in the Git tab) your files. Open a pull request from GitHub and merge into main to integrate your changes.
Preview your site for fast iteration
Run quarto preview in the Terminal to view changes in near real time – each time you edit and save your work, the preview will update in your browser.
Let’s start styling
So you’ve created your personal website using Quarto . . .
Quarto gives us an easy-to-use web publishing format to create our personal websites – we can develop in a space that is comfortable (for me, that’s Positron or RStudio) and write mostly Markdown syntax (which is rendered as HTML when we build our website). A massive benefit is that these websites already look pretty slick right out of the box.
But some additional modifications can make your website stand out from the rest
First, add a pre-built template to index.qmd and adjust website configurations by editing _quarto.yml – this is the easiest way to add some really cool features with minimal effort.
Arrange landing page content using a pre-built template
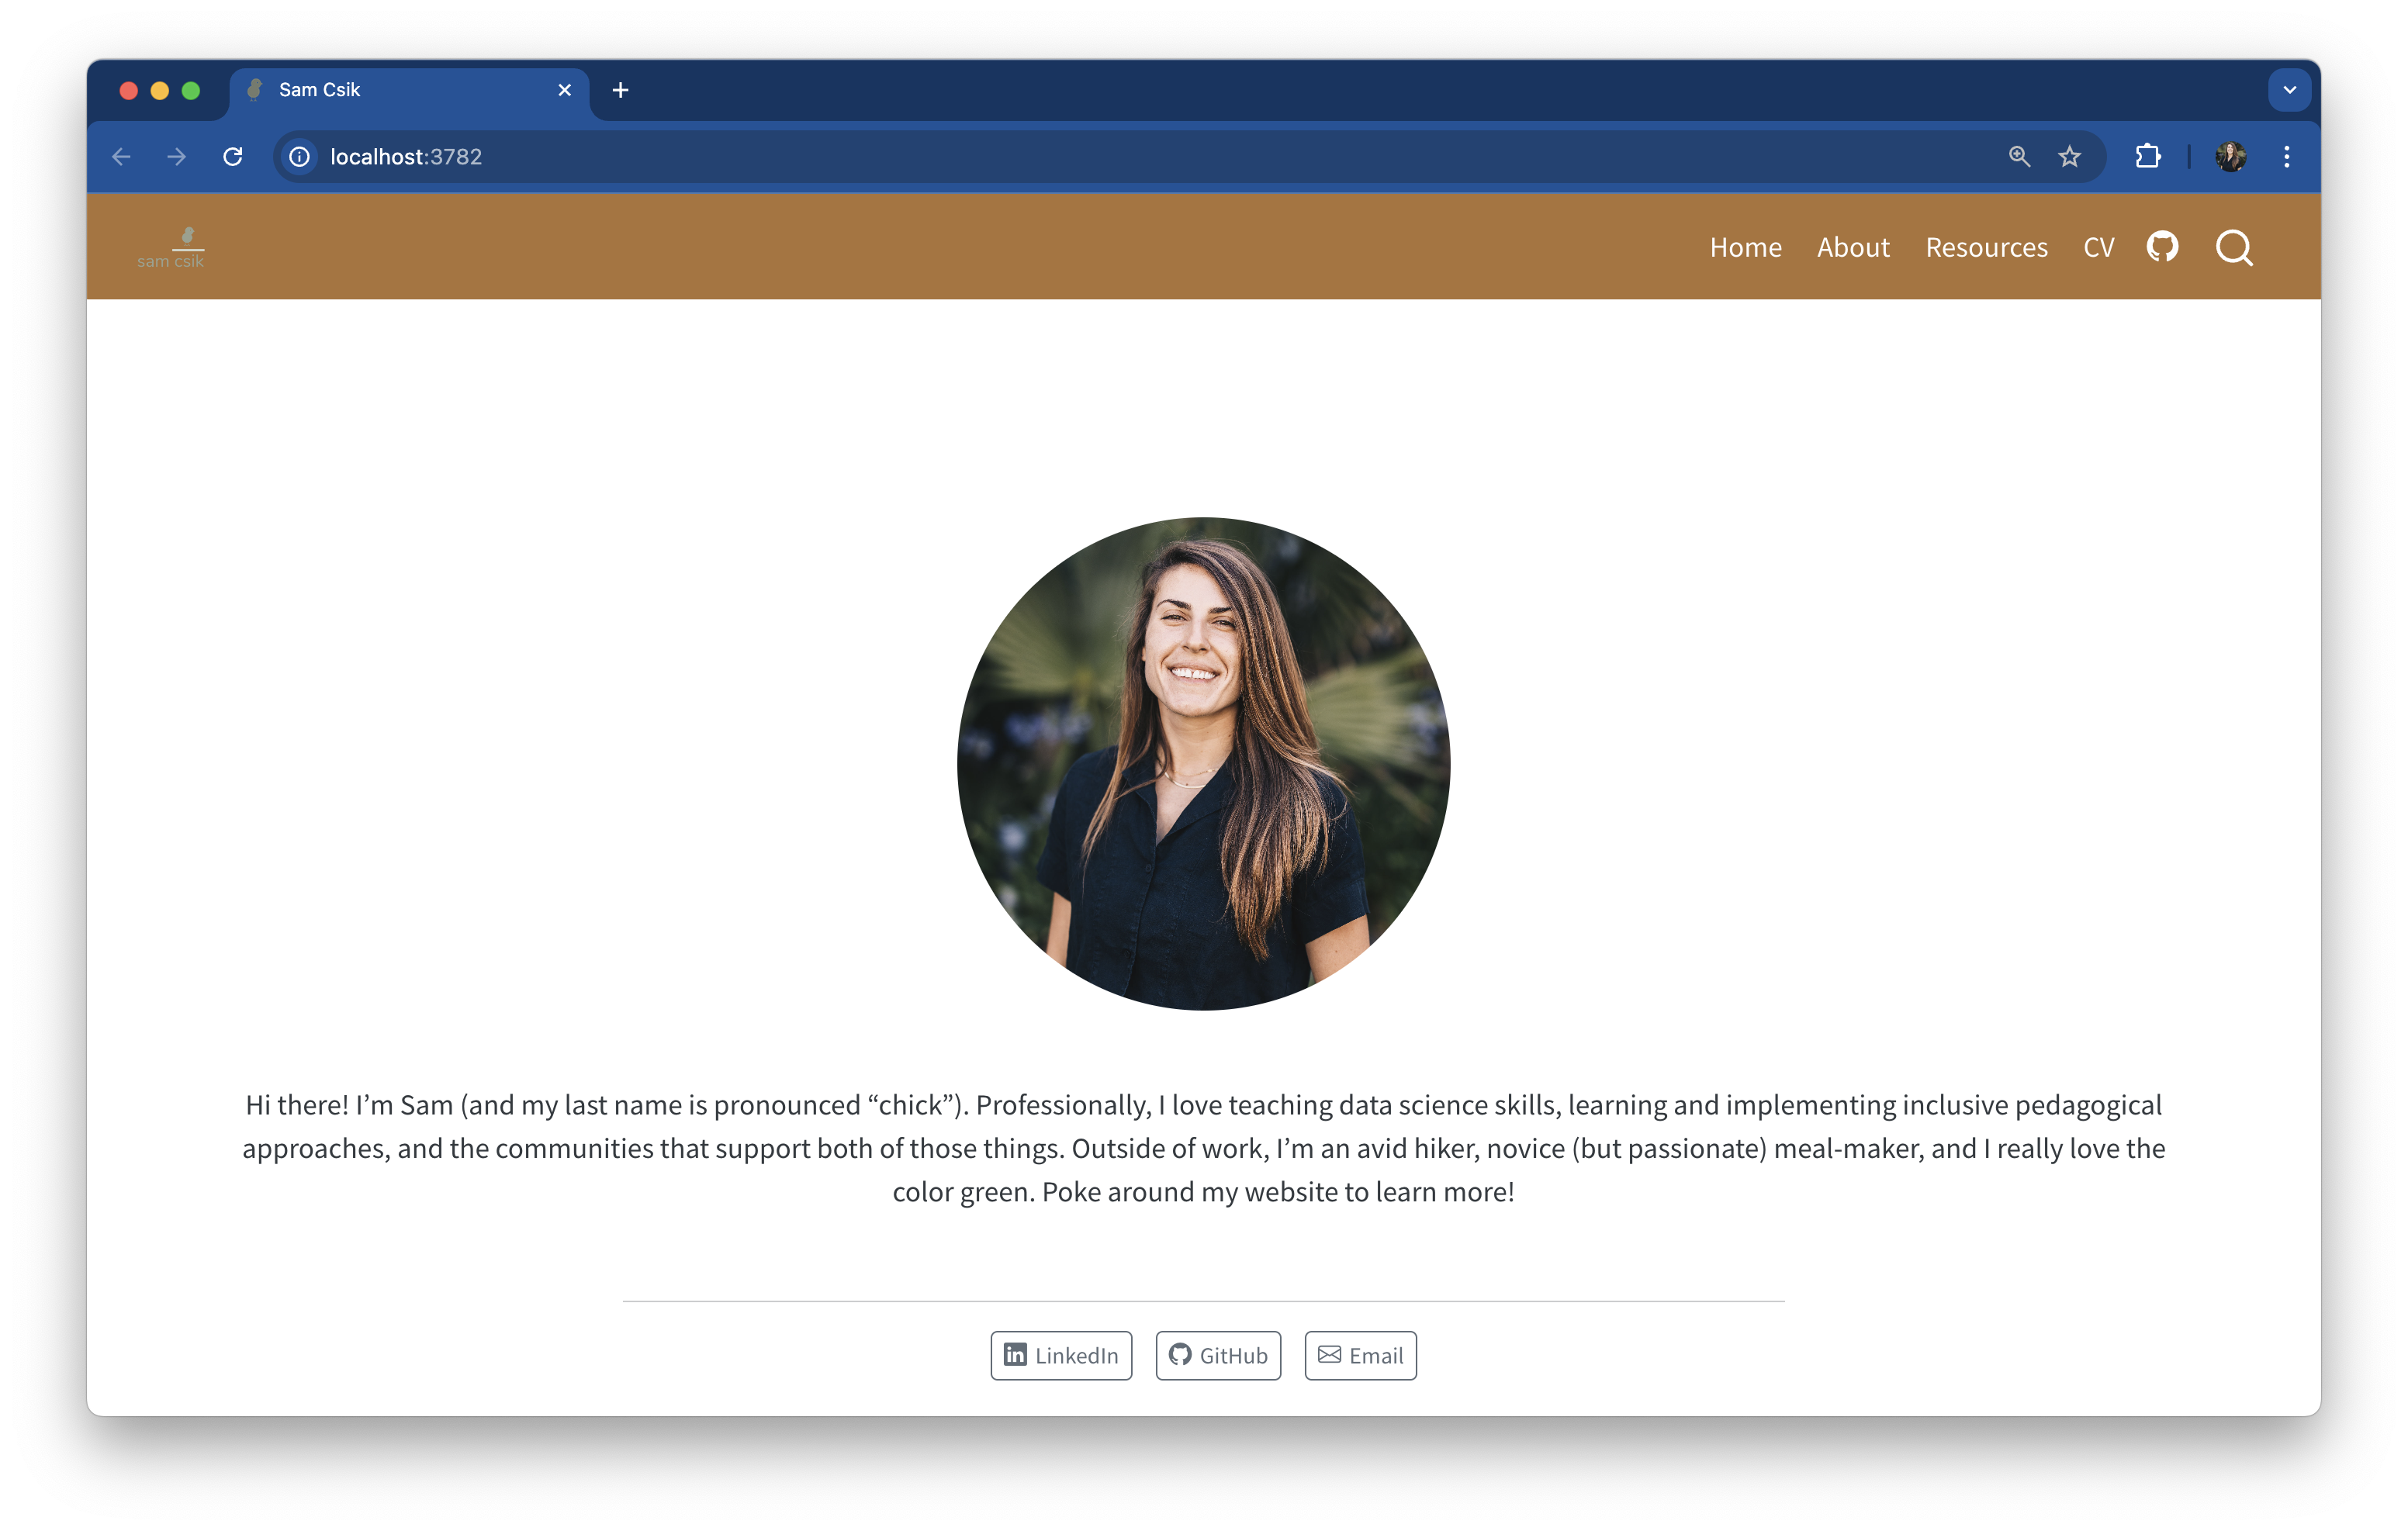
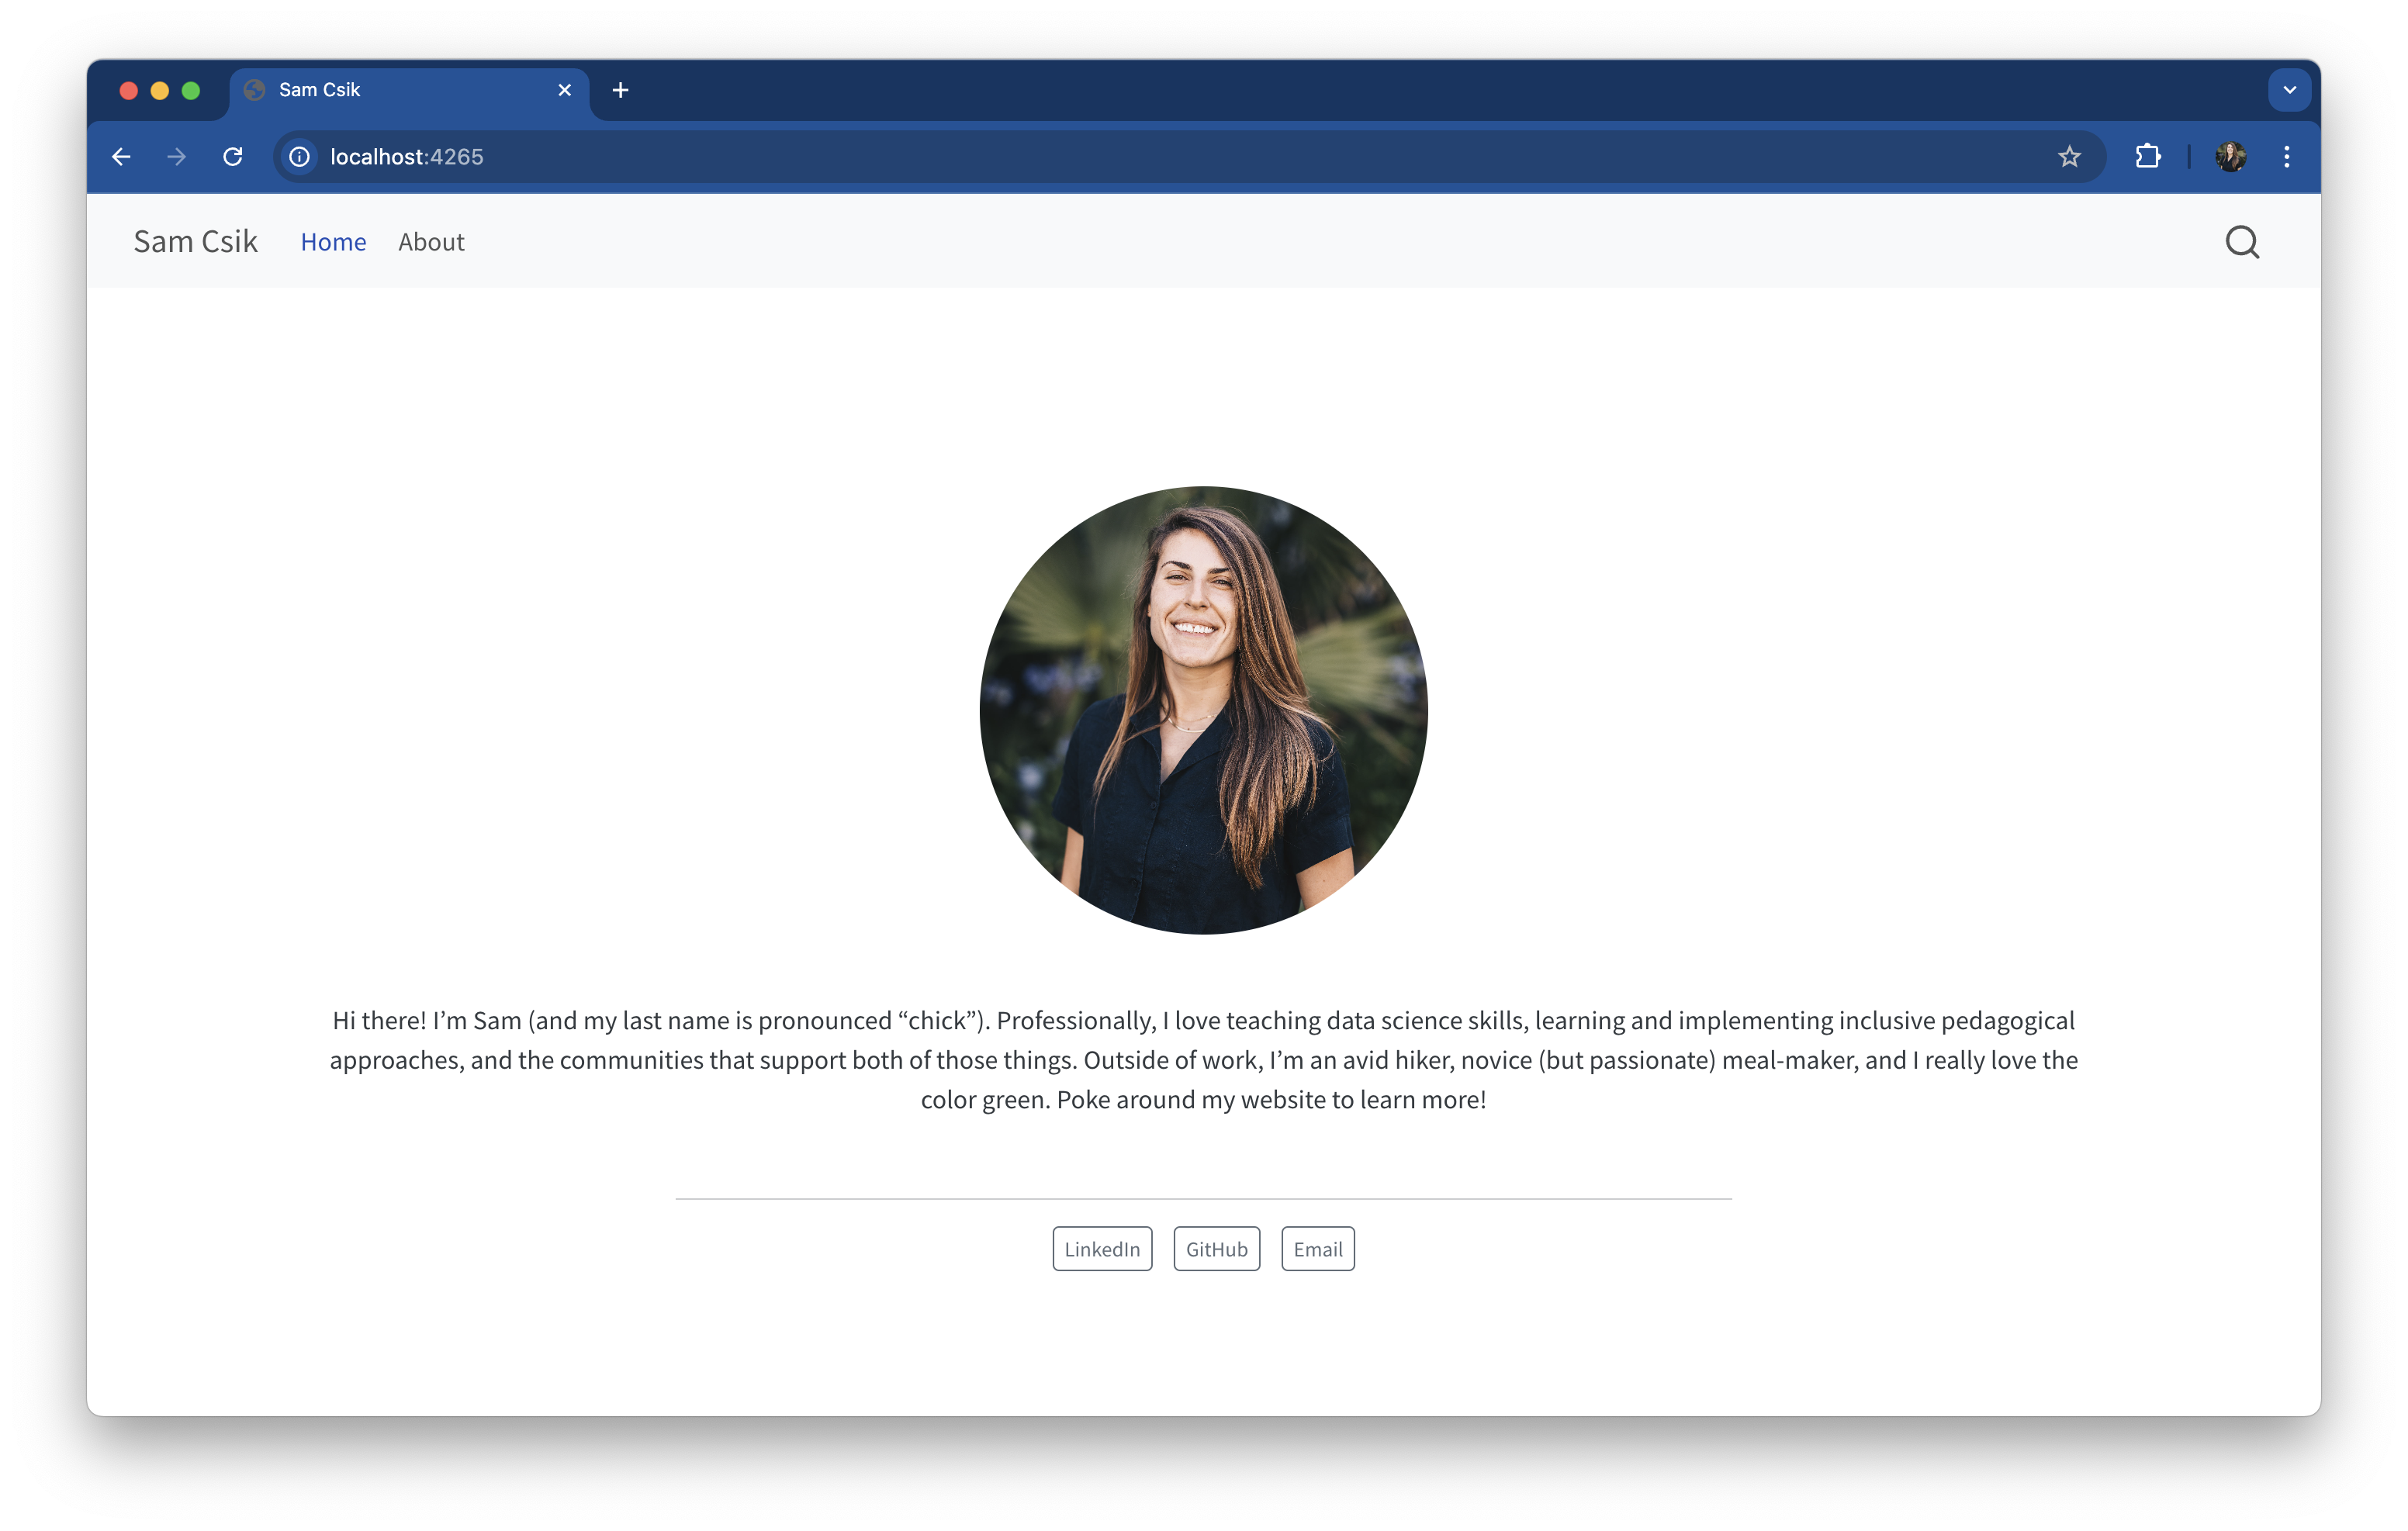
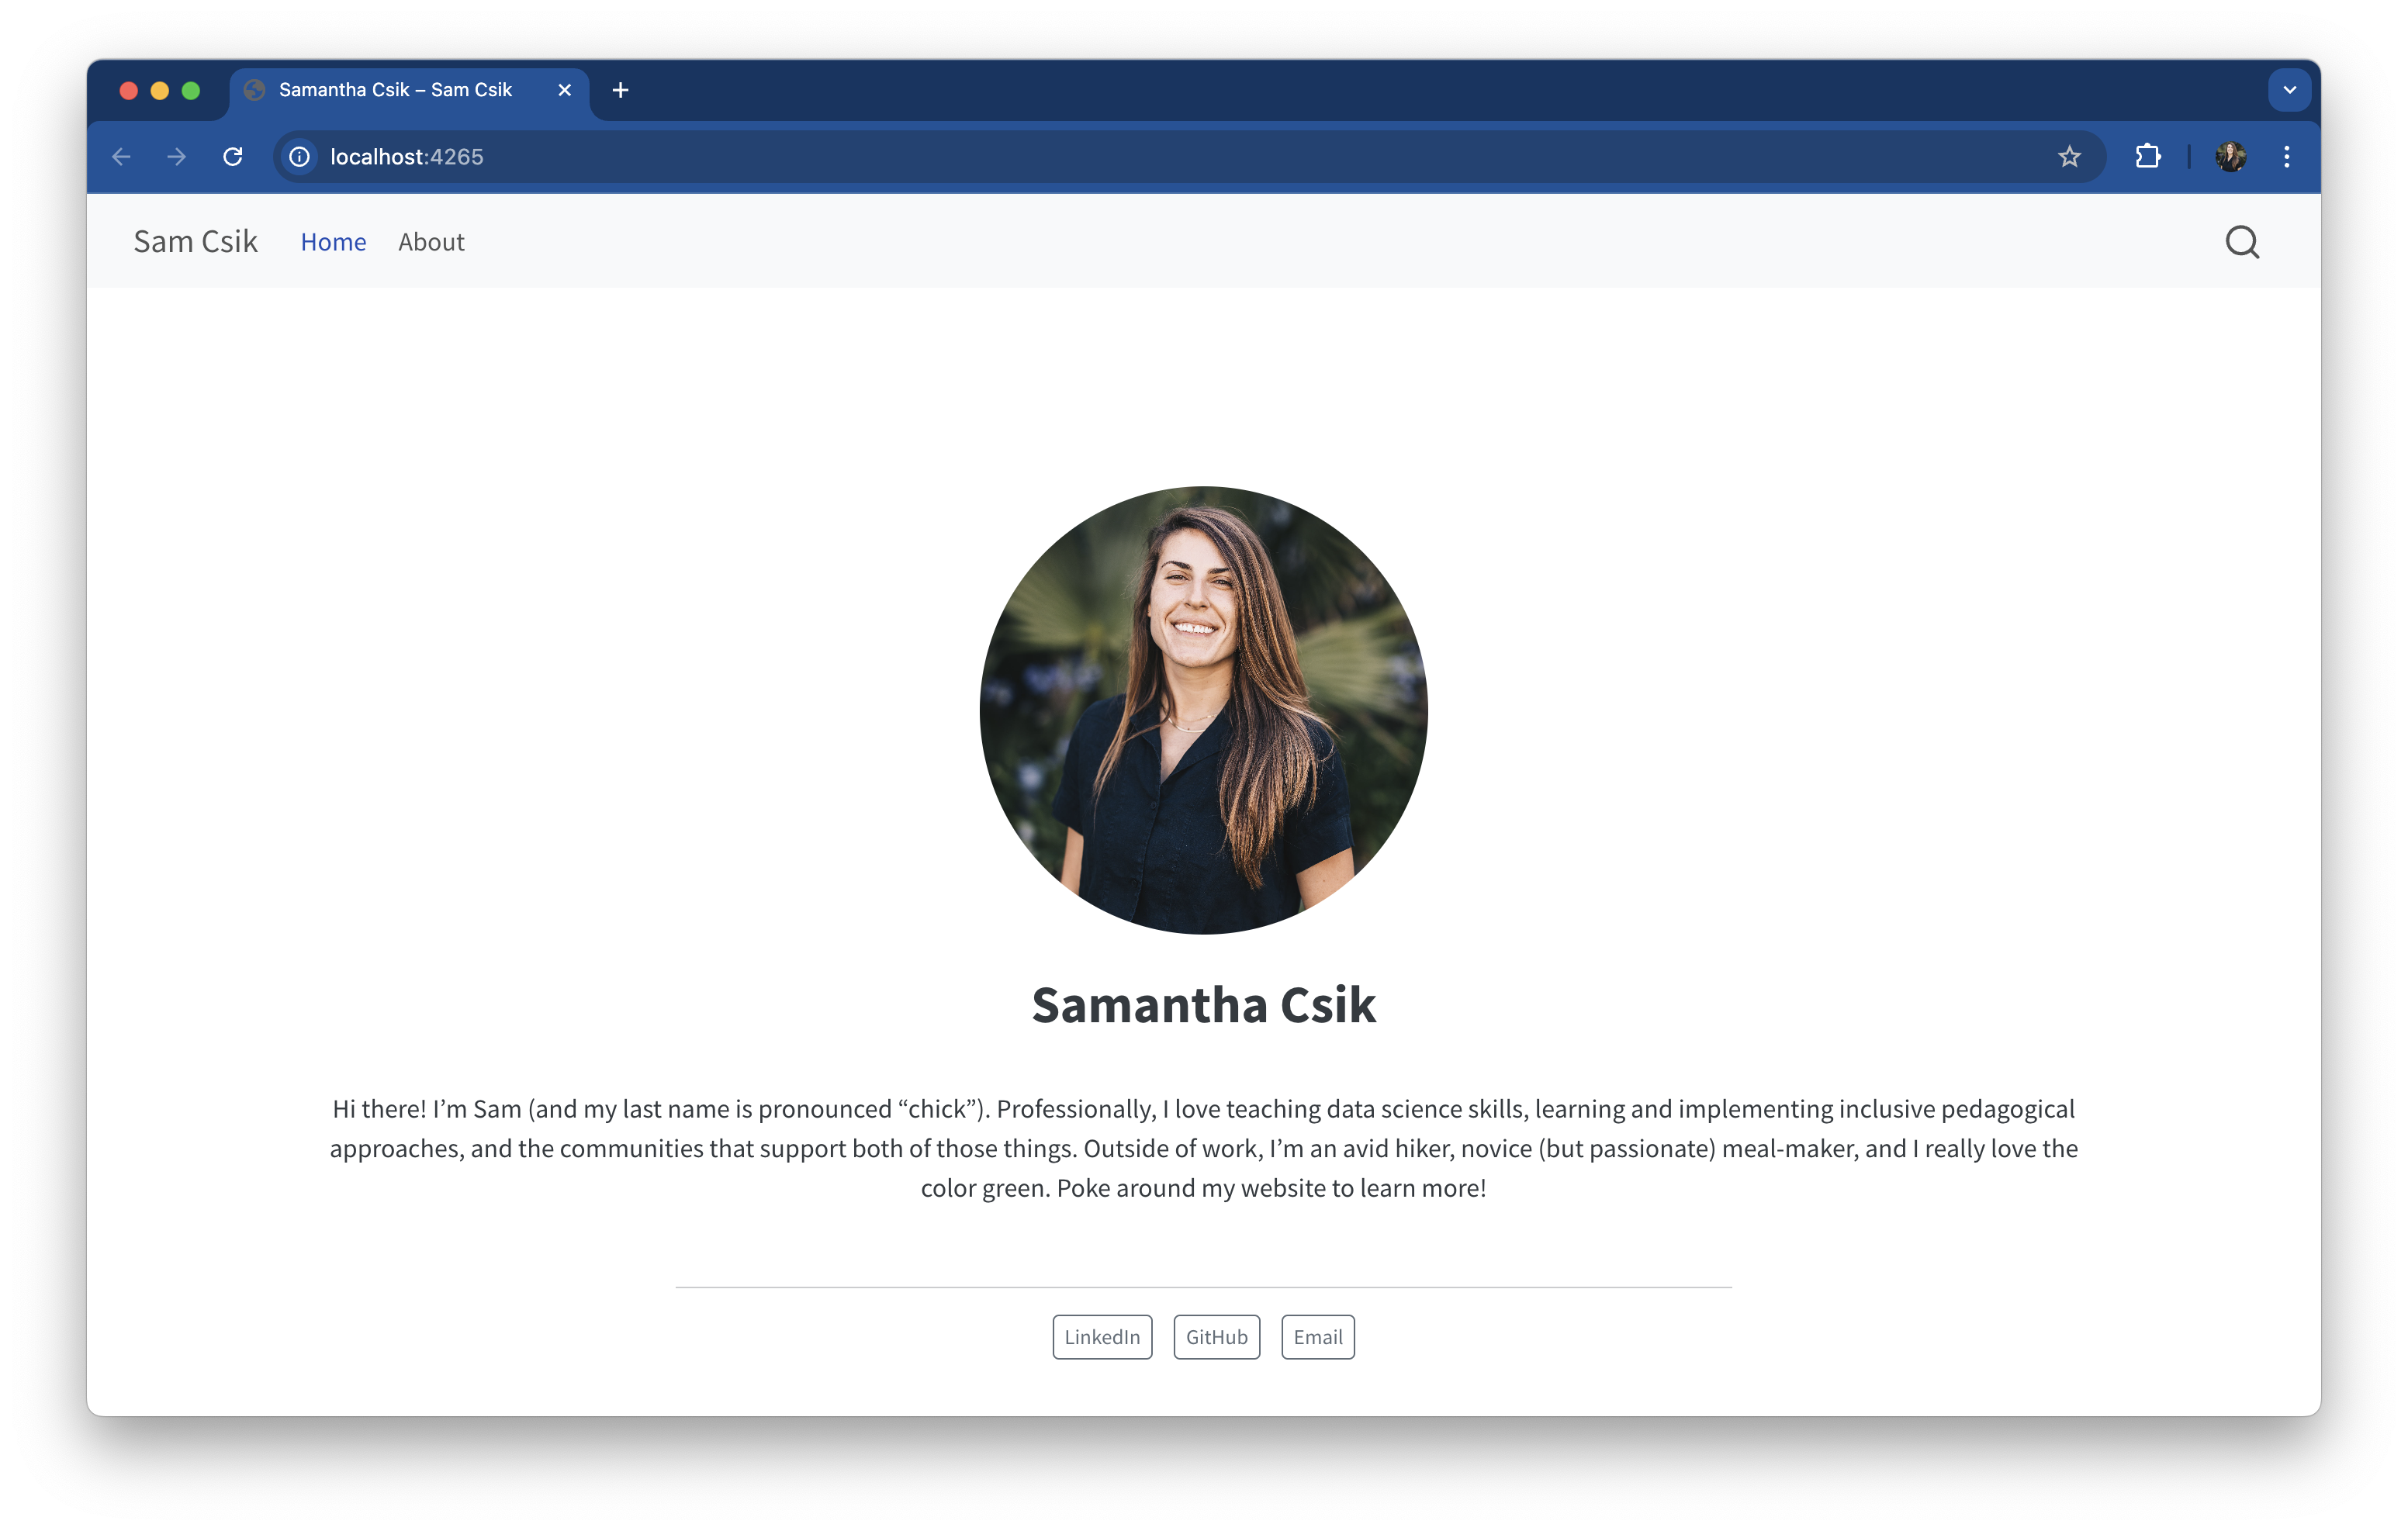
Quarto has 5 pre-built template “about pages”, which can be used to nicely arrange content about a person or organization. These work especially well for personal websites! For example:
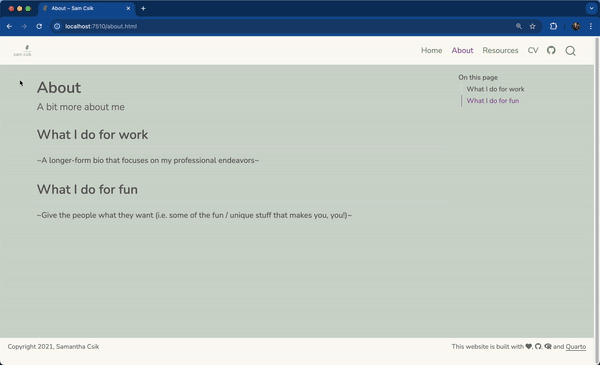
Without an About Page template
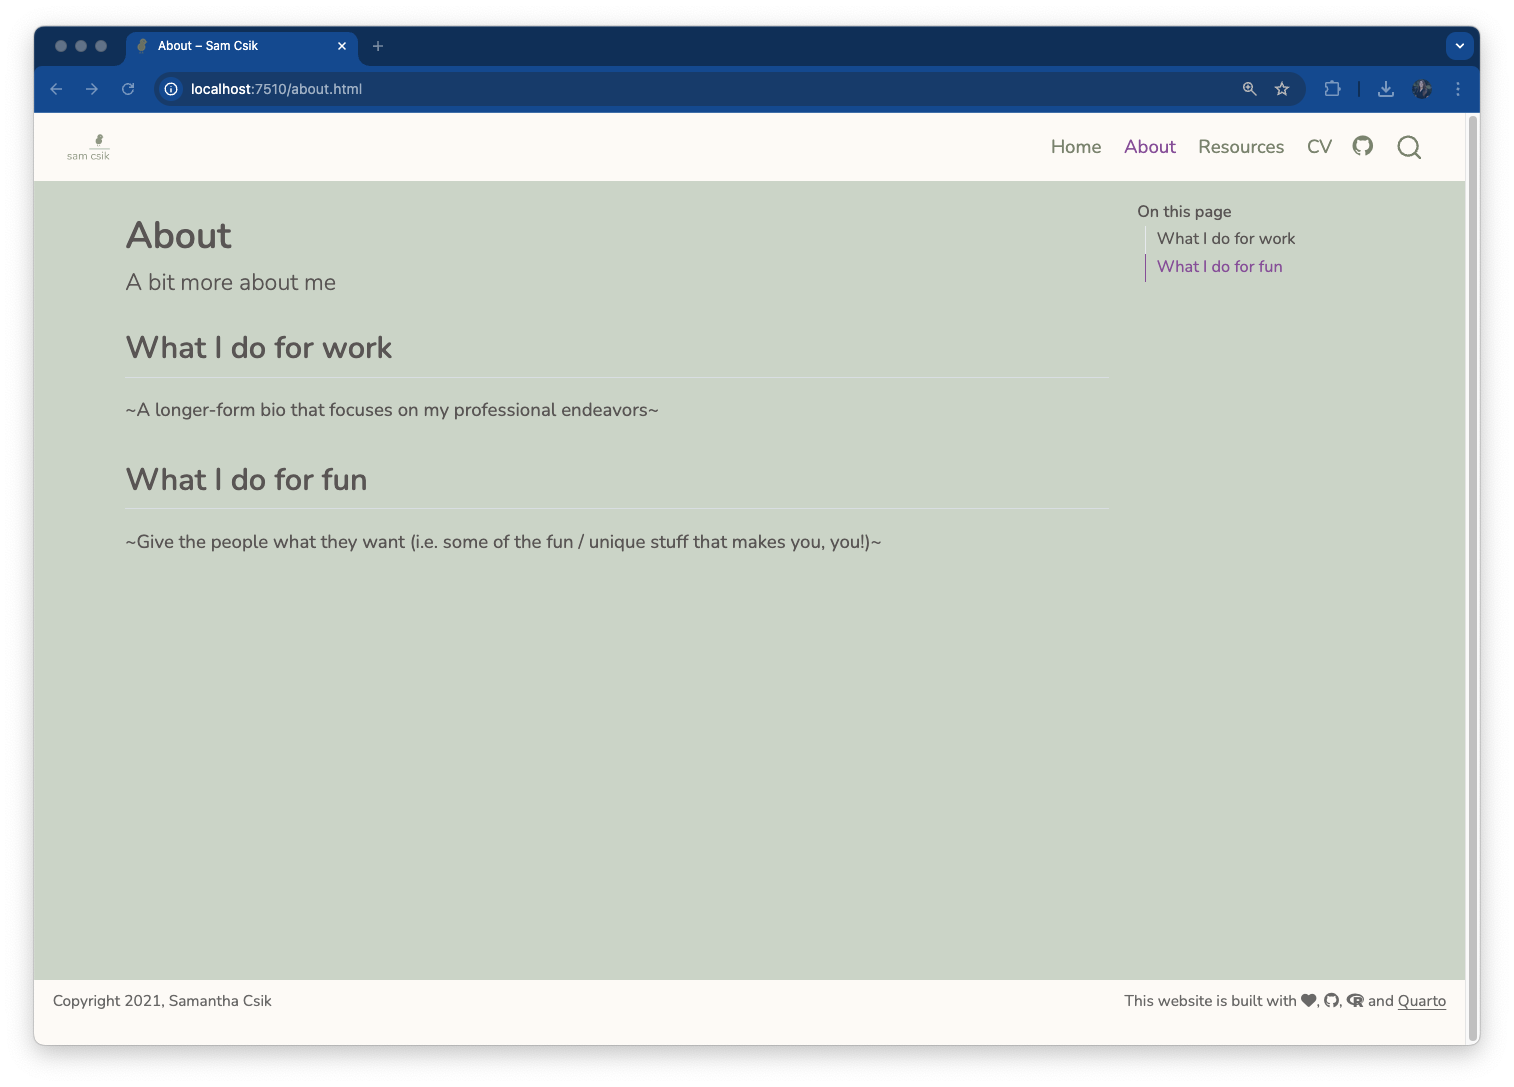
With the jolla About Page template
Note: You can apply a template to any of your website’s pages, though they are particularly awesome for creating a clean, professional-looking landing page.
Arrange landing page content using a pre-built template
Use the about option to apply a template to your landing page:
index.qmd
---# title: "Samantha Shanny-Csik" # optional (omitted in example screenshots); this title appears under your photoimage: file/path/to/headshot.jpeg # a great spot for your professional headshot :) toc: false # disable table of contents for this page (if applicable)about: template: jolla image-shape: round image-width:17em links:# create buttons- text: LinkedIn href: https://www.linkedin.com/in/samanthacsik/ target: _blank # opens link in a new browser tab- text: GitHub href: https://github.com/samanthacsik target: _blank - text: Email href: mailto:scsik@ucsb.edu---# ~ landing page content / text omitted for brevity ~
Be sure to spell the icon name exactly as it appears on FontAwesome’s website (e.g. the LinkedIn icon, , is all lowercase and spelled, linkedin).
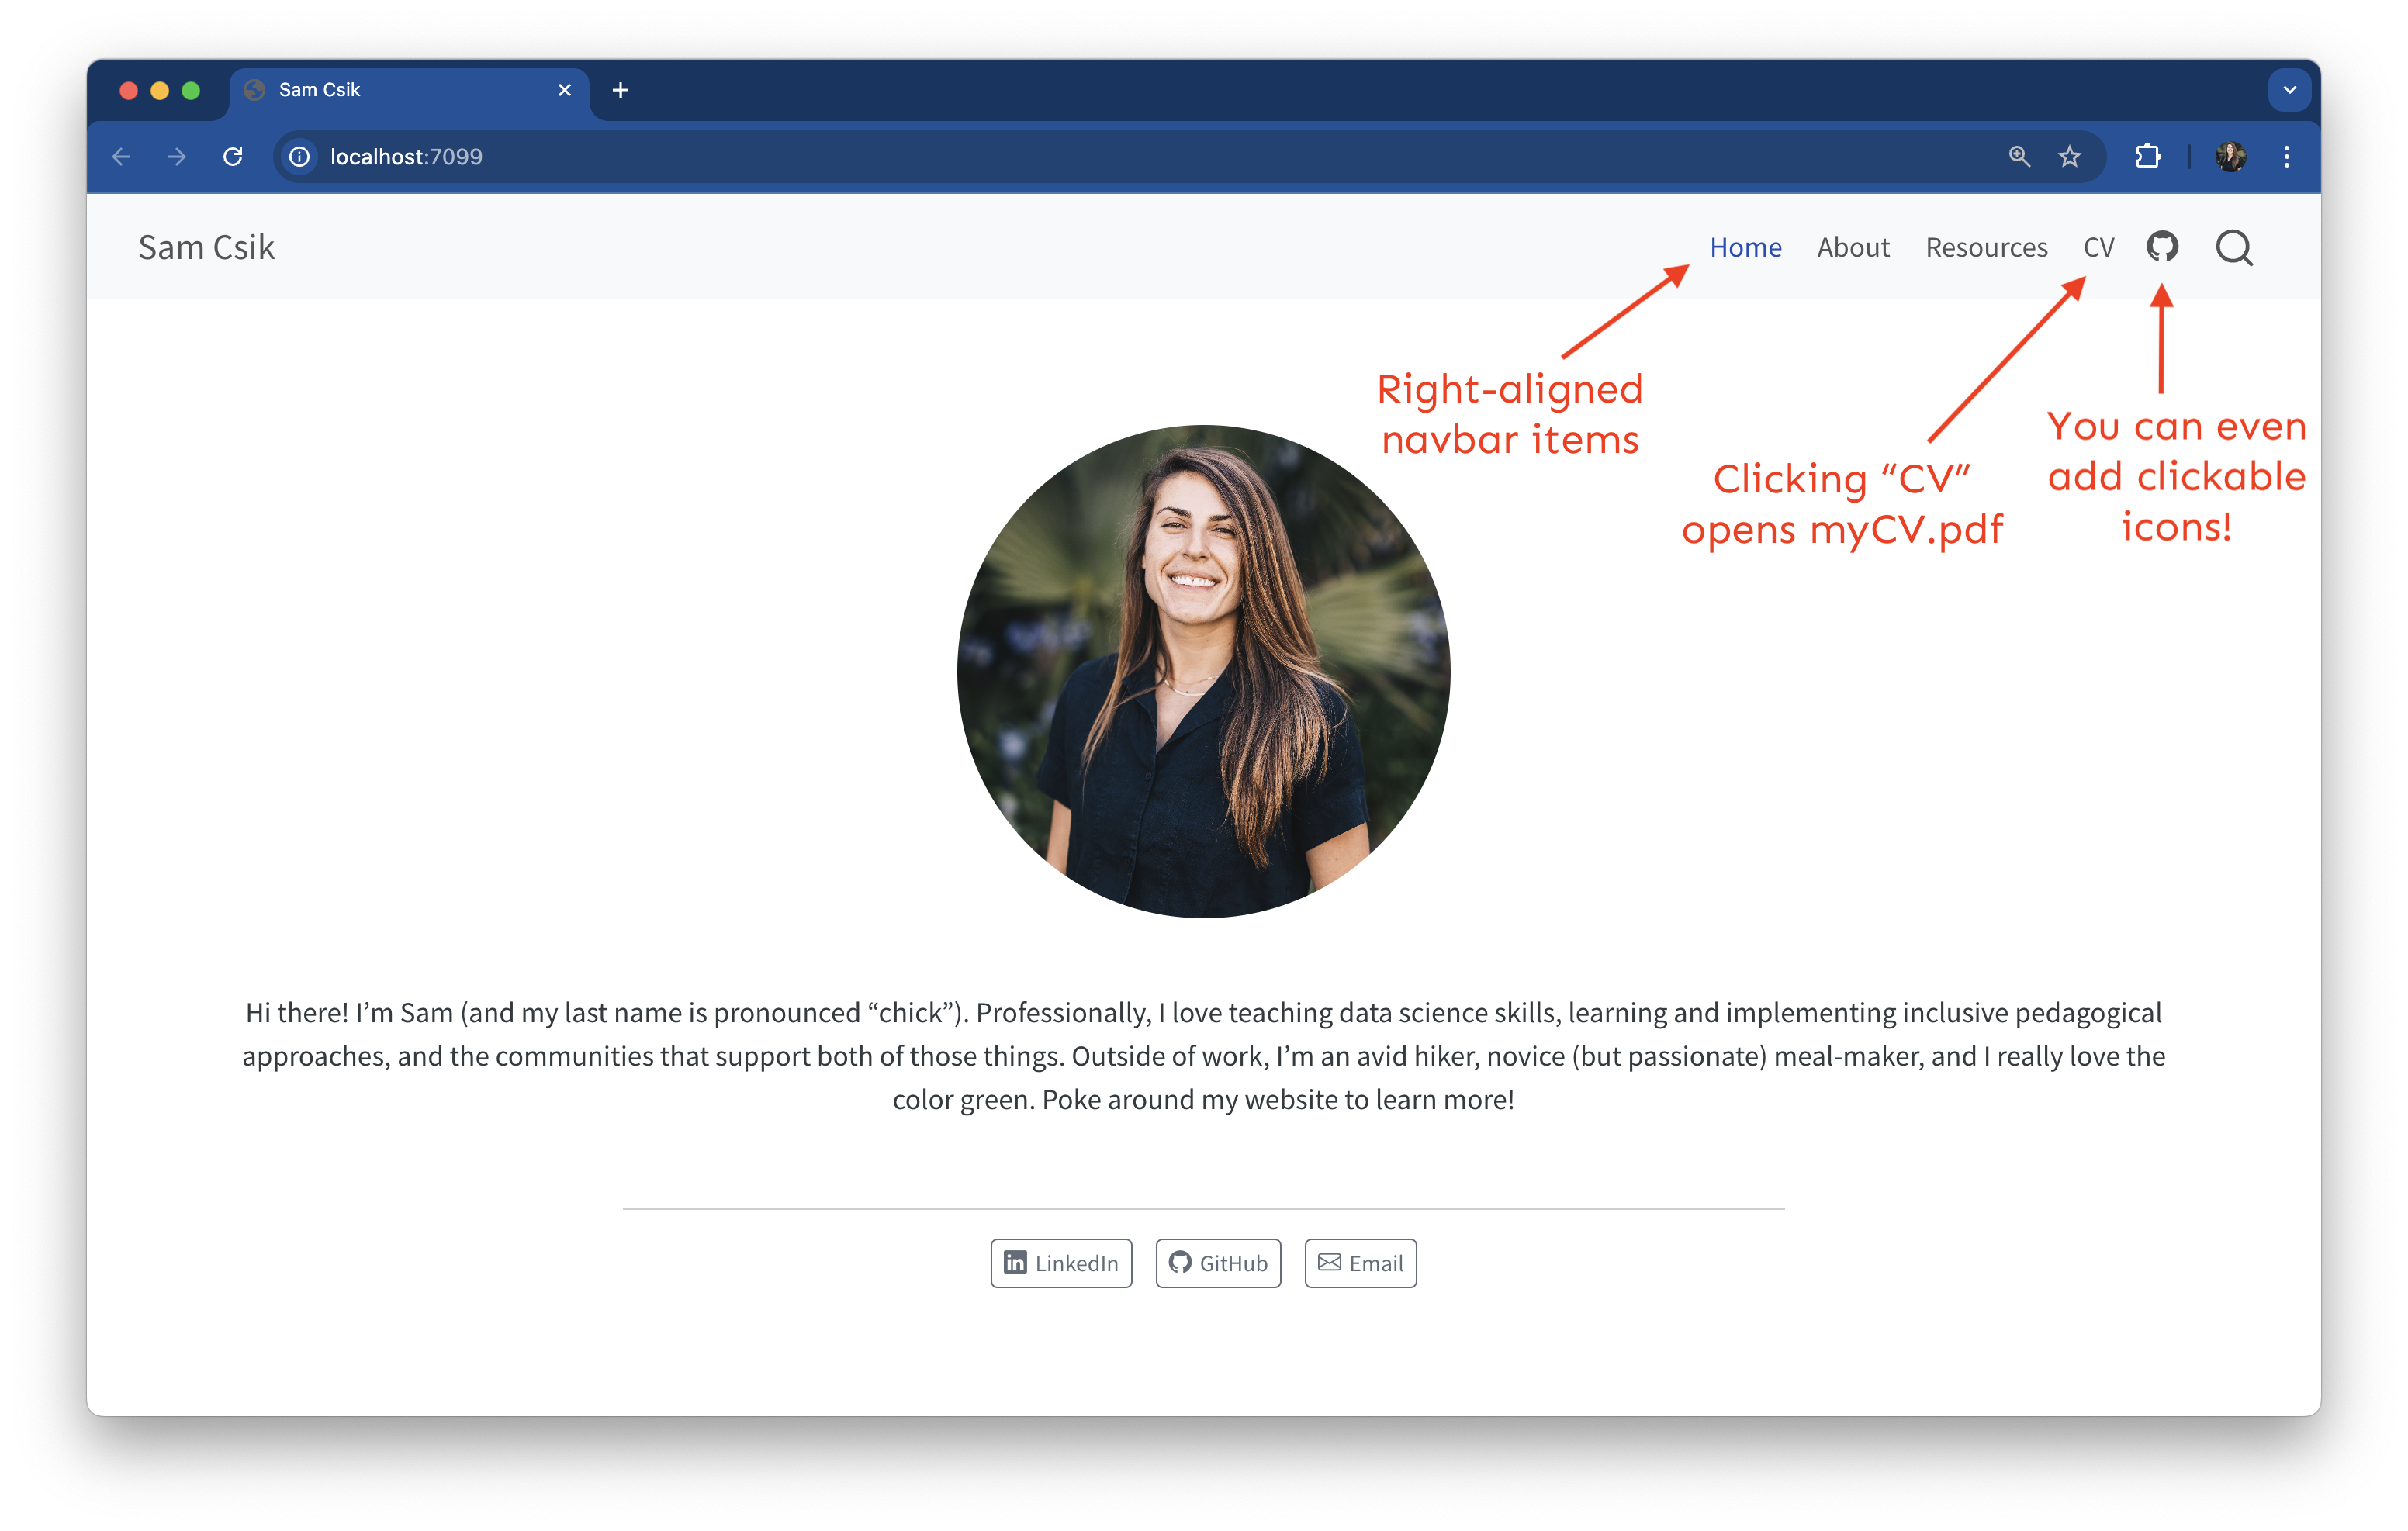
Add / arrange pages in your navbar
We configure website navigation in _quarto.yml, including the type of navigation menu (navbar, sidebar), how pages are ordered, etc.
Here, we moved our navbar items to the right side, link to a curriculum vitae (pdf), and also add a GitHub icon which links to a GitHub profile.
Add / arrange pages in your navbar
Make edits to a website’s navigation bar under the website > navbar option:
_quarto.yml
project: type: website output-dir: docswebsite: title:"Sam Shanny-Csik" navbar: right:# accepts right/left/center; you can also place items individually on the left, right, and center- href: index.qmd text: Home- about.qmd- href: resources.qmd text: Resources- href: file/path/to/myCV.pdf # providing a relative file path to a pdf will open up a browser-based pdf viewer when clicked text: CV target: _blank # opens link (or page) in a new browser tab- icon: github # add icons as navbar buttons href: https://github.com/samanthacsik target: _blankformat: html: theme: cosmo css: styles.css toc: true page-layout: full
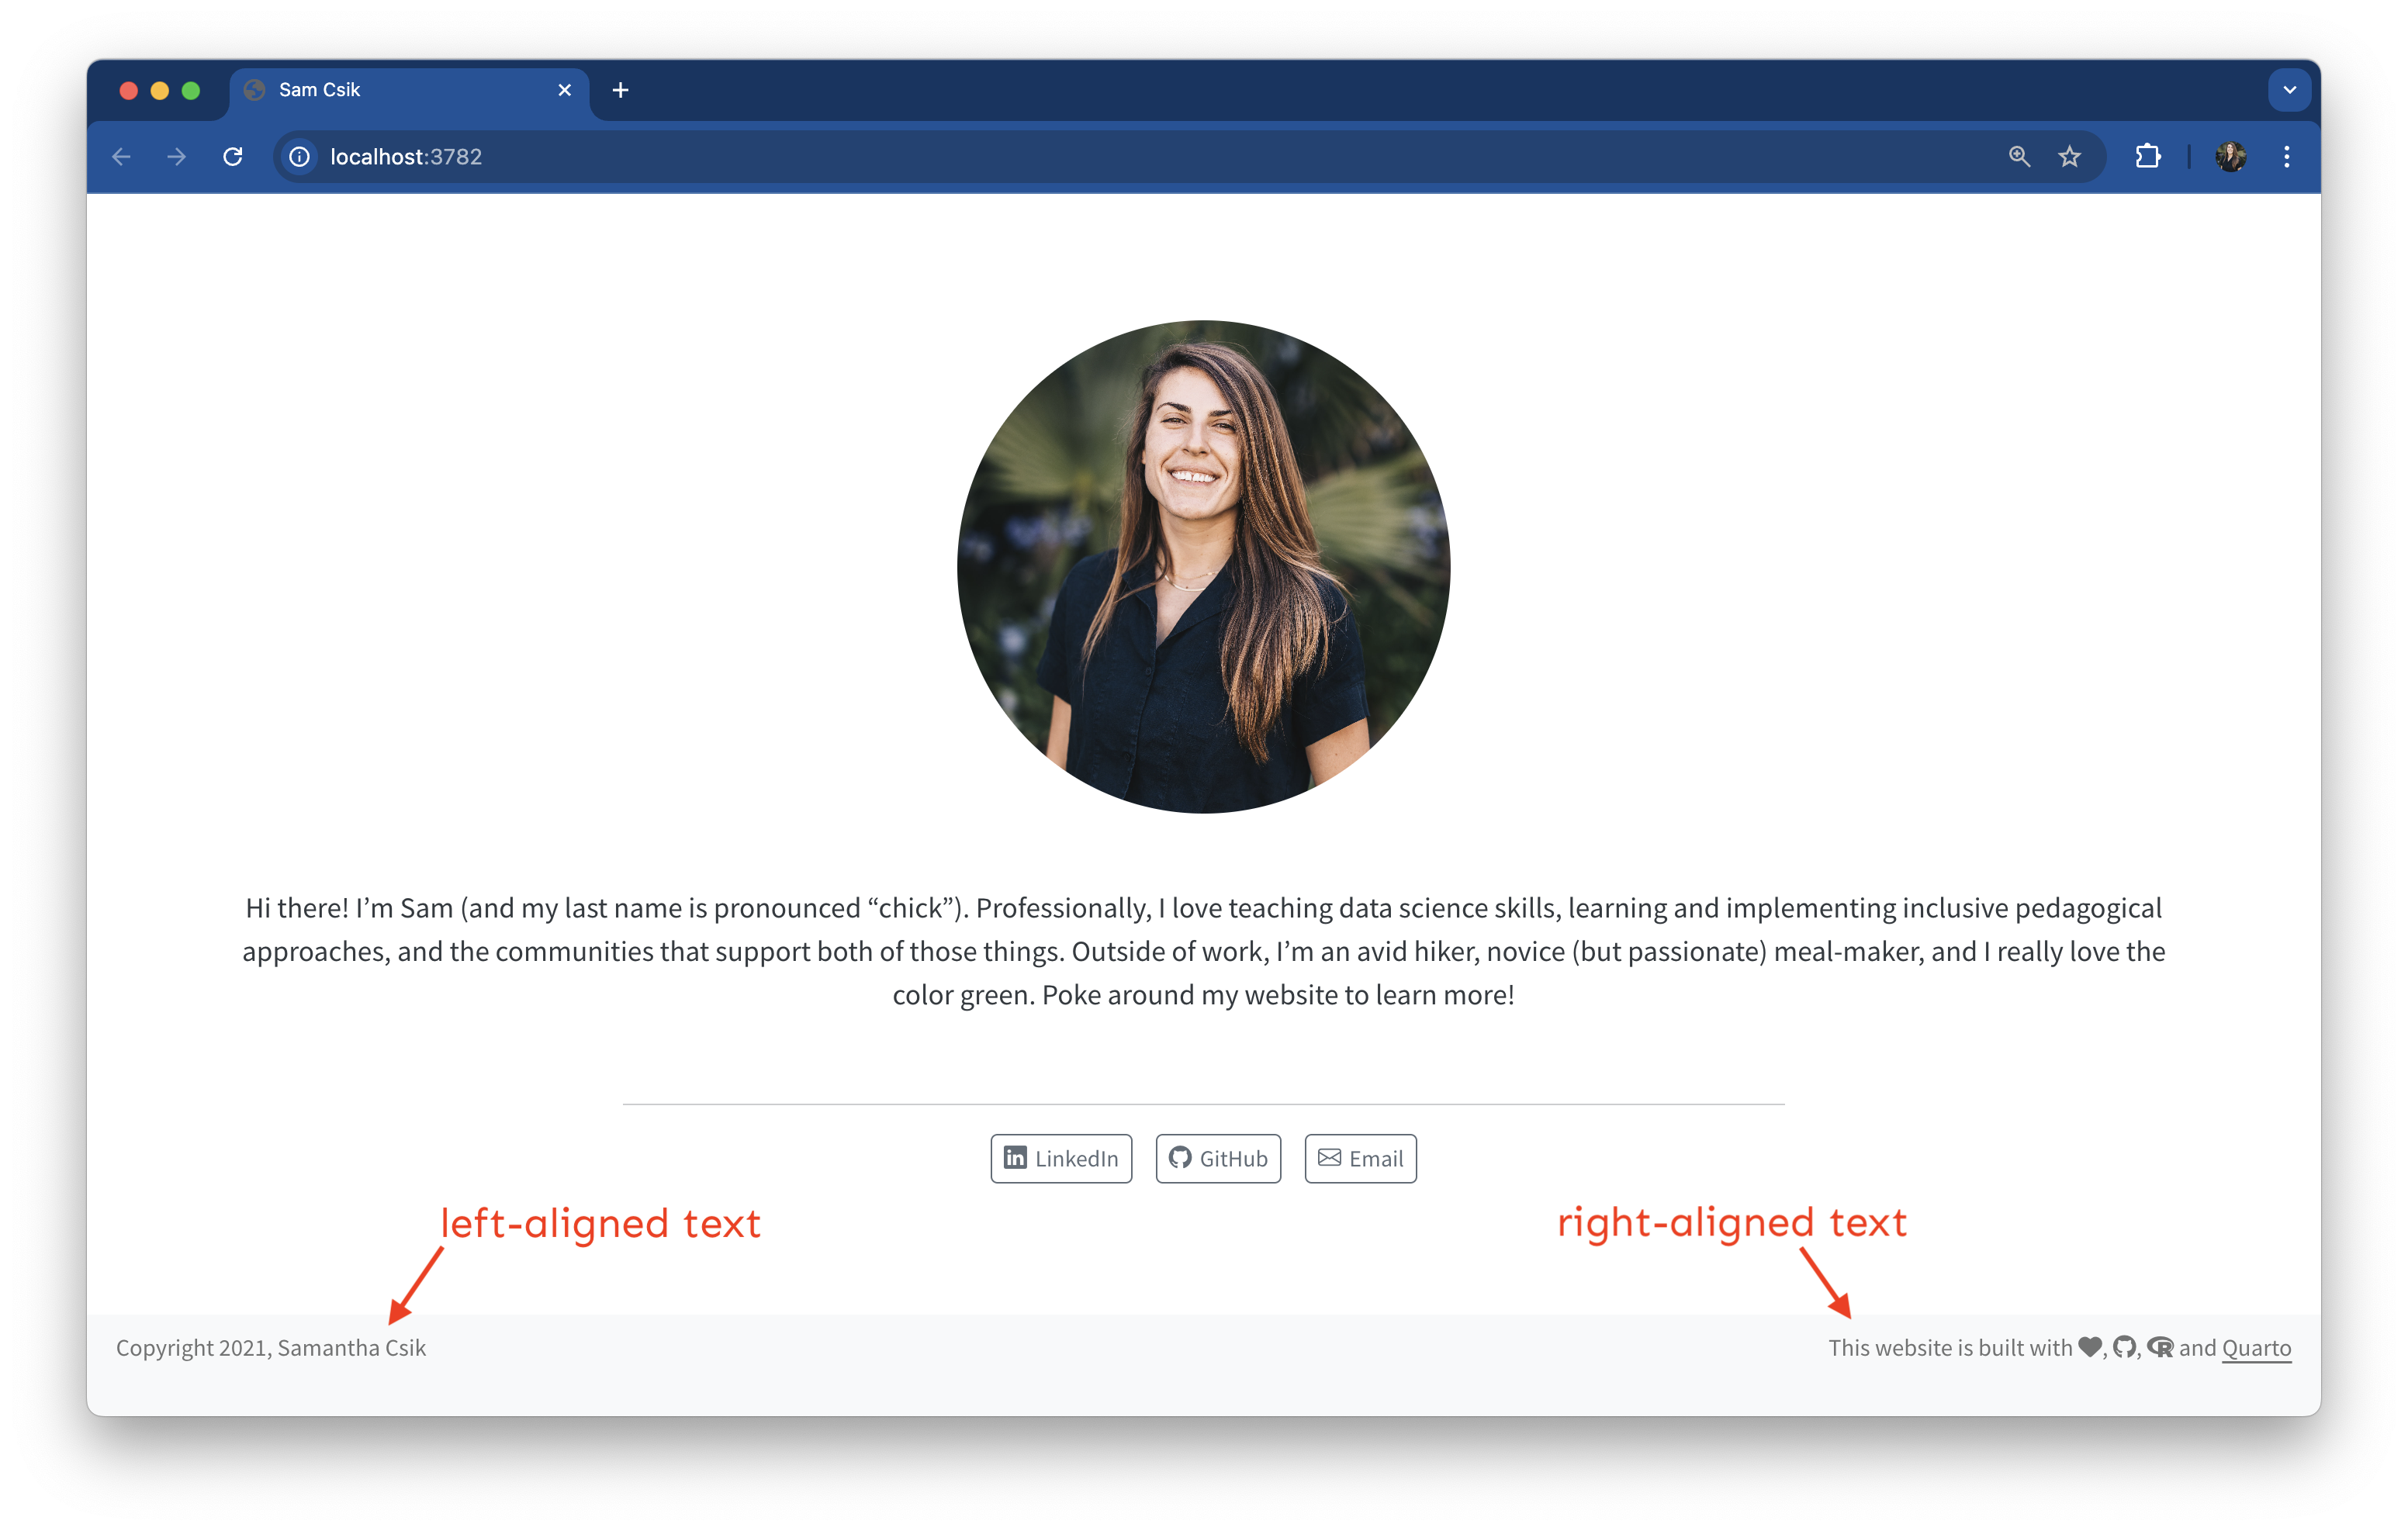
Add a page footer
Footers appear on each page (you may have to scroll to the bottom to see it appear). You can include a mix of text, icons, logos, hyperlinks, etc.
Add a page footer
Make edits to a website’s footer under the website > page-footer option:
project: type: website output-dir: docswebsite: title:"Sam Shanny-Csik" navbar: right:- href: index.qmd text: Home- about.qmd- href: resources.qmd text: Resources- href: cv/myCV.pdf text: CV target: _blank - icon: github href: https://github.com/yourUserName target: _blank page-footer: background: light # or `dark` or omit this option altogether (footer color will match page body color) left: Copyright 2021, Samantha Shanny-Csik right: This website is built with {{< fa heart title="a heart">}}, [{{< fa brands github title="GitHub octocat logo">}}](https://github.com/samanthacsik/samanthacsik.github.io){target=_blank}, [{{< fa brands r-project title="R Project">}}](https://www.r-project.org/about.html){target=_blank} and [Quarto](https://quarto.org/){target=_blank}format: html: theme: cosmo css: styles.css toc: true page-layout: full
If you want to use FontAwesome icons anywhere else on your website (i.e. outside of the icon YAML option), you’ll need to first install the Quarto fontawesome extension.
Running the following in your Terminal will download and save the extension to a folder named _extensions in your repo’s root directory (alternatively, you may do so from any command line interface, but make sure you’re in your project’s root directory). Be sure to push this new folder (and its contents) to GitHub:
Terminal
quarto add quarto-ext/fontawesome
Note: You’ll need to install this extension for each new project where you’d like to use icons (e.g. if you create a different website).
Use the fontawesome shortcode to embed icons
To embed an icon, look up the icon’s name on FontAwesome (be sure to only choose from the Free icons), then use the fontawesome shortcode:
{{< fa icon-name title="descriptive text for accessibility" >}}
For example, the following shortcodes…
{{< fa face-smile title="A smiling face" >}}{{< fa laptop title="An open laptop" >}}{{< fa file-code title="A code file" >}}
…will render as , ,
Pay attention for icons in the brands collection
Some icons fall within the brands collection and must be prefixed with brands inside the shortcode. For example, the GitHub icon :
{{< fa brands github title="The GitHub octocat logo" >}}
You can identify if an icon falls within the brands collection by clicking on its preview (e.g. the github icon) and checking to see if the HTML class is fa-brands:
Favicons & personal logos can add a nice personal touch
You can add a personal logo in the top left corner of your navbar in place of your title. The free Adobe Express Logo Maker is a great tool for creating your own logo!
A favicon is a small icon used on web browsers to represent a website or a web page. Get creative and use a custom favicon that complements your personal logo.
Favicons & personal logos can add a nice personal touch
_quarto.yml
project: type: website output-dir: docswebsite: title:"Sam Shanny-Csik" favicon: file/path/to/image.png # NOTE: that the `favicon` is a `website` level option (not under `navbar`) navbar: title: false # override printing your website `title` (e.g. "Sam Csik" on line 6) in the top left corner of your navbar logo: file/path/to/logo.png logo-alt:"Alt text for logo" right:- href: index.qmd text: Home- about.qmd- href: resources.qmd text: Resources- href: file/path/to/myCV.pdf text: CV target: _blank- icon: github href: https://github.com/samanthacsik target: _blank page-footer: background: light left: Copyright 2021, Samantha Shanny-Csik right: This website is built with {{< fa heart title="a heart">}}, [{{< fa brands github title="GitHub octocat logo">}}](https://github.com/samanthacsik/samanthacsik.github.io){target=_blank}, [{{< fa brands r-project title="R Project">}}](https://www.r-project.org/about.html){target=_blank} and [Quarto](https://quarto.org/){target=_blank}format: html: theme: cosmo css: styles.css toc: true page-layout: full
Sass is a CSS extension (provides additional features, like variables)
Sass is a CSS preprocesser (converts Sass code into standard CSS, which is a critical step because browsers can’t interpret Sass but can interpret CSS)
I know it might feel like we’re getting ahead of ourselves a bit here by talking about Sass before CSS, but bear with me!
Sass helps to reduce repetition
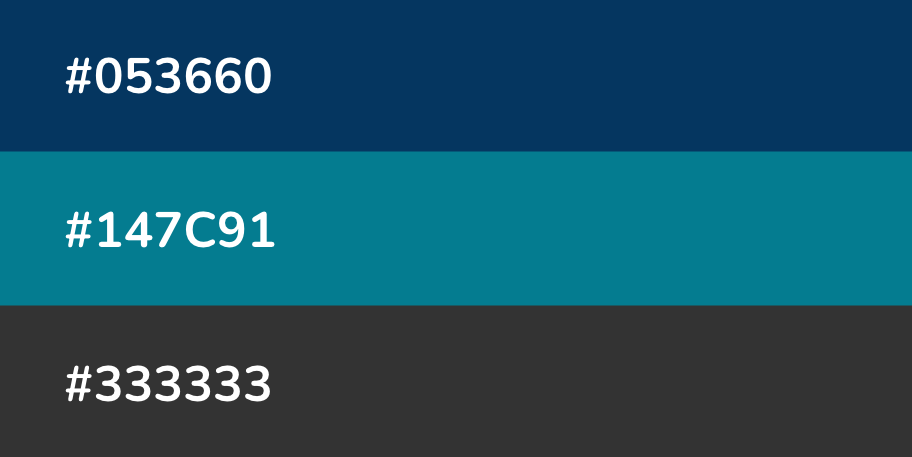
Sass extends existing CSS features in a number of exciting ways, but importantly reduces repetition. For example, let’s say you’re building a website / web page that uses three colors:
You might imagine how often you’ll need to type those HEX codes out as you developing your stylesheet…it can get annoying rather quickly.
Define Sass variables to reduce repetition
Sass allows us to define variables (in the form $var-name: value;) for our colors, which we can reference instead of writing out their HEX codes each time. This makes your stylesheet more readable and easier to update (e.g. only need to update HEX codes in one spot, not multiple!).
Example stylesheet (.scss)
// define Sass vars $darkblue: #053660;$teal: #147C91;$darkgray: #333333;// use vars in CSS rules (we'll learn more about how to write CSS soon!) h1 {color: $darkblue;}.button-styling {background: $teal;color: $darkblue; border-color: $darkgray;}
Quarto automatically compiles Sass
Web browsers can interpret CSS (.css) but not Sass (.scss or .sass).
Typically, you’d need to compile (i.e. convert) Sass to CSS, then link the resulting .css file in your HTML.
Lucky for us, Quarto compiles the contents of a .scss file into CSS without any extra steps – all we need to do is link to a .scss file directly in our website’s _quarto.yml.
Let’s create our website’s .scss stylesheet.
(The following slides break this down into ~7 steps)
Create a .scss file for your website
1. Create a .scss file in your repo’s root directory using the touch command in the Terminal (alternatively, use New Blank File > Text File in the Files pane):
Terminal
touch styles.scss # name it whatever you want
2. Add the /*-- scss:defaults --*/ region decorator to the top of styles.scss (required by Quarto) – you’ll write all your Sass variables underneath this.
styles.scss
/*-- scss:defaults --*/
Adding the region decorator as written above is critical! Quarto won’t recognize your .scss file without it.
Link to your .scss file in _quarto.yml
3. Apply your styles.scss file to your website using the theme option (Note: if you have your preview running, you’ll likely see an Bad resource ID error appear until we add more content to our styles.scss file):
styles.scss
project: type: website output-dir: docswebsite: title:"Sam Shanny-Csik" favicon: file/path/to/image.png navbar: title: false logo: file/path/to/logo.png logo-alt:"Alt text for logo" right:- href: index.qmd text: Home- about.qmd- href: resources.qmd text: Resources- href: cv/myCV.pdf text: CV target: _blank- icon: github href: https://github.com/samanthacsik target: _blank page-footer: background: light left: Copyright 2021, Samantha Shanny-Csik right: This website is built with {{< fa heart title="a heart">}}, [{{< fa brands github title="GitHub octocat logo">}}](https://github.com/samanthacsik/samanthacsik.github.io){target=_blank}, [{{< fa brands r-project title="R Project">}}](https://www.r-project.org/about.html){target=_blank} and [Quarto](https://quarto.org/){target=_blank}format: html: theme: styles.scss # I've also removed the `css: styles.css` option that was included by default, since I'll be writing all my sass and css in this single styles.scss file toc: true page-layout: full
Define some color variables
4. I like to start by defining the colors I want to use throughout my site. For example:
You can also define values with units, e.g. $my-font-size: 25px;.
Define Quarto’s Sass variables
5. Quarto provides a list of pre-defined Sass Variables, which control the appearance of various website elements and that can be specified within .scss files. We can assign our newly-minted color variables as values to Quarto Sass variables to easily update things like the background color, navbar & footer colors, hyperlink color, and more.
Define Quarto’s Sass variables
Use the syntax $quarto-var: $your-color-var;.
styles.scss
/*-- scss:defaults --*/// Colors$dark-green: #858E79;$light-green: #D1D9CE;$cream: #FDFBF7;$gray: #64605f;$purple: #9158A2;$orange: #ad7237;// Base document colors$navbar-bg: $cream; // navbar$navbar-fg: $dark-green; // navbar foreground elements$navbar-hl: $purple; // highlight color when hovering over navbar links$body-bg: $light-green; // page background $body-color: $gray; // page text $footer-bg: $cream; // footer $link-color: $purple; // hyperlinks // Inline code$code-bg: $cream; // inline code background color$code-color: $purple; // inline code text color
You can combine pre-built themes and stylesheets
You also do not need to create a theme entirely from scratch! If you like parts of a pre-built Bootswatch theme, you can modify it by layering on your desired updates using your own custom styles.scss file.
For example, let’s say I love everything about the pre-built cosmo theme, and only want to update the navbar background color to orange. My files might look something like this:
_quarto.yml
# additional metadata excluded for brevity ~format: html: theme:- cosmo- styles.scss toc: false page-layout: full
Our resulting website, which is primarily themed using cosmo, but with a custom orange navbar.
We can also import Google fonts in styles.scss
Fonts are just as important as color in expressing yourself and your brand – you should absolutely be importing and using a different (more exciting) font family(ies) than the default.
6a. Browse the many available Google fonts at https://fonts.google.com/ and choose 1-3 fonts (two is, in my option, the sweet spot). Click on the Filters button in the top left corner of the page to help narrow your choices.
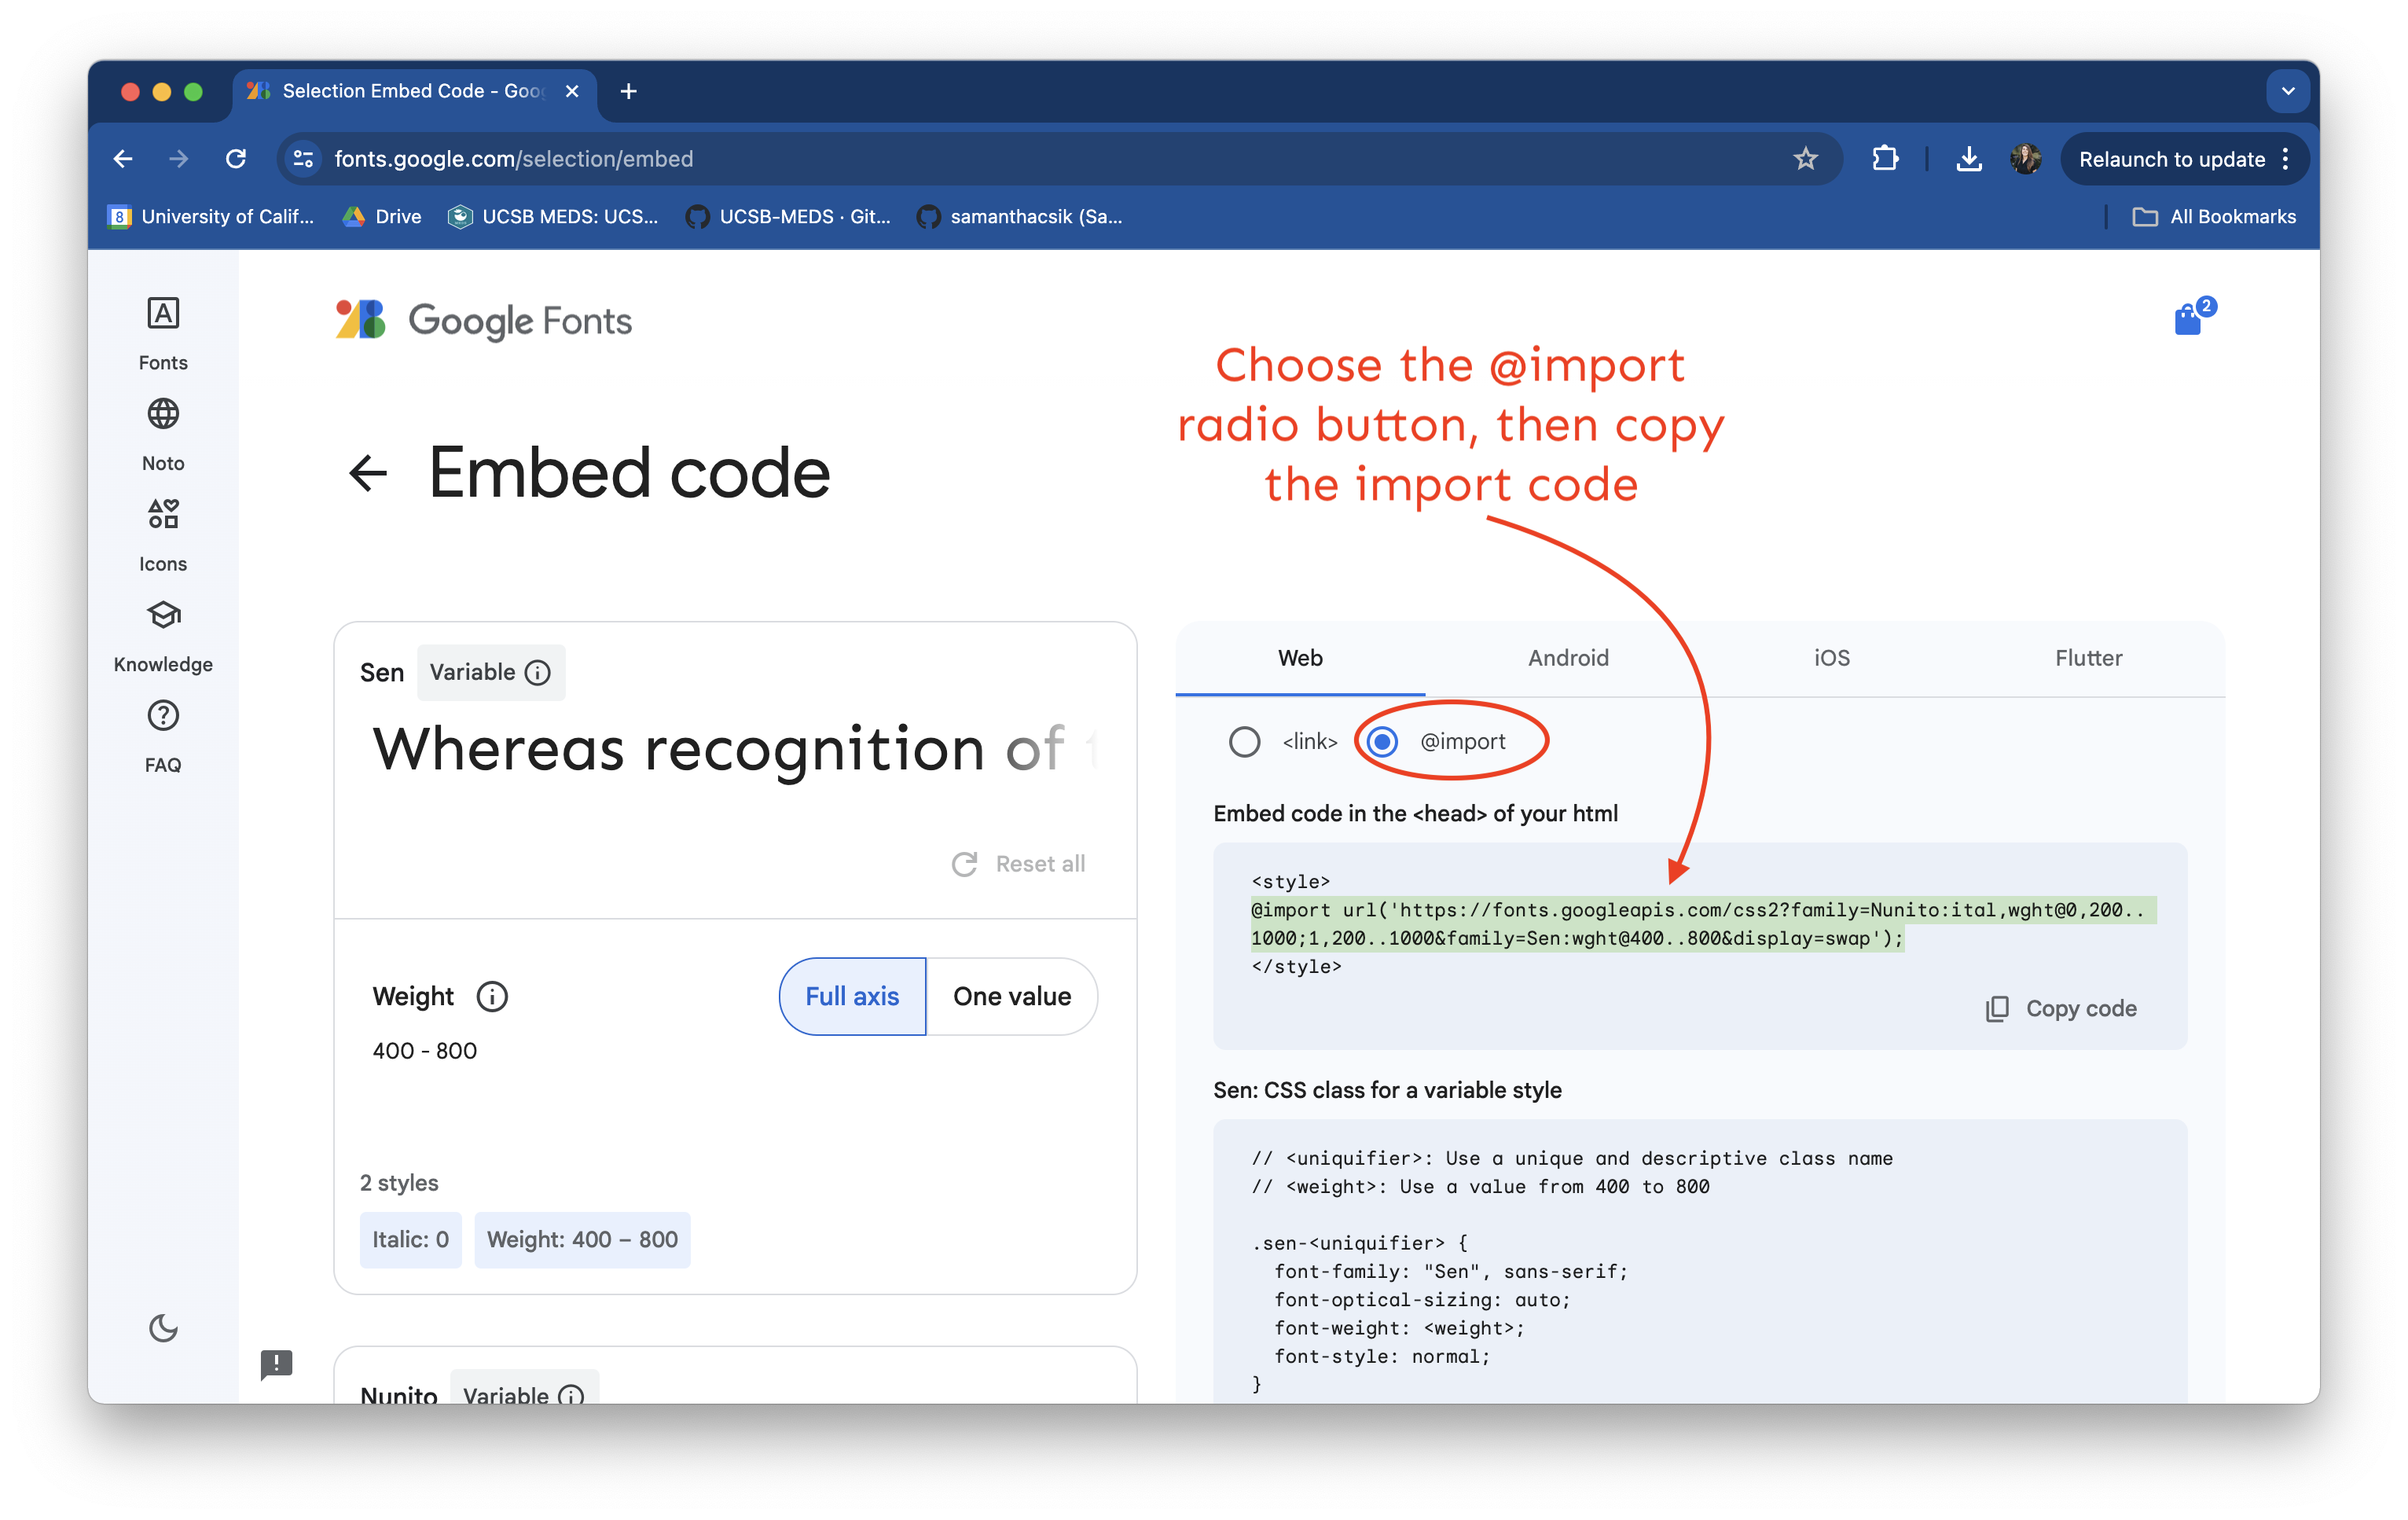
Selecting a Google font(s)
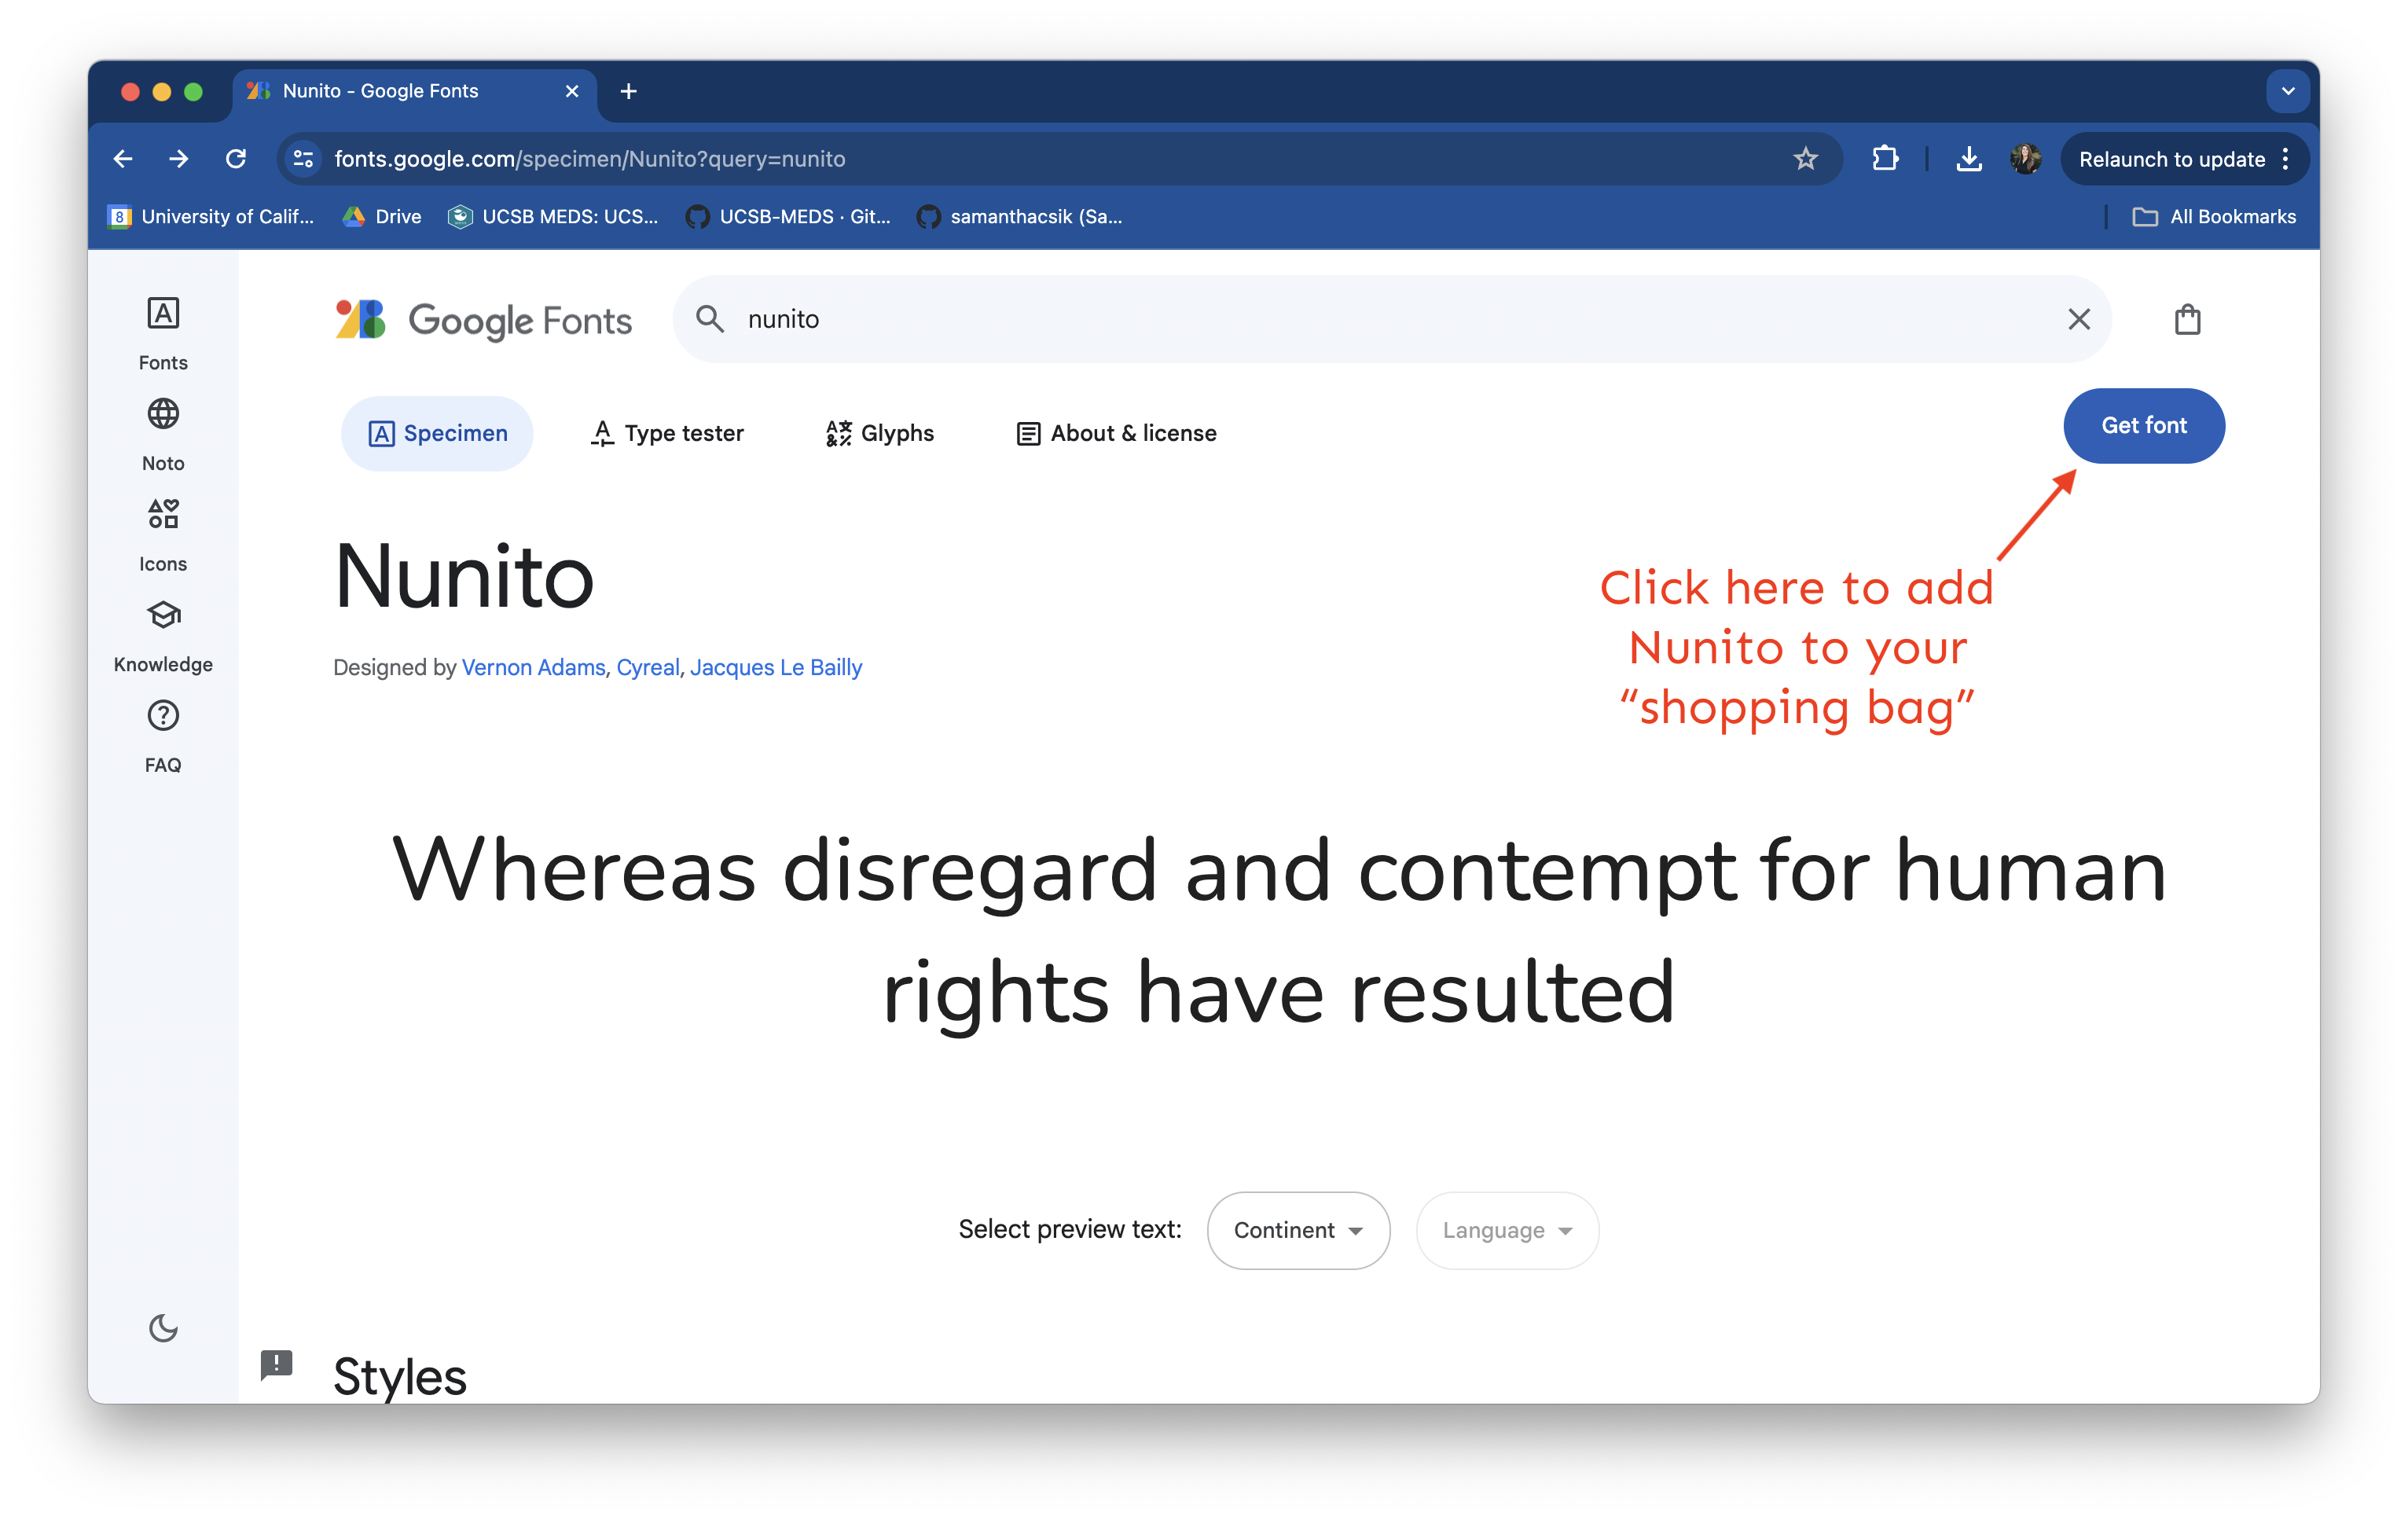
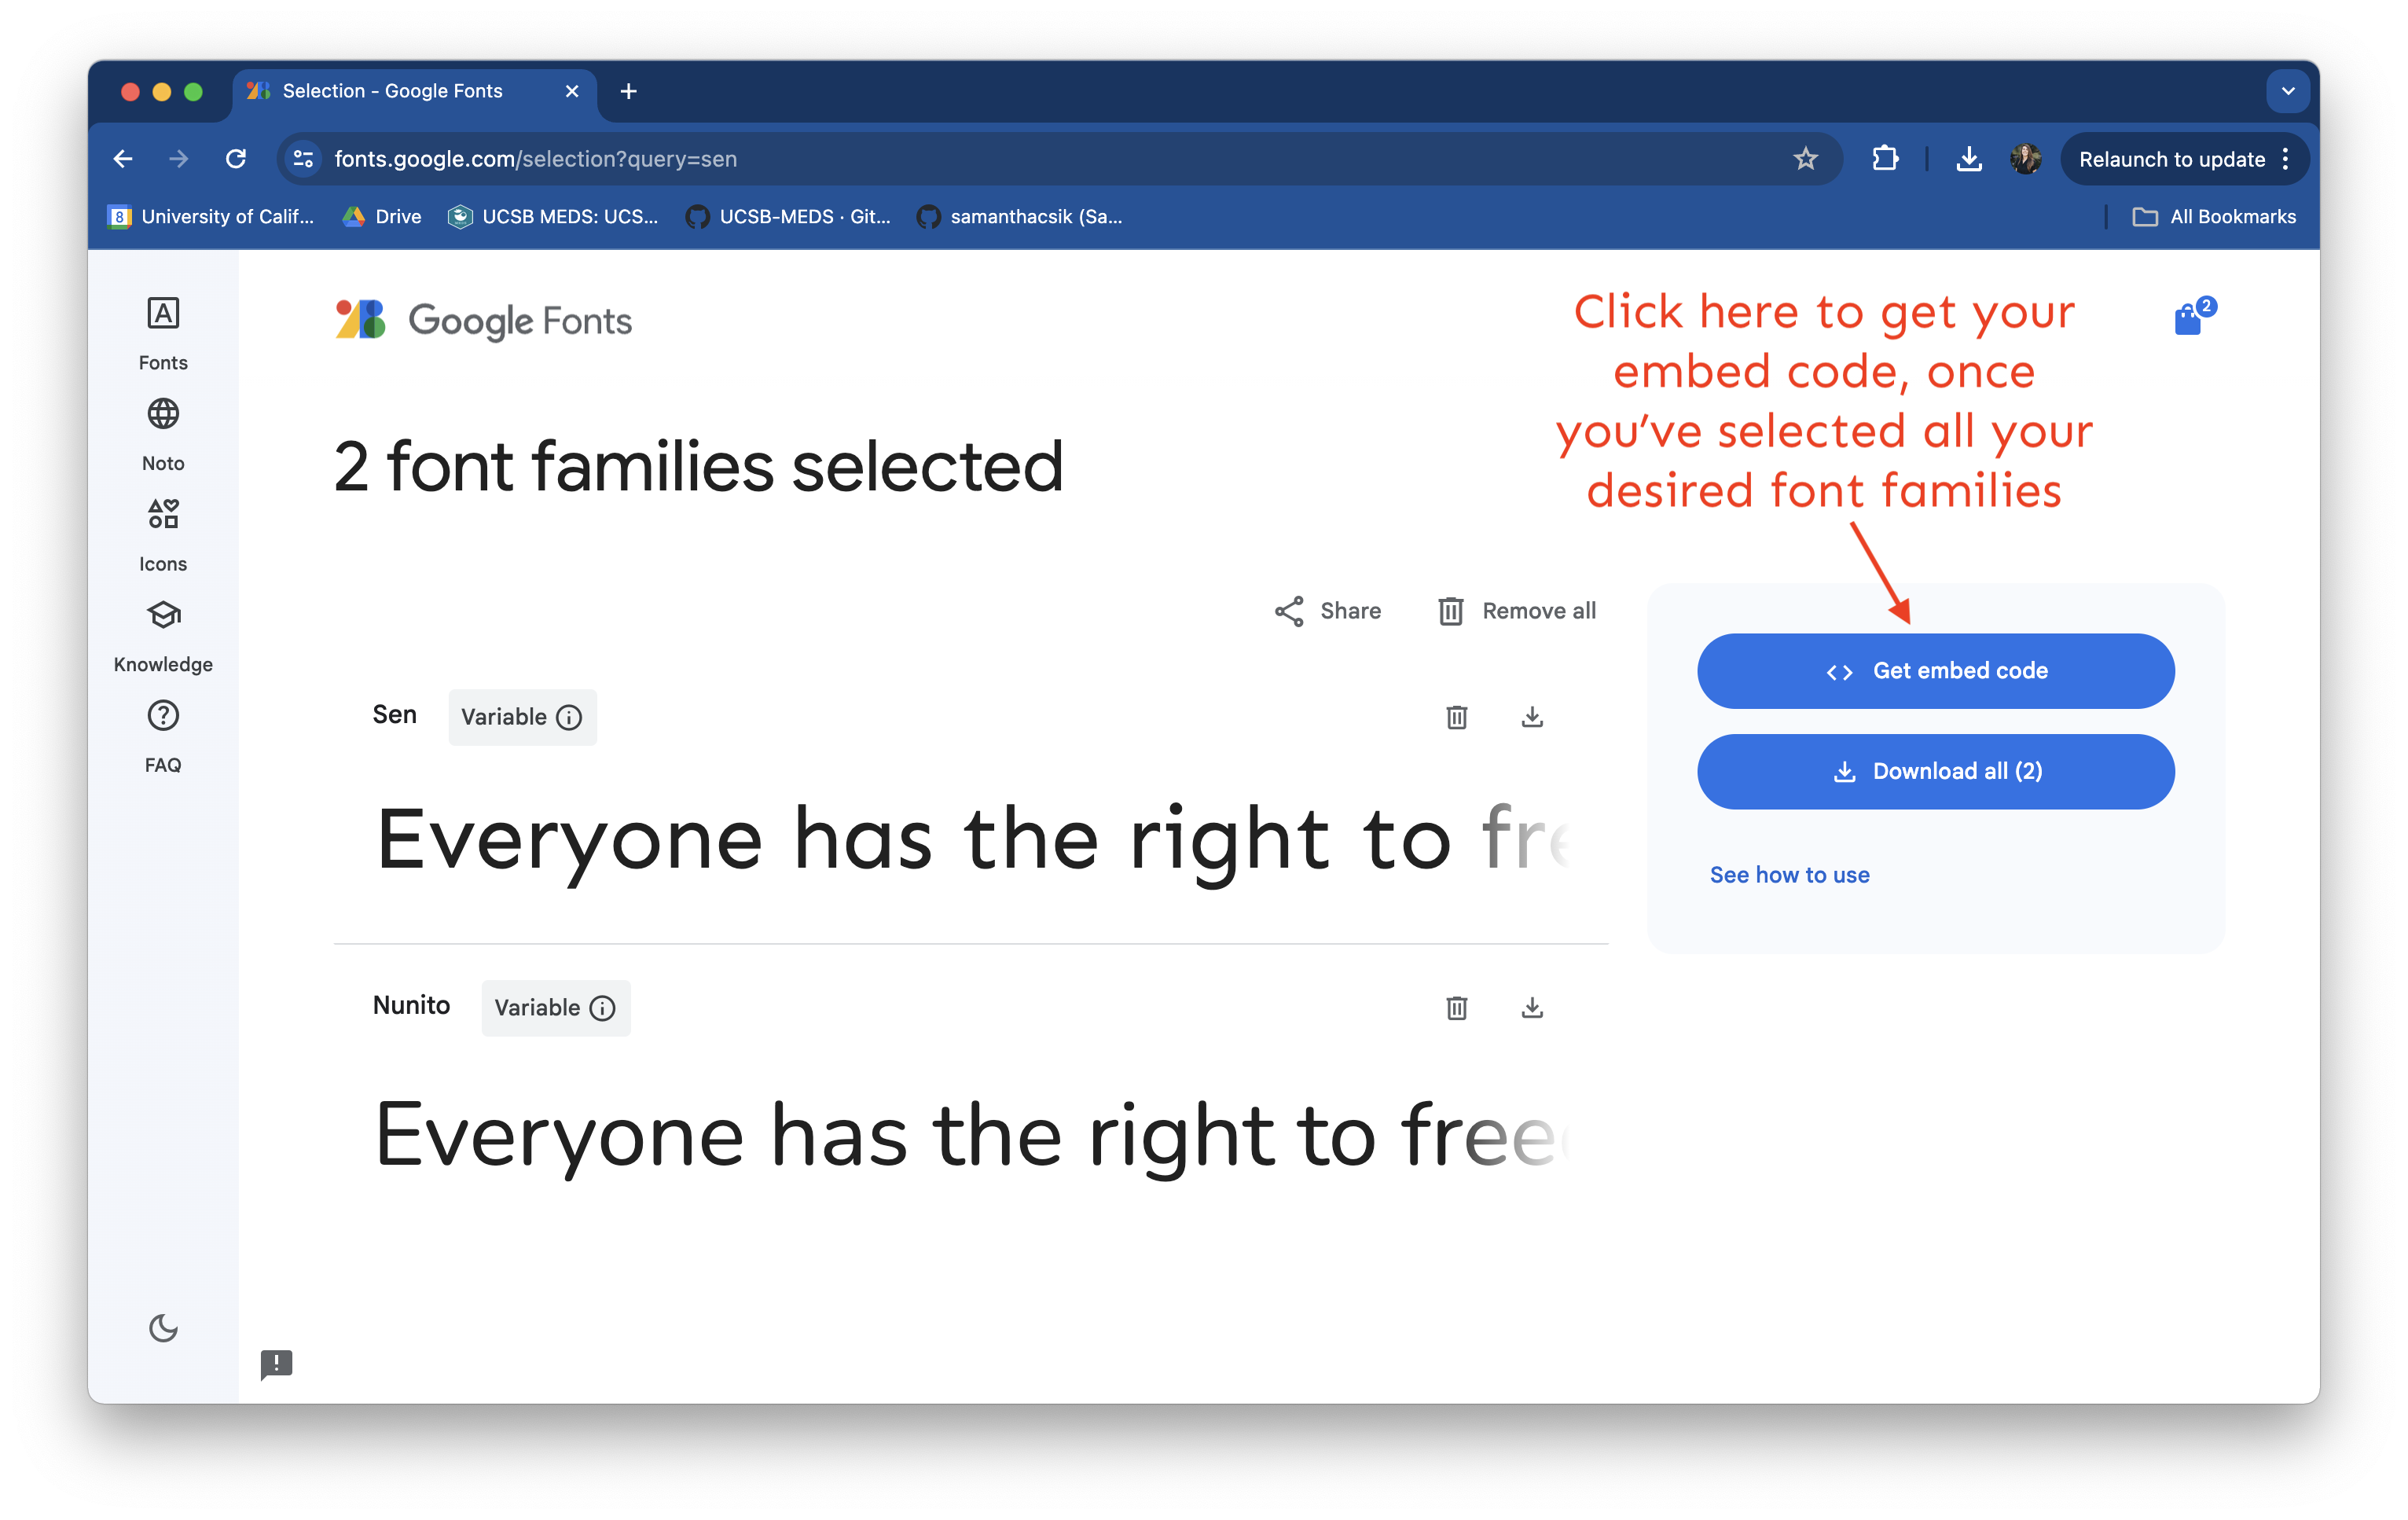
6b. Select a Google font family by clicking the blue Get Font button in the top right corner of the page, which adds your font family to your “bag.” You can add as many font families to your bag as you’d like to import – here, we select both Nunito and Sen.
Explore the Nunito font family, which is available in a number of styles (i.e. different weights and italic):
View all of your selected font families and get your embed code from your shopping bag:
IMPORTANT: If you want to bold or italicize text, you need to select a font family that has those styles (not all font families come in every style e.g. Sen does not come in italic).
Selecting a Google font(s)
6c. Click Get embed code, then choose the @import radio button (beneath the Web menu option), which will provide your import code chunk. Copy everything between the <style> </style> tags (starting with @import and ending with ;) to your clipboard.
Selecting a Google font(s)
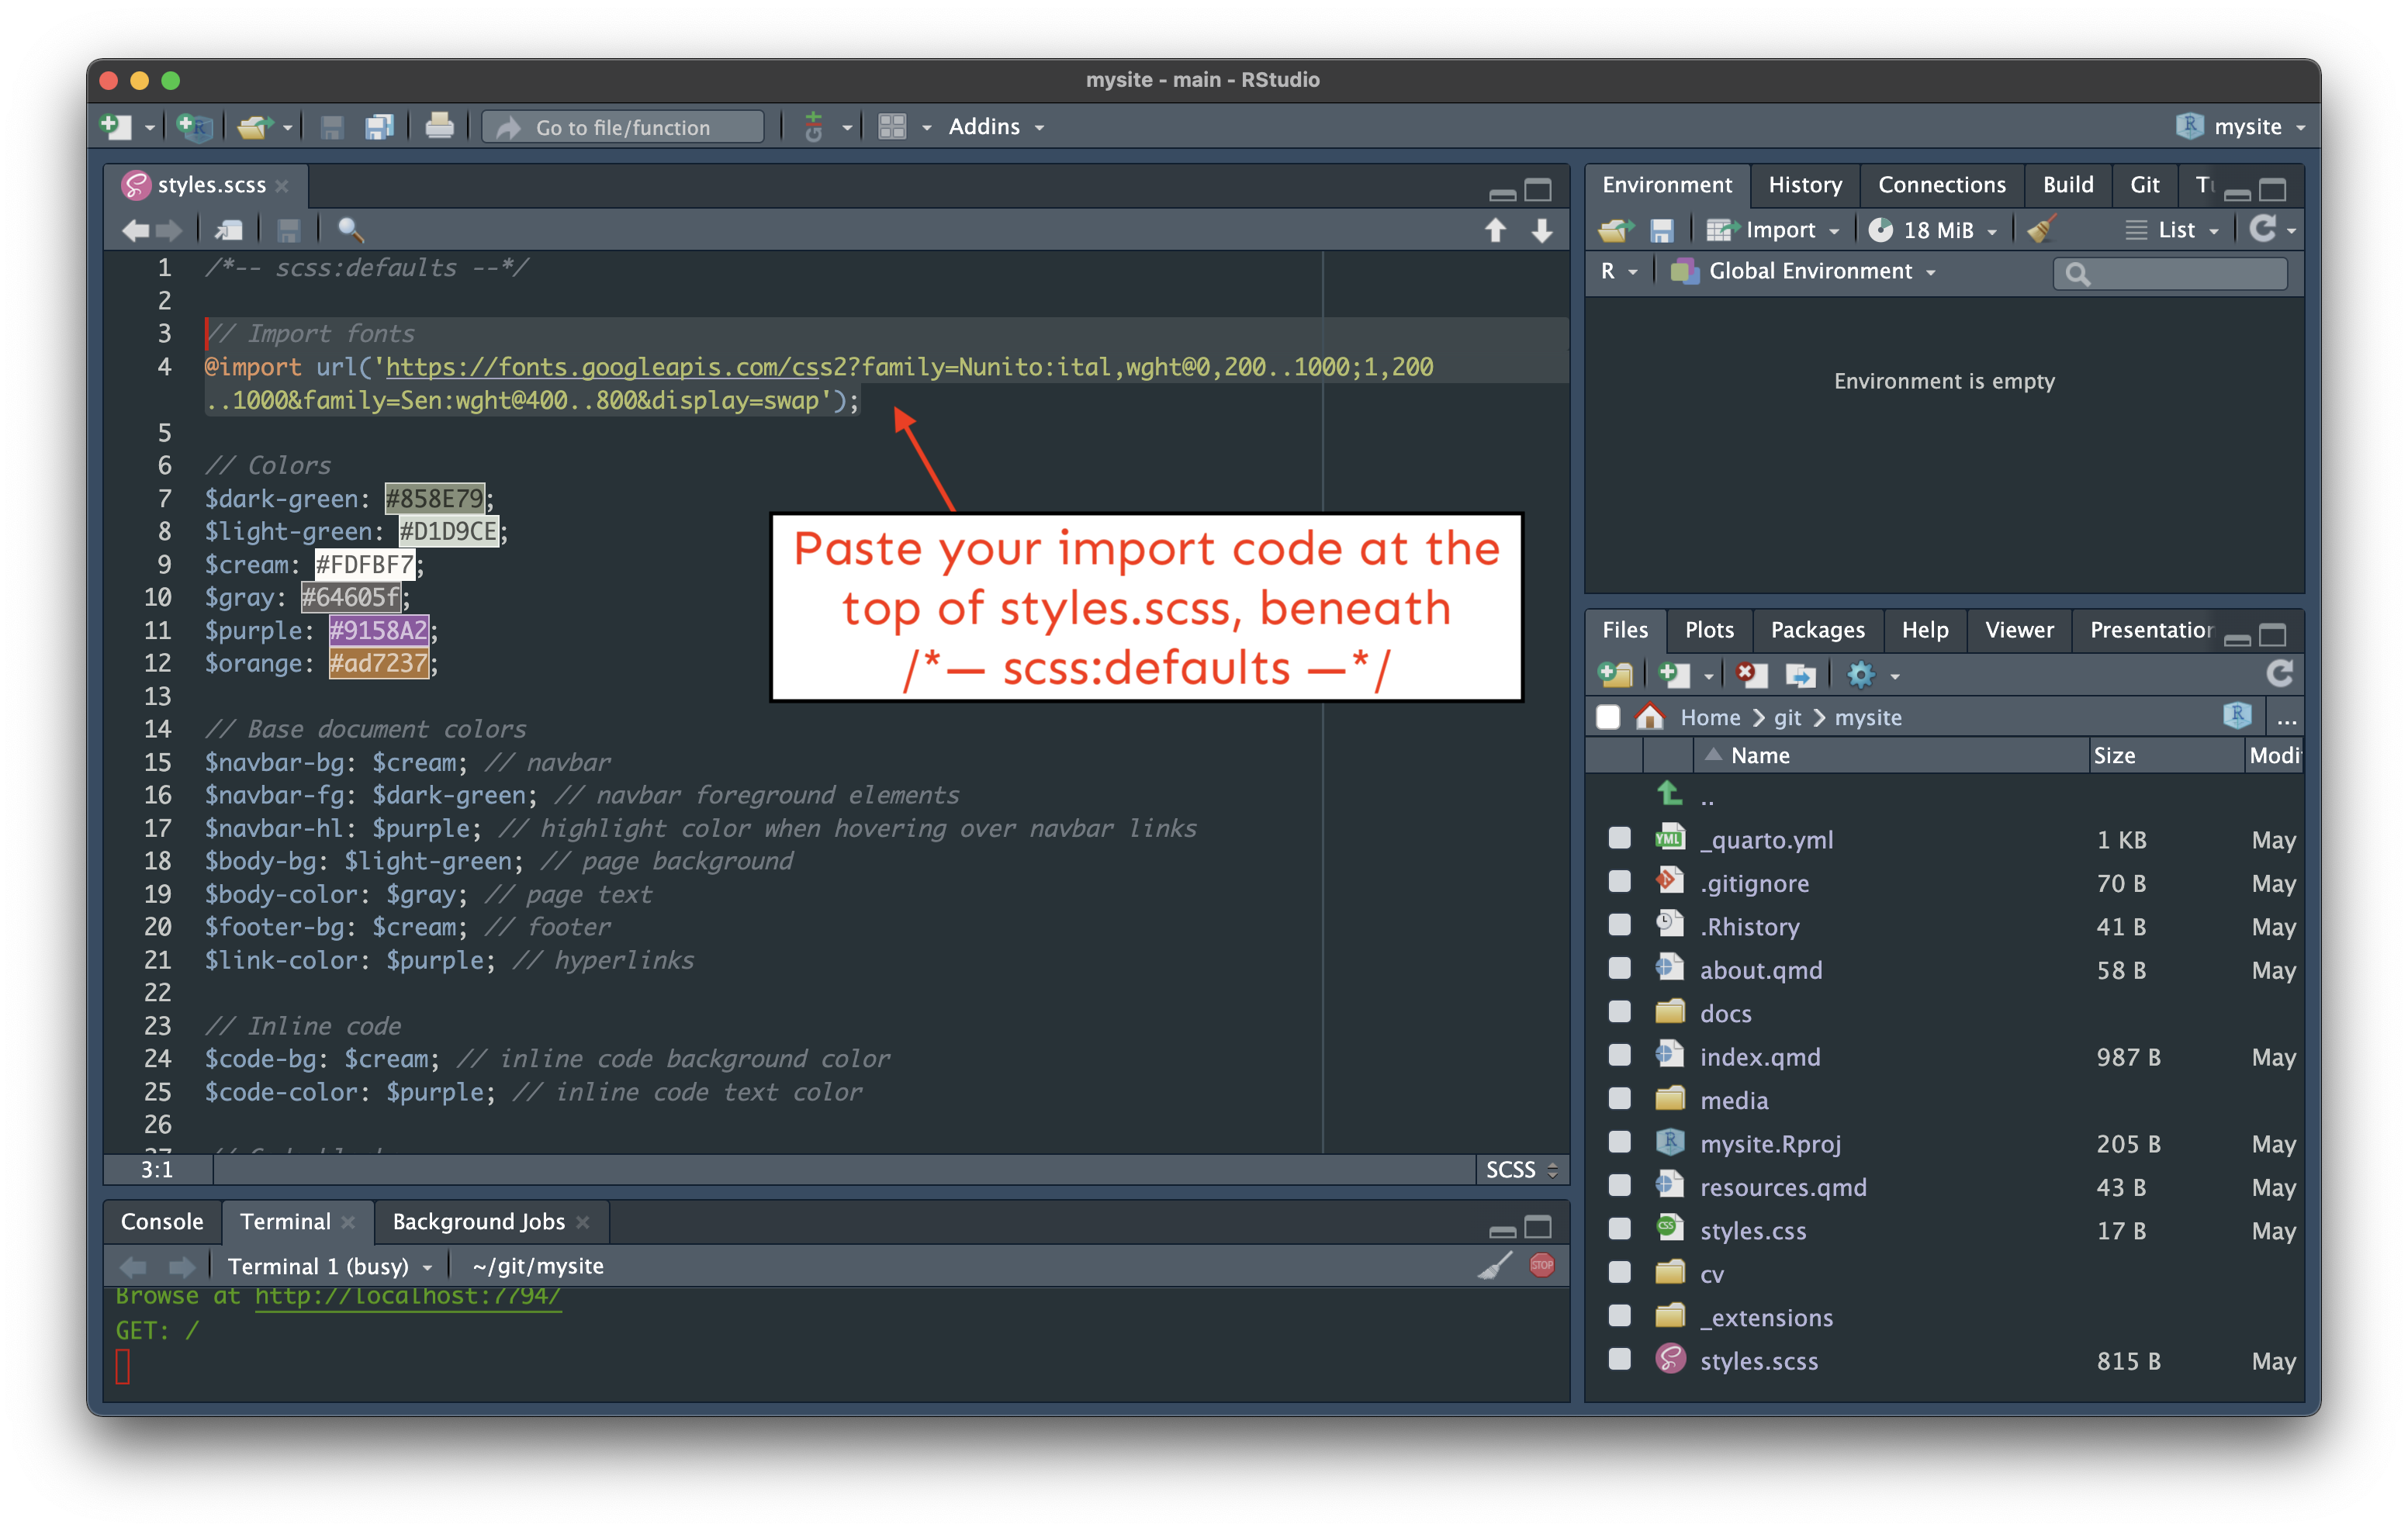
6d. Paste the import code into styles.scss (I always place this at the top of my stylesheet, beneath /*-- scss:defaults --*/).
Selecting a Google font(s)
If you’re like me, you might find a gif of the whole process helpful:
Import fonts into styles.scss
Your styles.scss should now similar to this:
styles.scss
/*-- scss:defaults --*/// Import Google fonts@importurl('https://fonts.googleapis.com/css2?family=Nunito:ital,wght@0,200..1000;1,200..1000&family=Sen:wght@400..800&display=swap');// Colors$dark-green: #858E79;$light-green: #D1D9CE;$cream: #FDFBF7;$gray: #64605f;$purple: #9158A2;$orange: #ad7237;// Base document colors$navbar-bg: $cream; // navbar$navbar-fg: $dark-green; // navbar foreground elements$navbar-hl: $purple; // highlight color when hovering over navbar links$body-bg: $light-green; // page background $body-color: $gray; // page text $footer-bg: $cream; // footer $link-color: $purple; // hyperlinks // Inline code$code-bg: $cream; // inline code background color$code-color: $purple; // inline code text color// Code blocks$code-block-bg: $cream; // code block background color
Set your main (default) font in _quarto.yml
7. The easiest way to apply a main (i.e. default) font for all text elements on your website is in _quarto.yml using the mainfont option:
_quarto.yml
project: type: website output-dir: docswebsite: title:"Sam Shanny-Csik" favicon: media/myFavicon.png navbar: title: false logo: media/myLogo.png logo-alt:"The name 'sam shanny-csik' written in green text. Above 'csik' is a dark green horizontal line, above which sits a green chick." right:- href: index.qmd text: Home- about.qmd- href: resources.qmd text: Resources- href: cv/myCV.pdf text: CV target: _blank- icon: github href: https://github.com/samanthacsik target: _blank page-footer: background: light left: Copyright 2021, Samantha Shanny-Csik right: This website is built with {{< fa heart title="a heart">}}, [{{< fa brands github title="GitHub octocat logo">}}](https://github.com/samanthacsik/samanthacsik.github.io){target=_blank}, [{{< fa brands r-project title="R Project">}}](https://www.r-project.org/about.html){target=_blank} and [Quarto](https://quarto.org/){target=_blank}format: html: theme: styles.scss mainfont: Nunito toc: true page-layout: full
All text elements on our website are now Nunito
Cool, but what about applying our second font, Sen?
Great question, and hang tight! This requires some CSS, which is the perfect segue into our next section.
Finally, make fine-tuned adjustments by defining CSS rules directly in your styles.scss file (you can write CSS in .scss files, but not Sass in .css files).
Enter HTML and CSS
In order to really fine-tune the appearance of our site, we need to dive a bit into the world of HTML and CSS.
We’re going to spend a few minutes first learning about what makes a web page…look like a web page, then apply what we learn to our own Quarto sites.
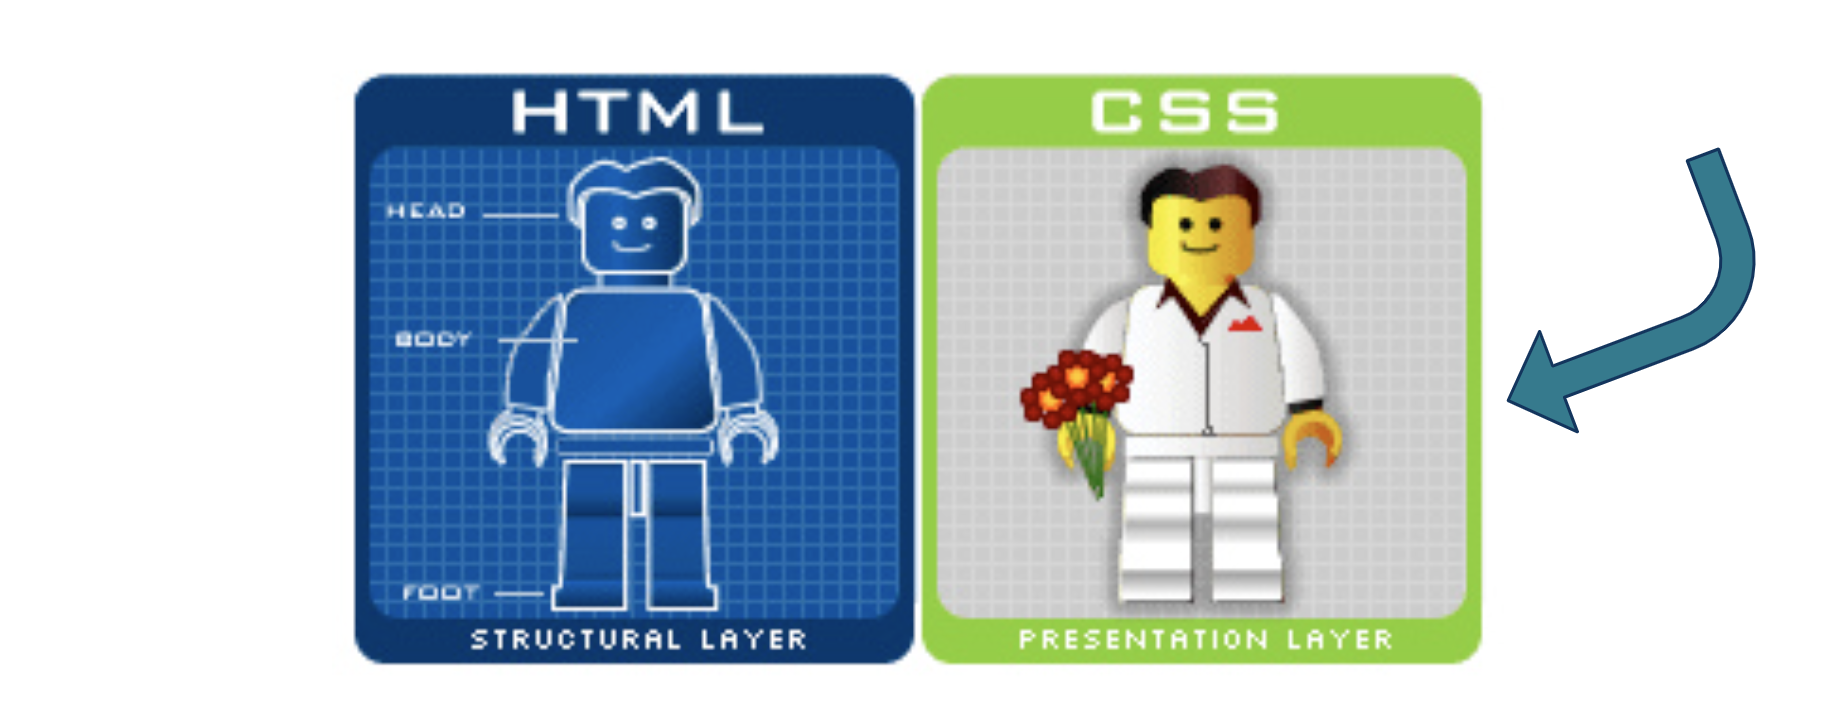
HTML & CSS are the building blocks of web pages
HTML (Hypertext Markup Language) is a markup language1 that tells web browsers how to structure web pages. You can think of HTML as the skeleton of a web page. It gives authors the means to create elements like headings, text, tables, lists, add media, etc.
1Markdown and R Markdown are both lightweight markup languages – they’re a bit easier for humans to write and read than HTML. HTML is more expressive and allows for customization that is difficult or impossible to do in Markdown.
HTML & CSS are the building blocks of web pages
CSS (Cascading Style Sheets) is a programming language that allows you to control how HTML elements look on a web page. You can think of CSS as the outfit that is styling the skeleton. It allows authors to control aspects such as the colors, layout, and font style.
Your browser has its own internal style sheet to render HTML
Your browser will style HTML documents using an internal style sheet, which ensures that headings are larger than normal text, links are highlighted, lists and tables are structured correctly, etc.
HTML
Browser default styling
CSS adds pizzazz to web page renderings
CSS allows website developers to add additional styling to web browser defaults. Otherwise, websites would be pretty boring to look at (and they’d all generally look the same).
Browser default styling
CSS styling
A light introduction to HTML
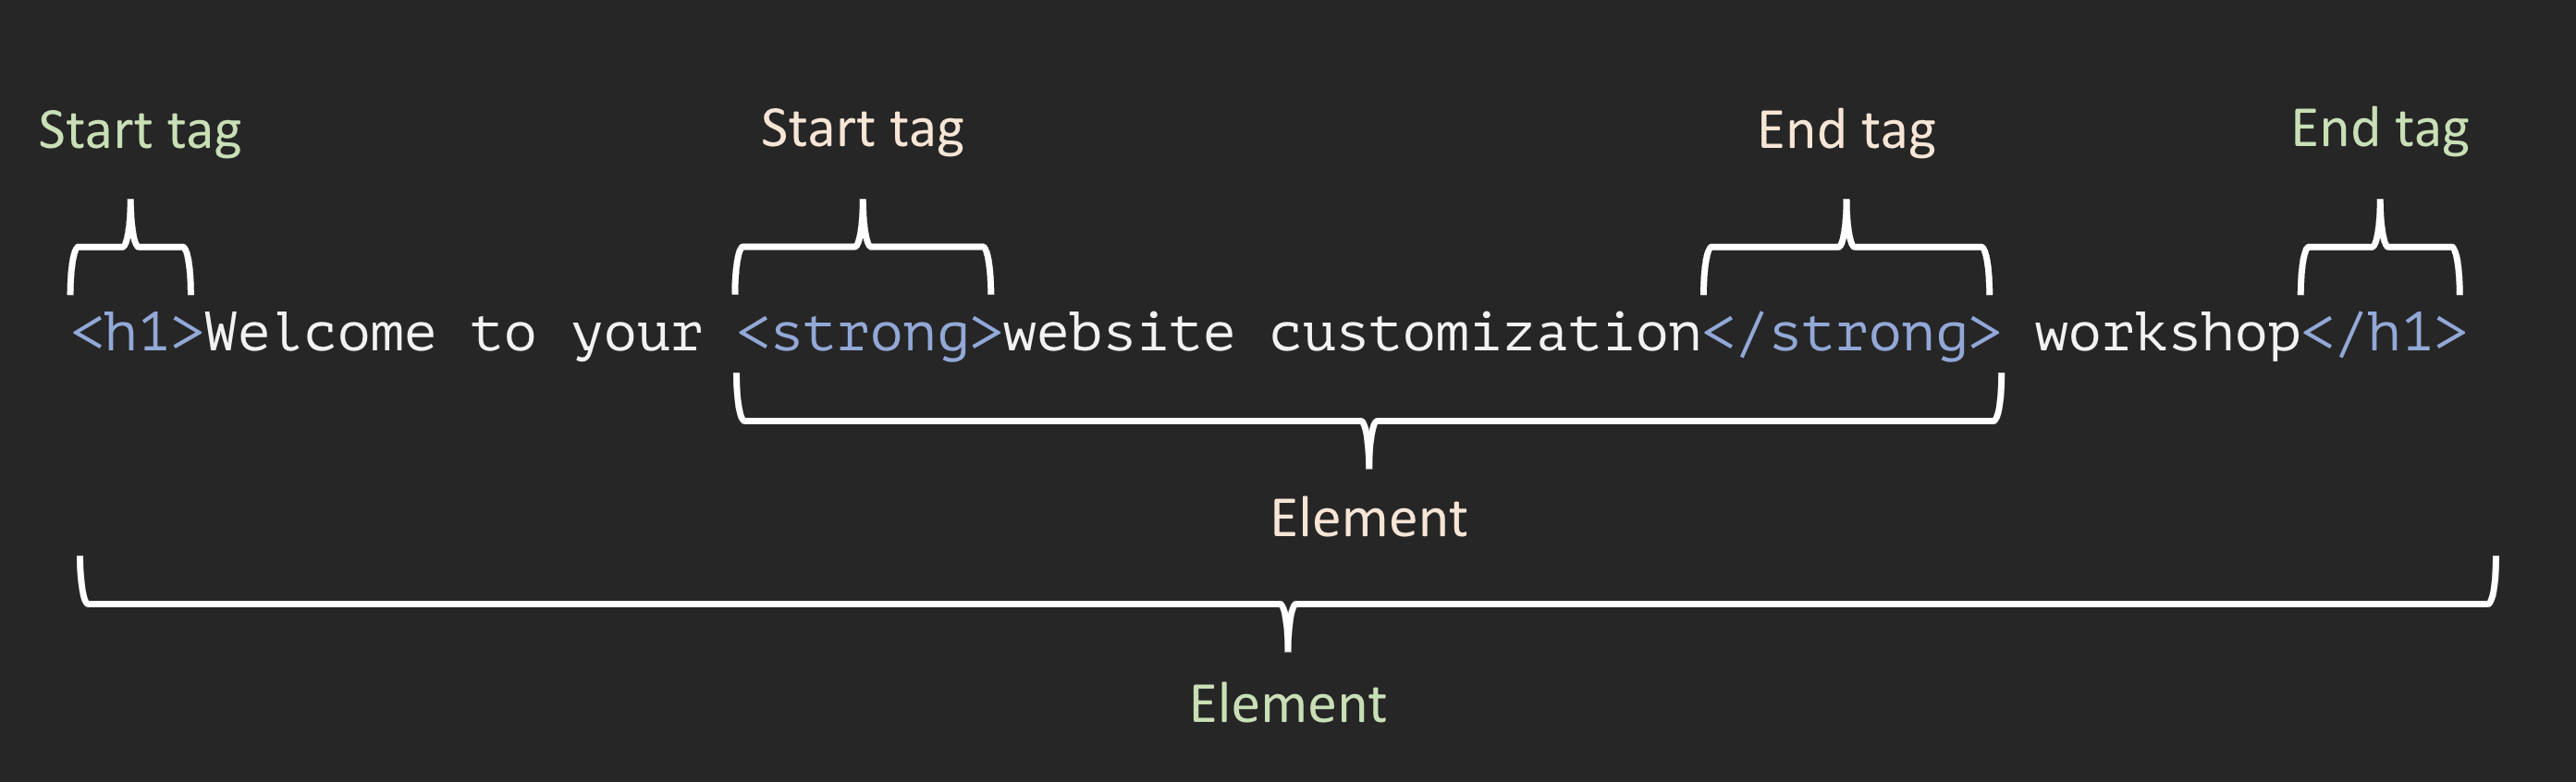
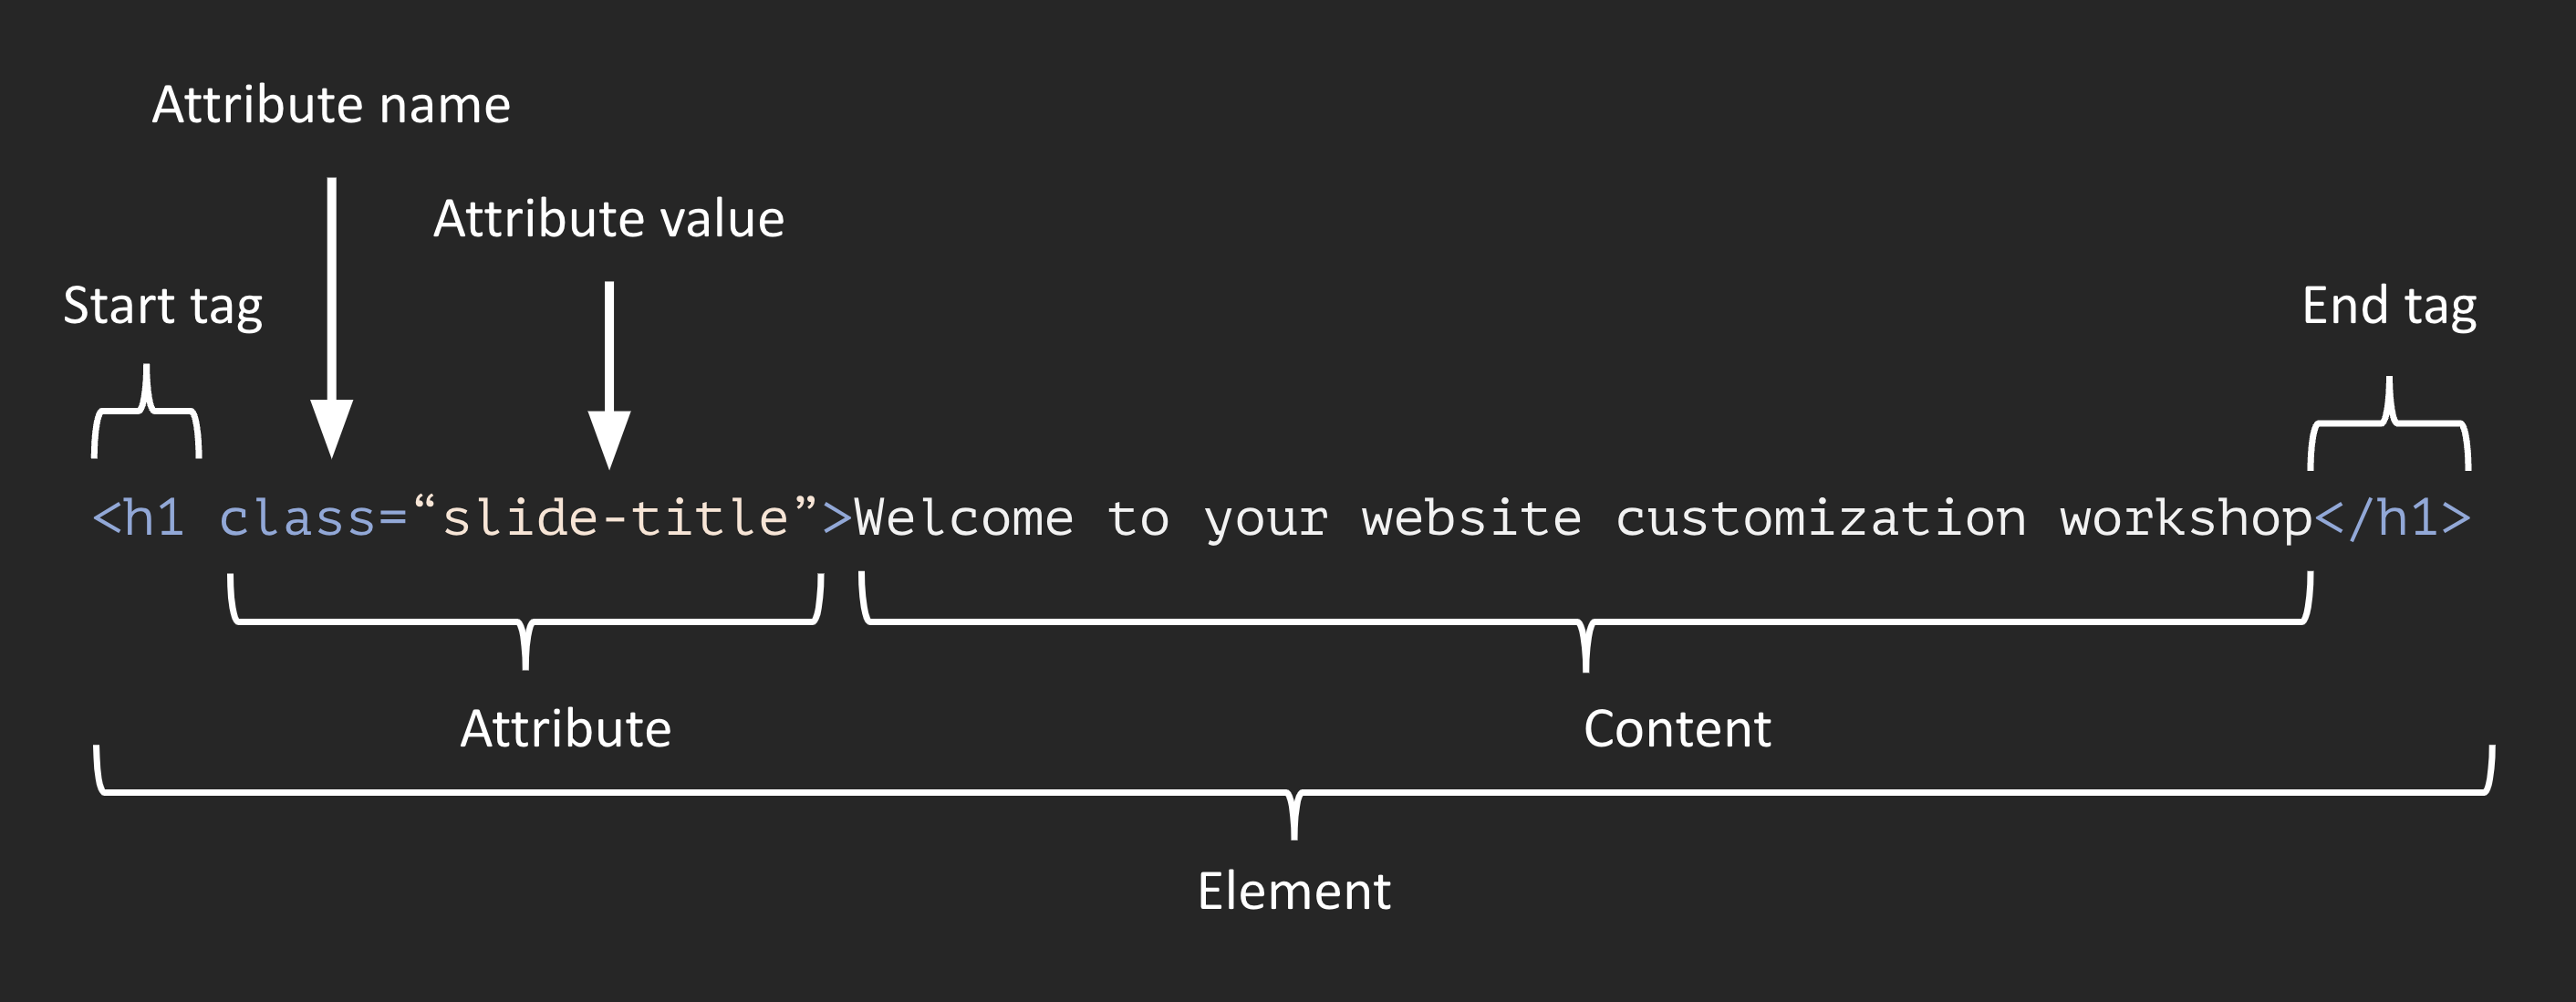
HTML consists of a series of elements
Elements comprise start tags and end tags that render some form of content in a particular way.
The basic anatomy of an HTML element:
In Markdown syntax, this HTML element would be written as, # Welcome to your website customization workshop
an inline container used to markup part of a text or document
HTML elements can be nested
Remember to close out tags from the inside-out to avoid unexpected renderings.
Nested HTML elements:
In Markdown syntax, this HTML element would be written as: # Welcome to your **website customization** workshop
Let’s take a look at some HTML
You can use any text editor to write HTML, but the following steps assume you’re working in Positron. You can continue to work on your branch.
0. I’m going to create a new subdirectory in my repo’s root directory called, DELETE-LATER/. We’ll save the following practice files to this folder, then delete it after (these files are purely for demonstration and aren’t needed for your website). To do so, click on the New Folder… button in the Explorer menu to add your new subdirectory.
1. Add a new file named practice-html.html to your DELETE-LATER/ folder by clicking on the DELETE-LATER/ folder in your Explorer menu, then clicking the New File… button.
Let’s take a look at some HTML
2. Type or copy / paste the following HTML into your practice-html.html file:
~/DELETE-LATER/practice-html.html
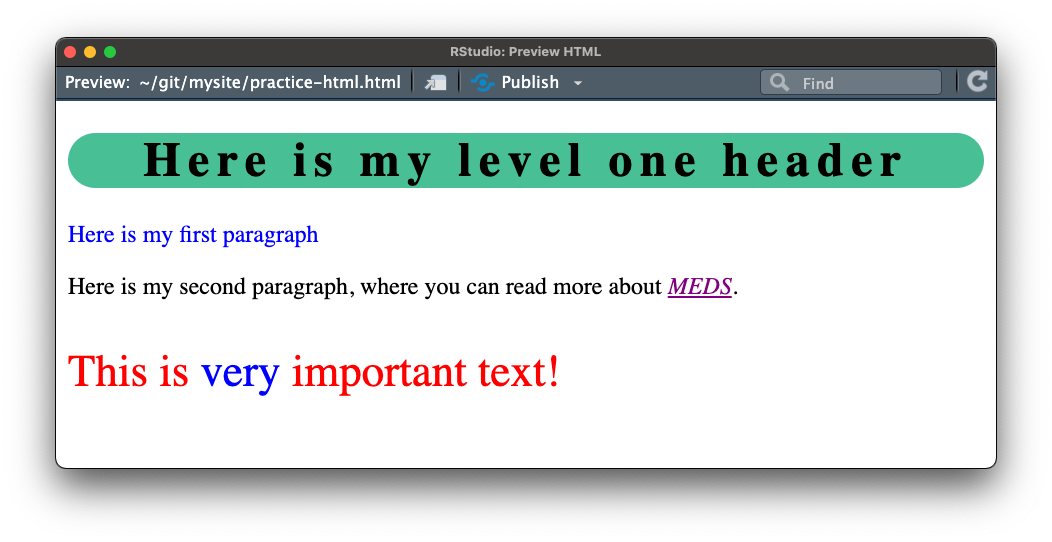
<!DOCTYPE html><!-- All HTML docs start with a doc type declaration--><html><!-- This tag represents the root of the HTML doc --><head><!-- Write any metadata about the HTML doc here (inluding the link to an external CSS file) --></head><body><!-- Write all the contents of the HTML doc here --><h1>Here is my level one header</h1><p>Here is my first paragraph</p><p>Here is my second paragraph, where you can read more about <a href="https://bren.ucsb.edu/masters-programs/master-environmental-data-science">MEDS</a>.</p><p>This is very important text!</p></body></html>
The resulting rendered HTML should look like this
3. Click the Open in Browser / Viewer button (located at the top right of your open file, ) to render your HTML in the browser:
Markdown makes it easy to “write” HTML
Quarto (.qmd) files allow us to write markdown, then Render that markdown as HTML (we can also write HTML directly in .qmd files). Let’s practice that together now:
1. Add a new file named practice-markdown.md to your DELETE-LATER/ folder by clicking on the DELETE-LATER/ folder in your Explorer menu, then clicking the New File… button.
2. Type or copy / paste the following into your practice-markdown.qmd file:
~/DELETE-LATER/practice-markdown.qmd
# Here is my level one headerHere is my first paragraphHere is my second paragraph, where you can read more about [MEDS](https://bren.ucsb.edu/masters-programs/master-environmental-data-science).This is very important text!
The resulting rendered Markdown should look like this
3. Click the Open Preview to the Side button to render the markdown as HTML in a secondary pane:
A light introduction to CSS
CSS is a rule-based language
CSS is a rule-based language, meaning that it allows you to define groups of styles that should be applied to particular elements or groups of elements on a web page.
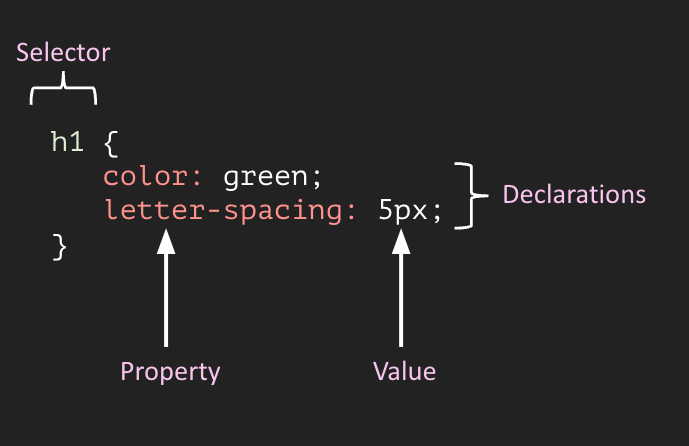
For example, “I want all level one (<h1>) headings to be green text with a bit of extra space between each letter” could be coded as:
Selectors select the HTML element(s) you want to style (e.g. level one headings, <h1>)
Declarations sit inside curly brackets, {}, and are made up of property and value pairs. Each pair specifies the property of the HTML element(s) you’re selecting (e.g. the color property of the element <h1>), and a value you’d like to assign to that property (e.g. green)
A property and its corresponding value are separated by a colon, :. Declarations end with a semicolon, ;
There are a number of different CSS selector types
There are many different CSS selector types, but the following will get you pretty far (though you can learn more about all the different categories of CSS selectors here).
Element selectors: selects all HTML elements with the specified element name
Grouping selectors: selects all HTML elements with the same style definitions
ID selectors: uses the id attribute of an HTML element to select a specific element; id of an element is unique within a page, so the id selector is used to select one unique element
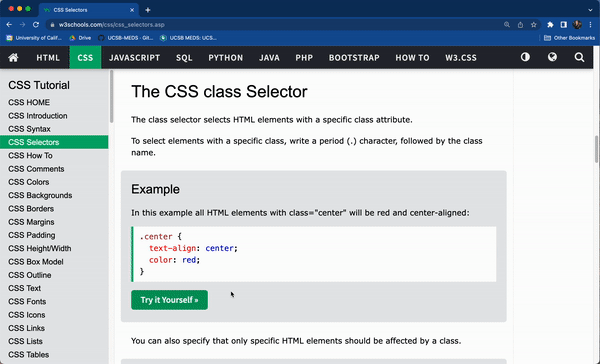
Class selectors: selects HTML elements with a specific class attribute
Universal selector: selects all HTML elements on the page
Inline styling: (not a selector type, but an alternative way to apply CSS styling)
There are a number of different CSS selector types
If you’re just getting started on styling your Quarto website, you’ll probably use element, grouping, and class selectors most often. We’ll focus on those today.
Element selectors:selects all HTML elements with the specified element name
Grouping selectors:selects all HTML elements with the same style definitions
ID selectors: uses the id attribute of an HTML element to select a specific element; id of an element is unique within a page, so the id selector is used to select one unique element
Class selectors:selects HTML elements with a specific class attribute
Universal selector: selects all HTML elements on the page
Inline styling: (not a selector type, but an alternative way to apply CSS styling)
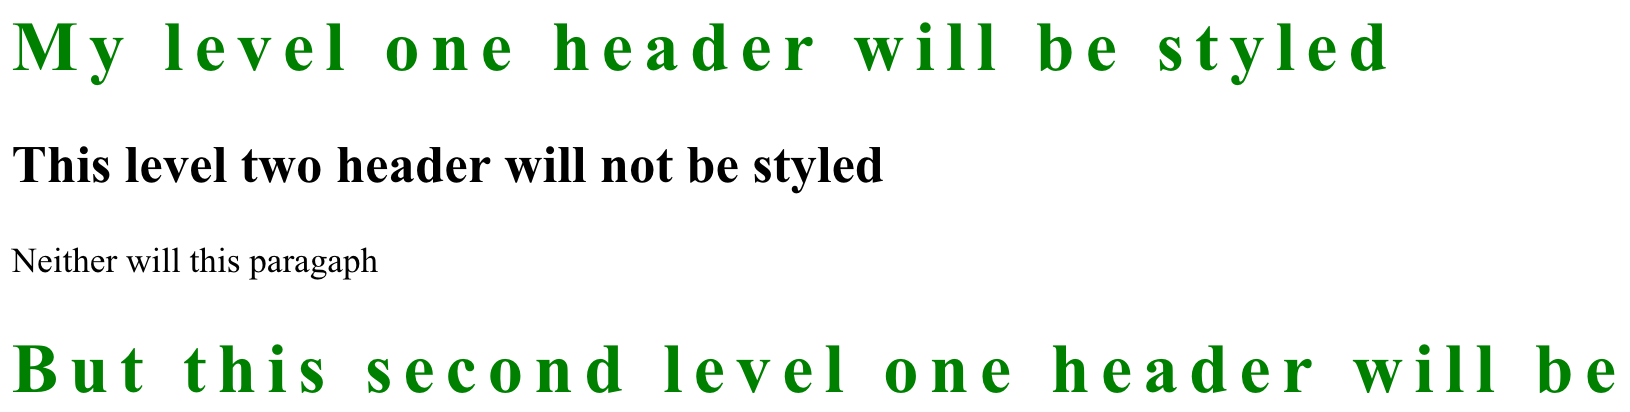
Use element selectors for styling an element based on its tag
Any HTML element can be used as a selector. The declarations specified apply to all HTML elements of that type.
CSS
h1 {color:green;letter-spacing:5px;}
HTML
<h1>My level one header will be styled</h1><h2>This level two header will not be styled</h2><p>Neither will this paragaph</p><h1>But this second level one header will be</h1>
Use grouping selectors for styling multiple elements the same way
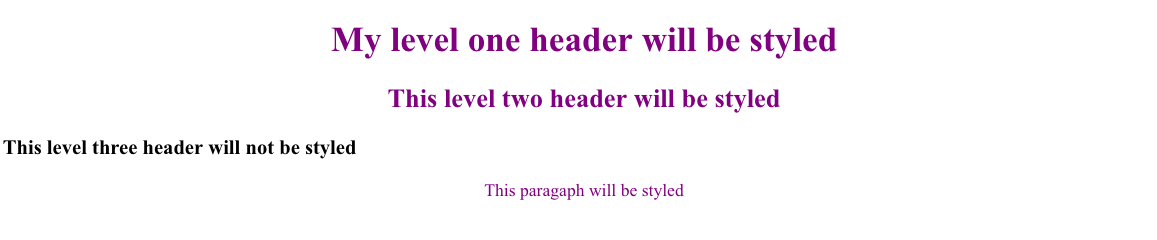
Group multiple element selectors together (separated by commas) if you want them all styled the same way.
CSS
h1, h2, p {text-align:center;color:purple;}
HTML
<h1>My level one header will be styled</h1><h2>This level two header will be styled</h2><h3>This level three header will not be styled</h3><p>This paragraph will be styled</p>
Use class selectors and HTML attributes to target particular elements
Attributes provide extra information about elements. They are always specified in the start tag and usually come in value/name pairs (e.g. attributeName="attributeValue"). We can use attributes (e.g. the class attribute) to apply targeted styling using class selectors.
Use class selectors and HTML attributes to target particular elements
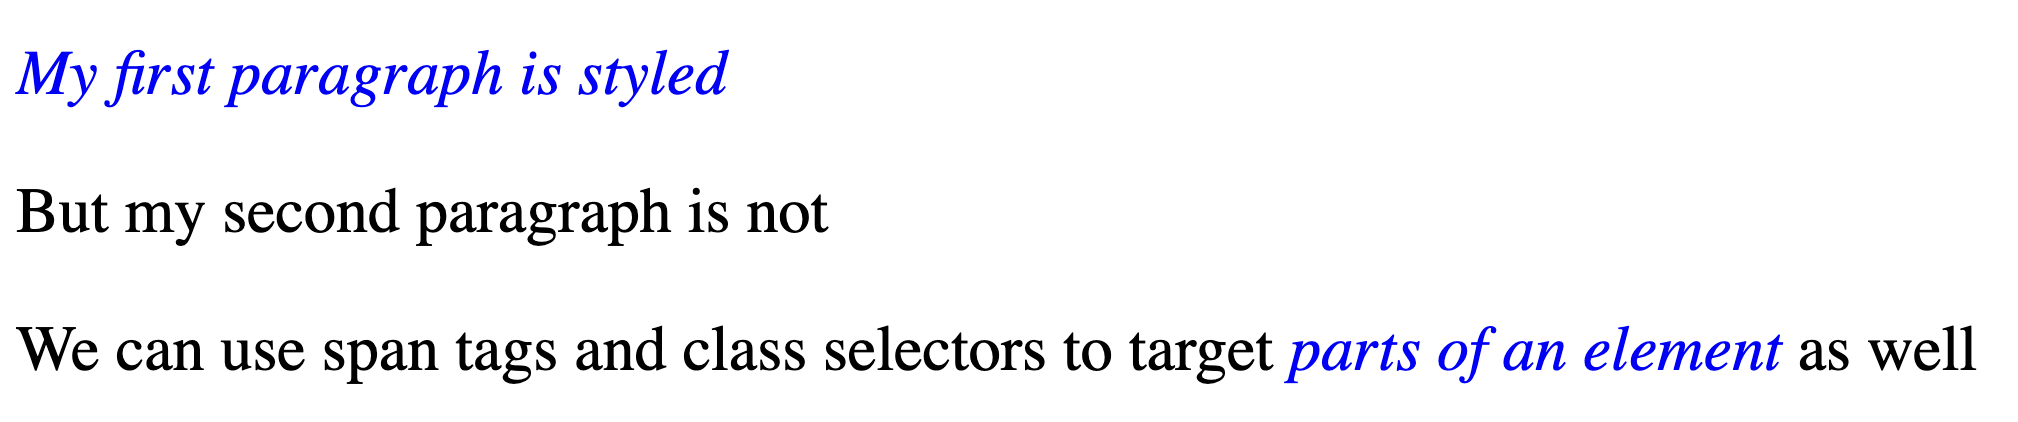
A class selector uses the class attribute of an HTML element to style that specific element. Class selectors are written using a . followed by the selector name, e.g. .selector. HTML elements can have more than one class, e.g. <p class="class1 class2">
CSS
.blue-italicized {color:blue;font-style:italic;}
HTML
<p class="blue-italicized">My first paragraph is styled</p><p>But my second paragraph is not</p><p>We can use span tags to target <span class="blue-italicized">parts of an element</span> as well</p>
An ID selector uses the id attribute of an HTML element to style that specific element. IDs must be unique within a page and therefore can only be used to select and style one unique element. ID selectors are written using a # followed by the selector name, e.g. #selector.
CSS
#para1 {color:red;text-align:center;}
HTML
<p id="para1">My first paragraph is styled</p><p>But my second paragraph is not</p>
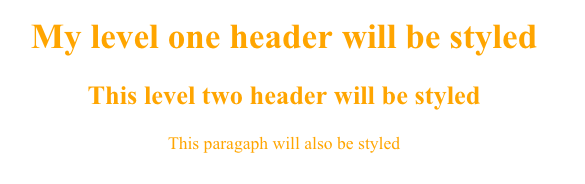
The universal selector selects all HTML elements on the page. It is written using only an asterisk, *.
CSS
* {text-align:center;color:orange;}
HTML
<h1>My level one header will be styled</h1><h2>This level two header will be styled</h2><p>This paragaph will also be styled</p>
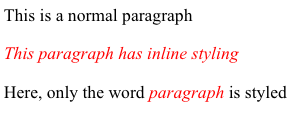
You may define styles directly inline using the style attribute. However, it’s best practice to use these sparingly as it mixes content (HTML) with presentation (CSS) and cannot be reused with other elements like defined CSS rules can.
HTML with inline styling
<p>This is a normal paragraph</p><p style="color: red; font-style: italic;">This paragraph has inline styling</p><p>Here, only the word <span style="color: red; font-style: italic;">paragraph</span> is styled</p>
Conflicting CSS rules?
It is often the case that more than one CSS rule will point to the same element. For example, say you have a style sheet and HTML that look like the following:
<h1>This is my header</h1><p>This is my paragraph with <span style="green-text">some green text</span></p>
In this case, we have a universal selector that styles all of our text orange, but we also have an element selector that colors our <h1> elements blue and a class selector that is applied inline to color a subset of text green. How do you know which style will be declared and applied to each of our HTML elements?
The highest specificity value “wins”
Specificity can be complicated (especially when you consider all the other types of selectors we haven’t covered in these slides). For the purposes of this workshop and getting started on your CSS journeys, a general rule of thumb is as follows: Inline styles are the most specific and will override ID selectors, which will override class selectors, which will override element selectors, etc. The order that rules are written in your stylesheet matters as well – since rules are read top to bottom, a directly competing rule farther down your stylesheet will take precedent.
Inline Styles
IDs
Class Selectors
Element Selectors
Universal Selectors
Practice writing CSS (1/3)
1. Add a new CSS file named practice.css inside your DELETE-LATER/ folder by clicking on the DELETE-LATER/ folder in your Explorer menu, then clicking the New File… button.
2. Link your CSS file inside the <head> of your HTML file (you can read more about inserting style sheets).
~/DELETE-LATER/practice-html.html
<!DOCTYPE html><!-- All HTML docs start with a doc type declaration--><html><!-- This tag represents the root of the HTML doc --><head><!-- Write any metadata about the HTML doc here (inluding the link to an external CSS file) --><link rel="stylesheet" href="practice.css"></head><body><!-- Write all the contents of the HTML doc here --><h1>Here is my level one header</h1><p>Here is my first paragraph</p><p>Here is my second paragraph, where you can read more about <a href="https://bren.ucsb.edu/masters-programs/master-environmental-data-science">MEDS</a>.</p><p>This is very important text!</p></body></html>
Practice writing CSS (2/3)
3. Write some CSS selectors in your practice.css file and save. Update your HTML file as necessary (e.g. using class selectors) to apply your styles. Check out your updates by clicking on the Open in Browser / Viewer button. Some suggestions:
(a) create an <h1> element selector that styles the background color to something of your choosing (hex and rgb codes allowed!), rounds the edges of the background box, increases the spacing between each letter, and centers the text on the page,
(b) create an element selector that changes the color of hyperlinked text and italicizes it
(c) create a class selector that you can use to color your first paragraph (“Here is my first paragraph”) blue,
(d) create a class selector to that you can use to color your third paragraph (“This is very important text!”) red and enlarge the font size (try 20px),
(e) use your class selector from Step cinline to color just the word “very” (in your third paragraph) blue
It’ll be especially helpful to explore this list of available CSS properties.
/* ------- element selectors ------- *//* style level one headers */h1 {background-color:#49bf96;border-radius:25px;letter-spacing:5px;text-align:center;}/* purple italicized hyperlinks */a {color:purple;font-style:italic;}/* ------- class selectors ------- *//* blue text */.blue-text {color:blue;}/* large red text */.important-text {color:red;font-size:30px;}
~/DELETE-LATER/practice-html.html
<!DOCTYPE html><!-- All HTML docs start with a doc type declaration--><html><!-- This tag represents the root of the HTML doc --><head><!-- Write any metadata about the HTML doc here (inluding the link to an external CSS file) --><link rel="stylesheet" href="practice.css"></head><body><!-- Write all the contents of the HTML doc here --><h1>Here is my level one header</h1><p class="blue-text">Here is my first paragraph</p><p>Here is my second paragraph, where you can read more about <a href="https://bren.ucsb.edu/masters-programs/master-environmental-data-science">MEDS</a>.</p><p class="important-text">This is <span class="blue-text">very</span> important text!</p></body></html>
Okay, that’s cool…but what about Quarto?
A styles.css file is automatically generated when you create a new Quarto site
We can write our CSS rules in styles.css, but alternatively, we can write them directly in our styles.scss file(remember, you can write CSS in a .scss file but you can’t write Sass in a .css file).
You can delete styles.css if you don’t plan to use it, or leave it be (it won’t impact your Quarto site since it’s not linked as our stylesheet in _quarto.yml).
Create a section for defining CSS rules in styles.scss
To start defining CSS rules in styles.scss you first need to add the /*-- scss:rules --*/ region decorator beneath your Sass variables section (this is important! your CSS won’t be recognized without this region decorator in place):
Next, we’ll walk through some examples of how to modify your site with your own CSS rules.
Determine which element(s) you want to style
Note: I’ve added a bit more text to my page titled, “About,” for demonstration purposes.
Let’s say I want to similarly style (add a bit of spacing between each letter, increase font weight) the following text on my website:
On my About page, I want to style the page title, “About”, and each of the section headers
On my Resources page, I want to style the page title, “All of my favorite resources!”
But what if I don’t know what HTML element type this is? Inspect!
Using the Inspect tool is a great way to get a better sense of how CSS is used to modify particular HTML elements (this works with any web page, and also your locally hosted website preview).
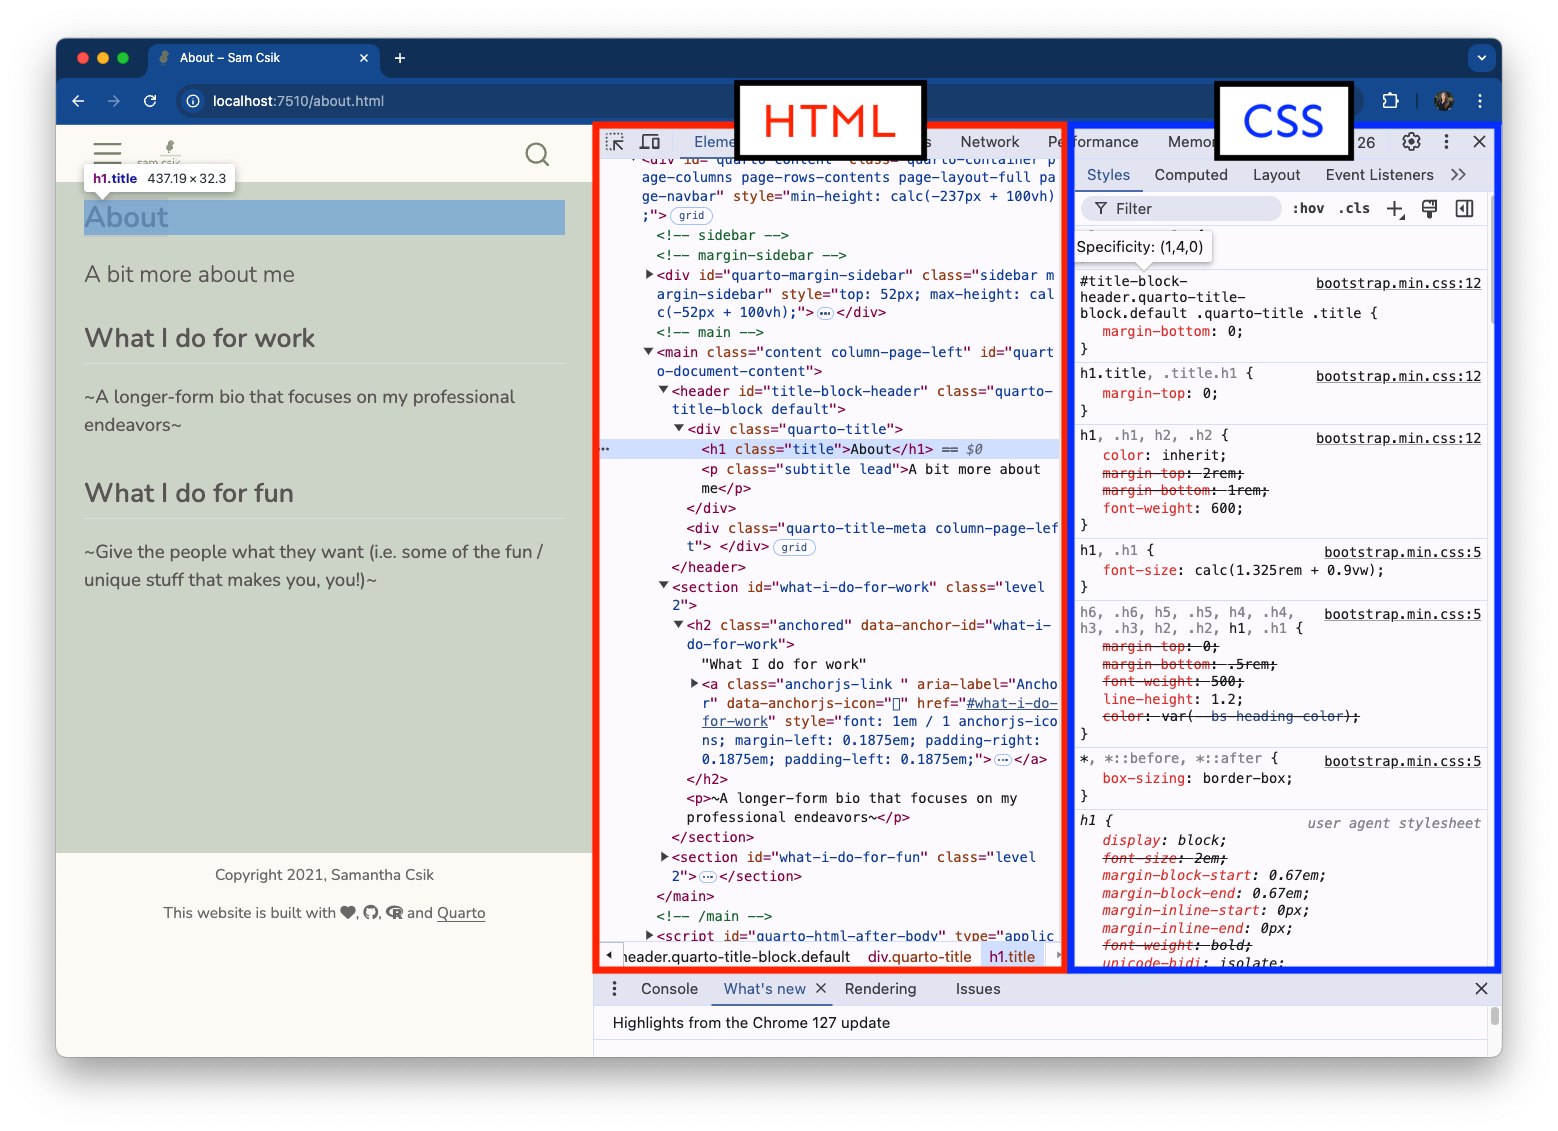
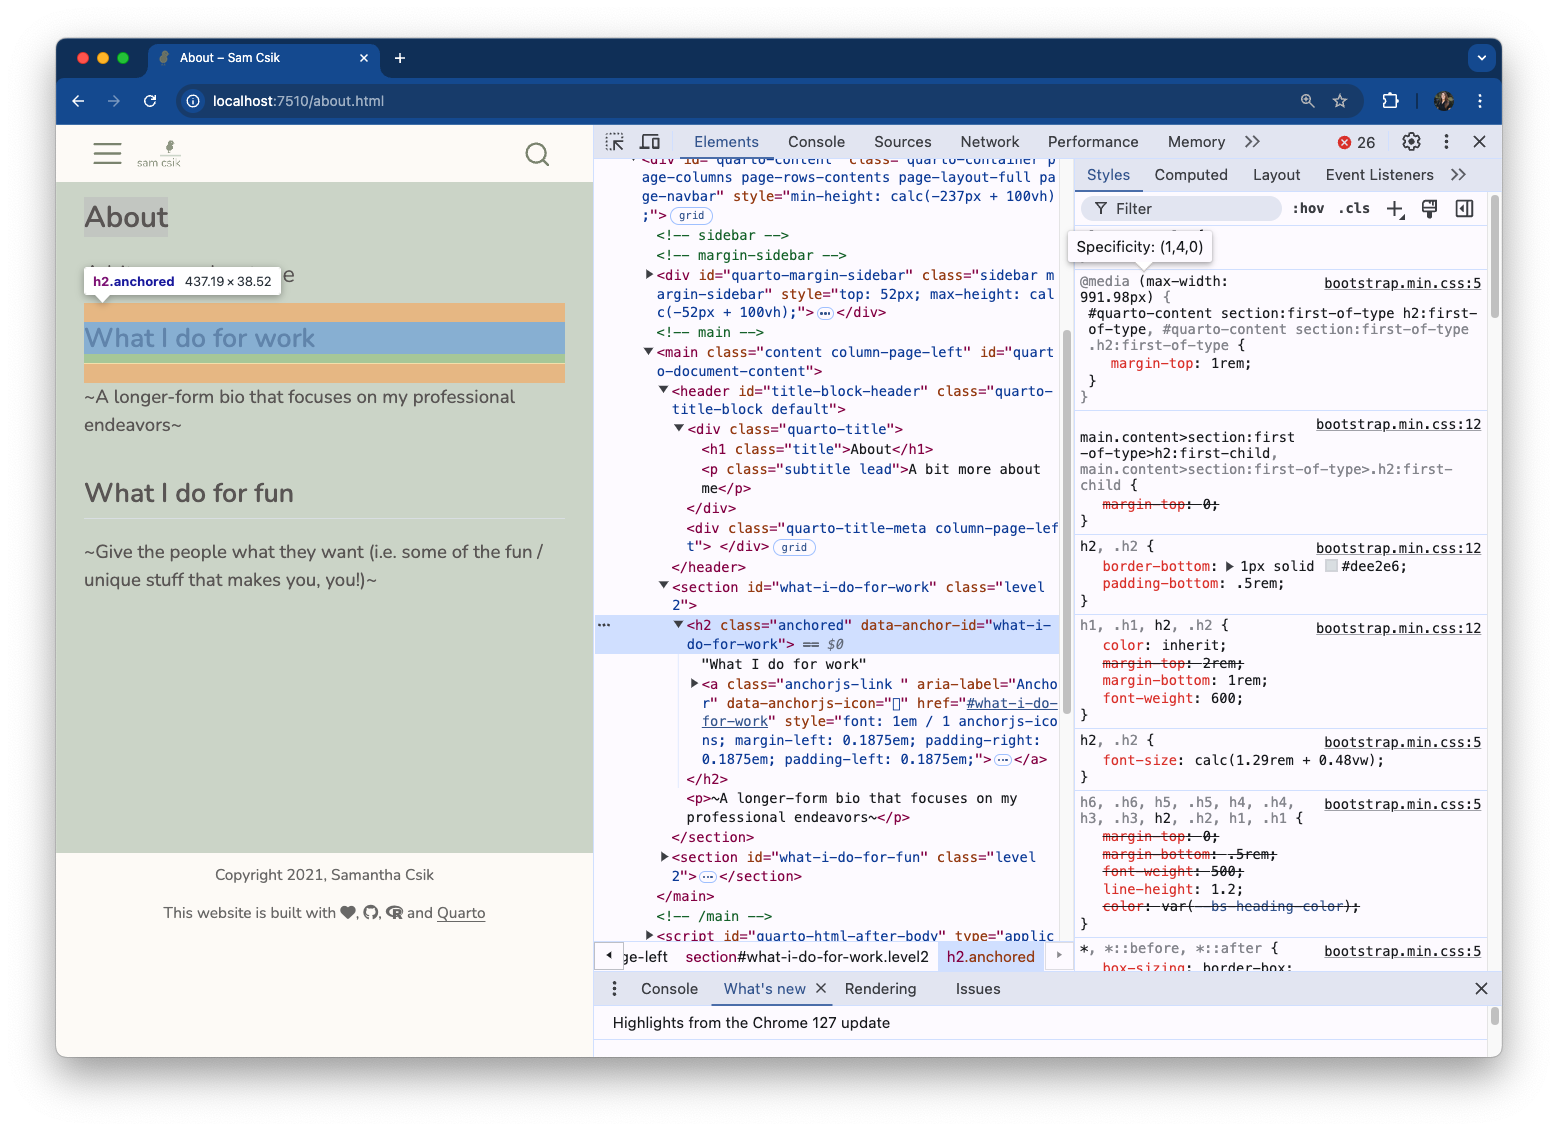
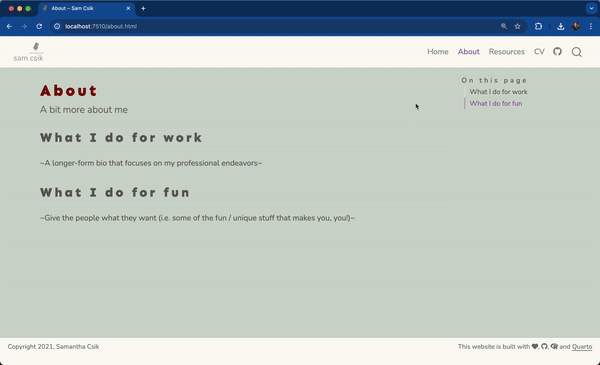
In your website preview, right click on an element of interest (in this case, let’s start with the page title, “About”) and choose Inspect to pull up the underlying HTML & CSS files. You can continue to right click / inspect additional elements (e.g. the section header, “What I do for work”).
Hovering your mouse over different lines of HTML highlights the corresponding element on your webpage.
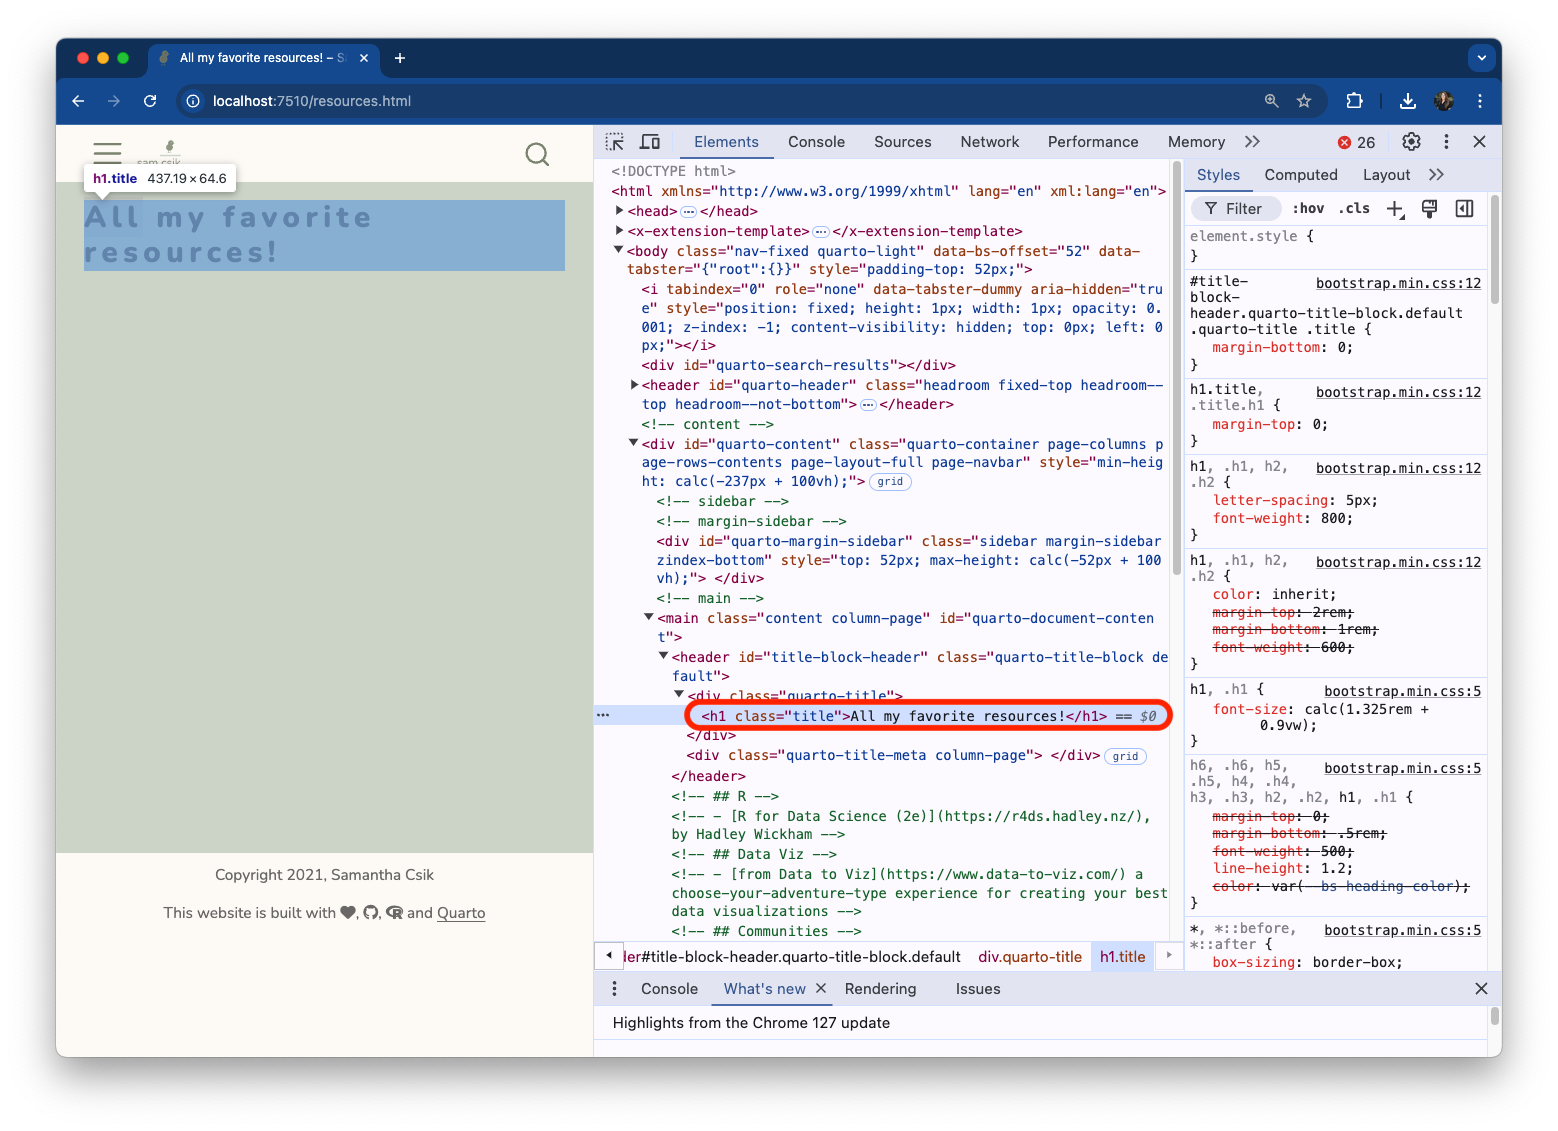
The words “About” and “All my favorite resources!” are <h1> elements
Only the screenshot for the “About” page shown here
Note: These <h1> elements also have a class title – more on that in a minute.
Both section headers on the page titled, “About,” are <h2> elements
Only the screenshot for the section header that reads, “What I do for work,” shown here
Note: These <h2> elements also have a class anchored – more on that in a minute.
Write a <h1> and <h2> grouping selector
styles.scss
/*-- scss:defaults --*/// Import Google fonts@importurl('https://fonts.googleapis.com/css2?family=Nunito:ital,wght@0,200..1000;1,200..1000&family=Sen:wght@400..800&display=swap');// Colors$dark-green: #858E79;$light-green: #D1D9CE;$cream: #FDFBF7;$gray: #64605f;$purple: #9158A2;$orange: #ad7237;// Base document colors$navbar-bg: $cream; // navbar$navbar-fg: $dark-green; // navbar foreground elements$navbar-hl: $purple; // highlight color when hovering over navbar links$body-bg: $light-green; // page background $body-color: $gray; // page text $footer-bg: $cream; // footer $link-color: $purple; // hyperlinks // Inline code$code-bg: $cream; // inline code background color$code-color: $purple; // inline code text color// Code blocks$code-block-bg: $cream; // code block background color /*-- scss:rules --*/h1, h2 {letter-spacing: 5px;font-weight: 800; // Google fonts tells you which weights your chosen font family allows for!}
Preview your updated styling
Our updated <h1> and <h2> elements should now look something like this:
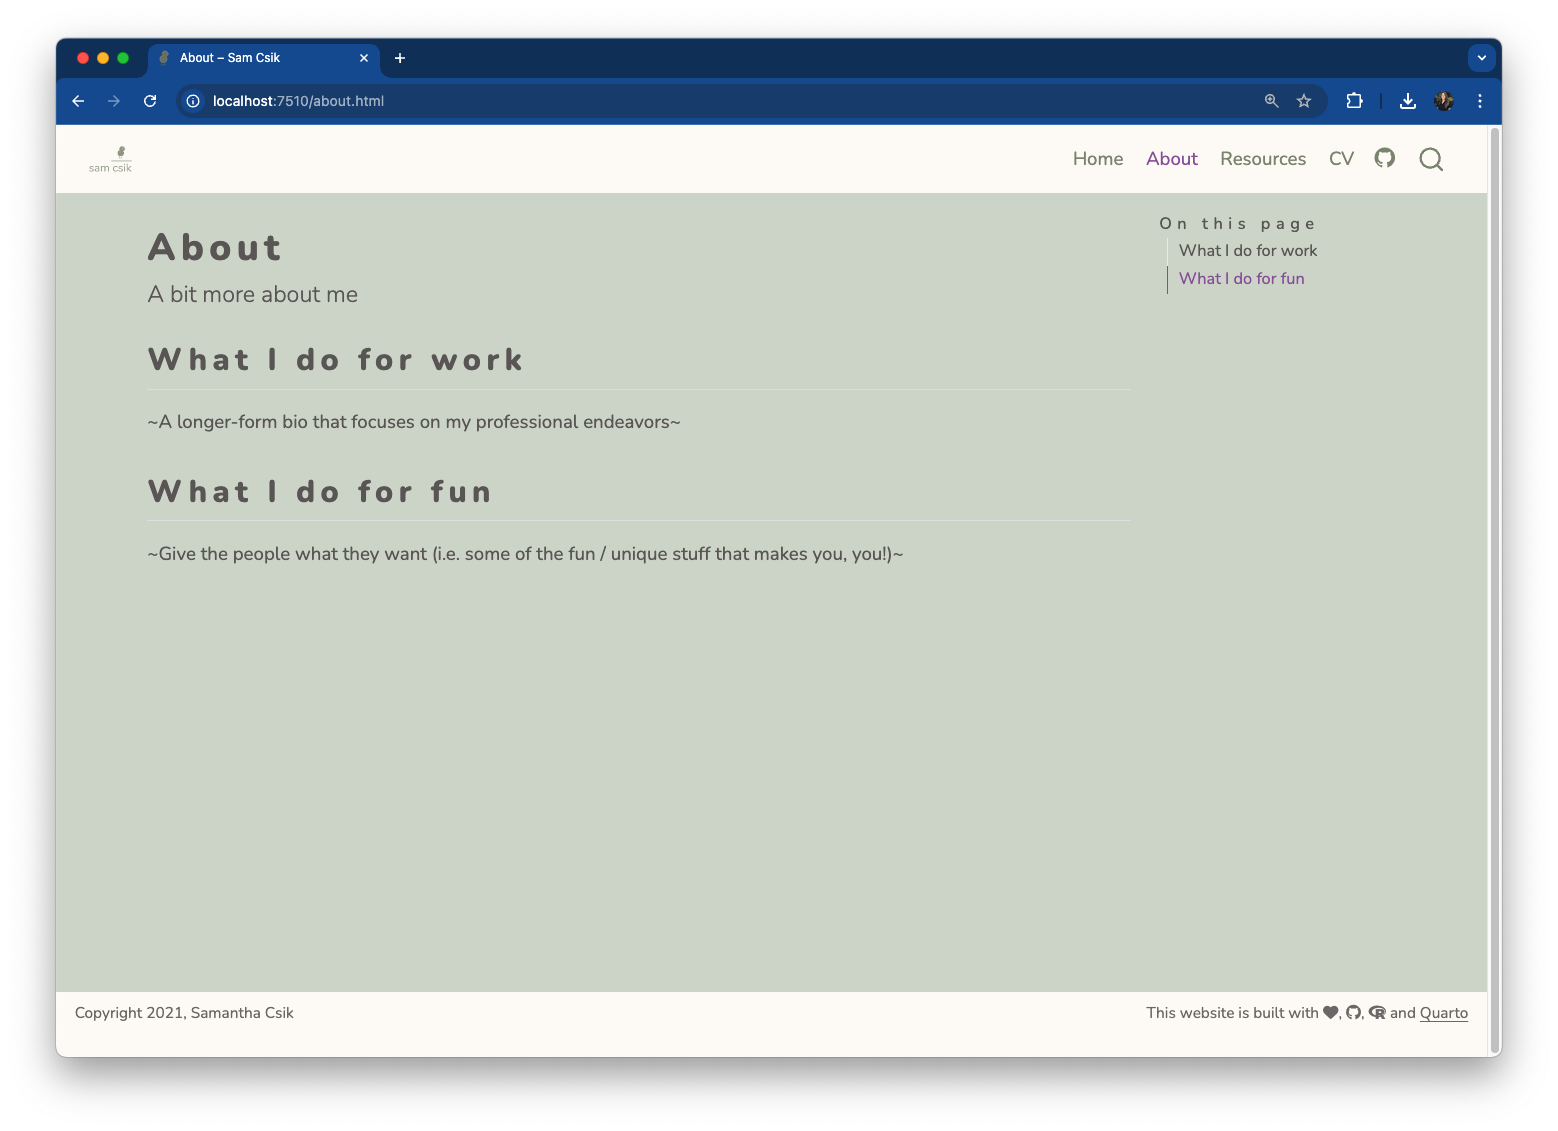
No CSS styling on h1 and h2 headers
With CSS styling on h1 and h2 headers
Check to see that our styles were also applied to our “Resources” page title.
Recall those .title class selectors we noted earlier?
We noted that the page titles (“About” on the About page and “All my favorite resources!” on the Resources page), are all <h1> elements and are also given the class, title (e.g. <h1> class="title">All of my favorite resources!</h1>). This means that the Quarto framework has already defined a class selector called .title and applied that class to the above elements.
We can modify existing class (or ID) selectors
For example, let’s make any text elements that are assigned the class, .title, the color maroon:
It’s important to note that we didn’t need to make any changes to the HTML (in about.qmd, and resources.qmd) since those <h1> elements are already assigned the class, title. Updates are automatically applied to any elements that the Quarto framework has already assigned as that class.
Can we apply the title class to other elements?
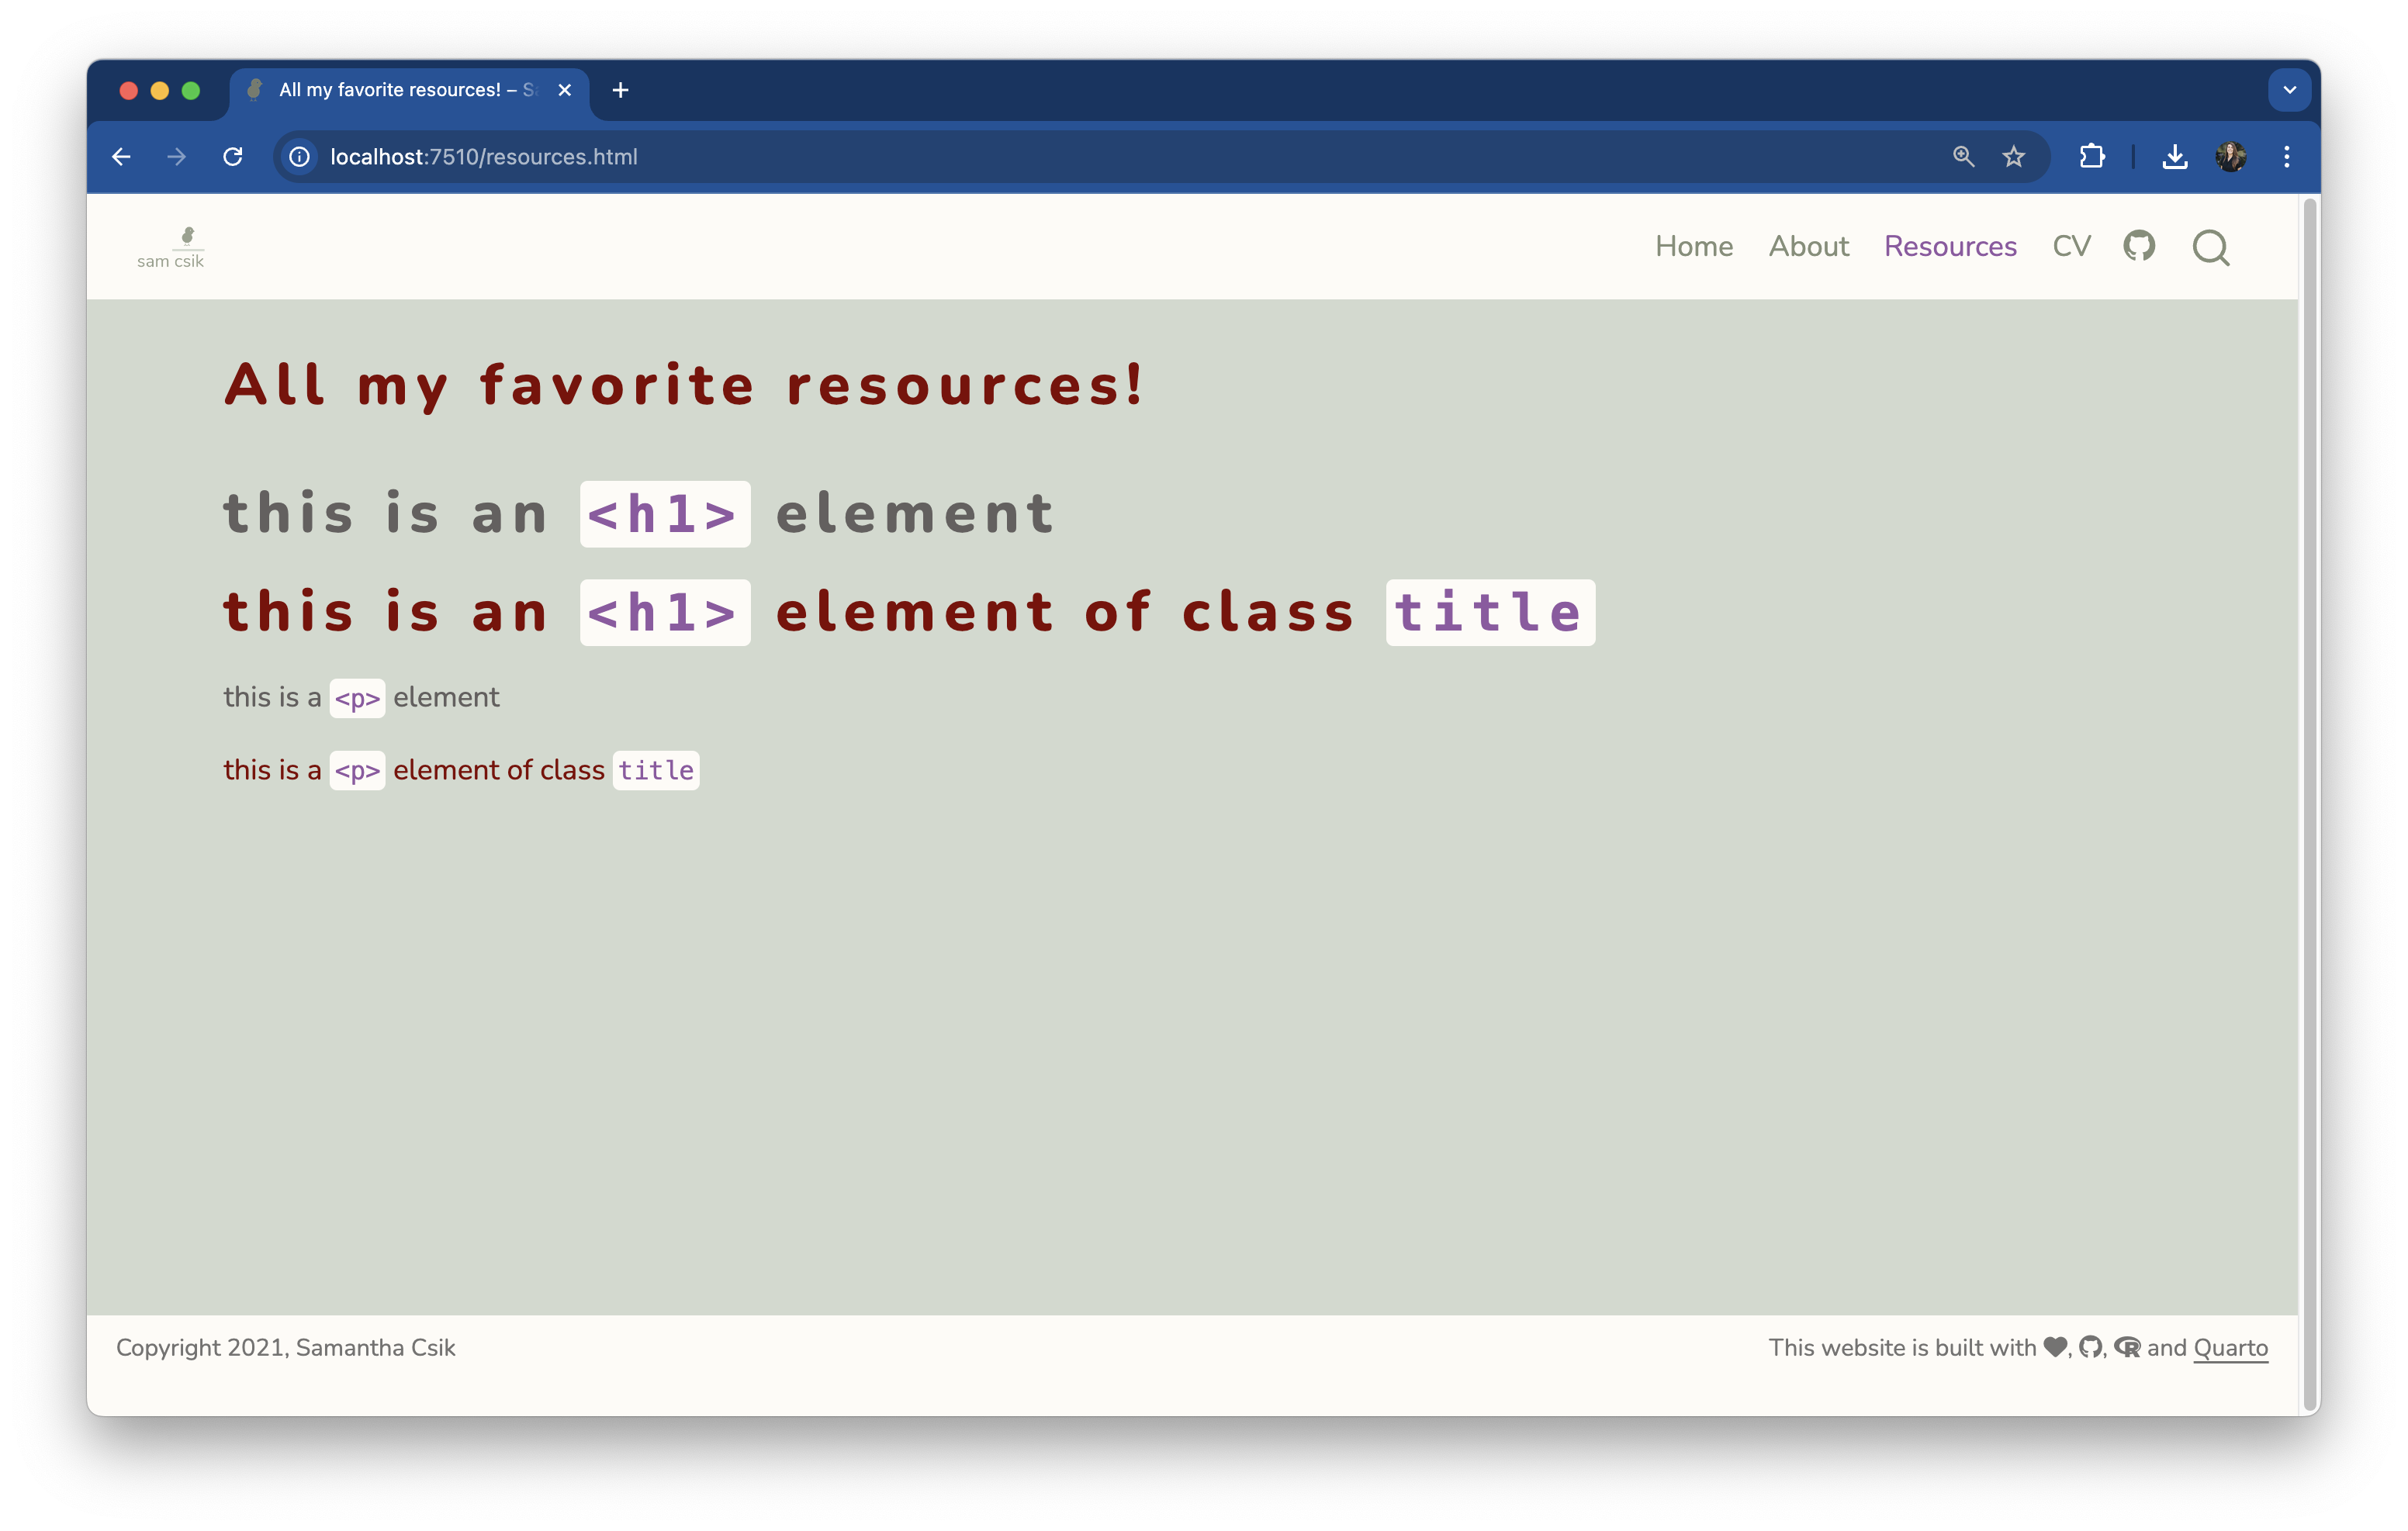
Yes! To demonstrate, let’s write a couple of HTML elements that are not by default assigned the title class to see what happens – in other words, let’s apply the title class to some elements beyond just our website’s landing page name and page titles. I’ll do this on my Resources page (resources.qmd):
resources.qmd
---title:"All my favorite resources!"---<h1>this is an `<h1>` element</h1># alternatively, you can write <h1> elements using markdown (`# this is an `<h1>` element`)<h1 class="title">this is an `<h1>` element of class `title`</h1><p>this is a `<p>` element</p><p class="title">this is a `<p>` element of class `title`</p>
Class selectors allow us fine-tuned control over styling
Class selectors allow us to customize exactly how CSS rules apply to particular elements. In this example, only <h1> elements that are assigned the class, title, are colored maroon. Any <h1> elements that are not assigned the class, title, are styled according to our h1, h2 {} element selector.
Note that we can also apply the title class to any text element (not just<h1> elements). In this example, we apply it both to an <h1> element and a <p> element. That said, giving your class selectors sensible names can help keep your code readable – the Quarto .title class is (most likely) intended for styling page titles.
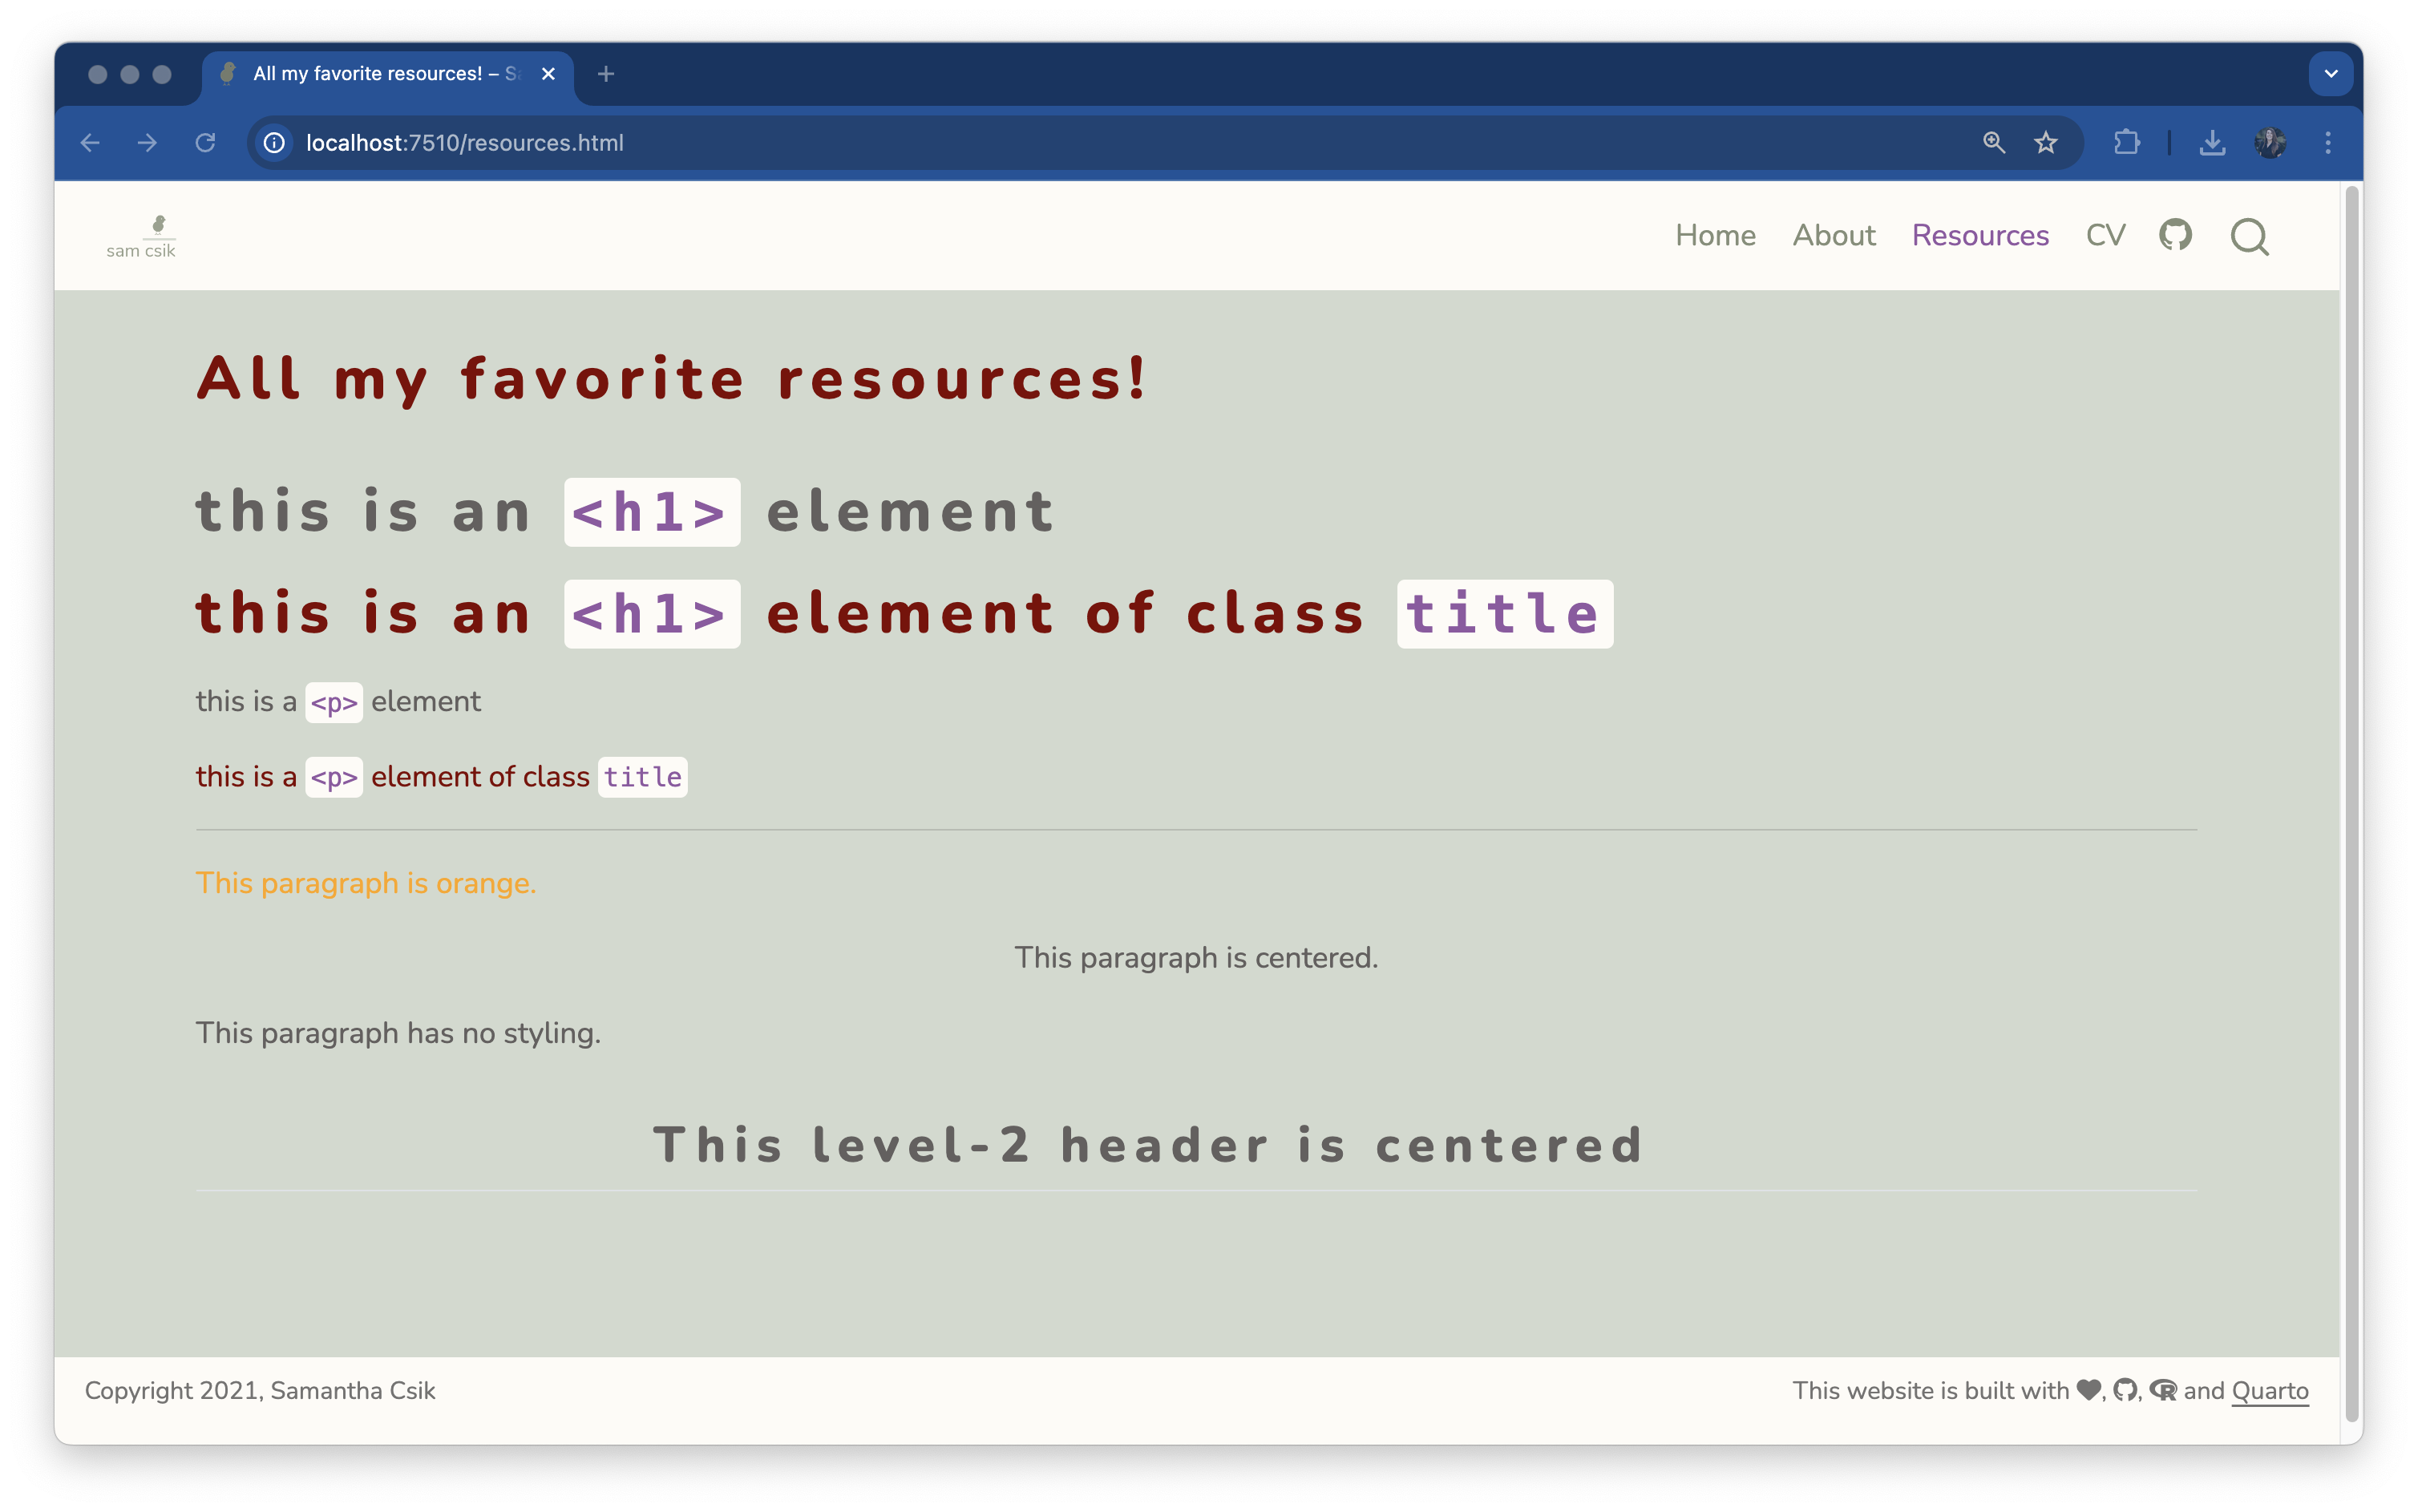
We can also write our own class selectors
Let’s first create two different classes: one to center text on the page, and another to color text orange:
Write some HTML elements and apply class selectors
Add a few more elements in resources.qmd and apply our custom class selectors. Remember, unlike element selectors, class selectors must be applied to the elements that we want to style (i.e. we must update our HTML!):
resources.qmd
---title:"All my favorite resources!"---<h1>this is an `<h1>` element</h1><h1 class="title">this is an `<h1>` element of class `title`</h1><p>this is a `<p>` element</p><p class="title">this is a `<p>` element of class `title`</p>---# three dashes is markdown syntax for creating a horizontal line across your page<p class="orange-text">This paragraph is orange.</p><p class="center-text">This paragraph is centered.</p><p>This paragraph has no styling.</p><h2 class="center-text">This level-2 header is centered</h2>
Check out your new orange / centered text
Elements can have more than one class selector
Simply list the names of the class selectors one after the next inside "" – for example, <tag class="class1 class2">Content</tag>.
resources.qmd
---title:"All my favorite resources!"---<h1>this is an `<h1>` element</h1><h1 class="title">this is an `<h1>` element of class `title`</h1><p>this is a `<p>` element</p><p class="title">this is a `<p>` element of class `title`</p>---# three dashes is markdown syntax for creating a horizontal line across your page<p class="orange-text">This paragraph is orange.</p><p class="center-text">This paragraph is centered.</p><p>This paragraph has no styling.</p><h2 class="center-text">This level-2 header is centered</h3>---<h3 class="center-text orange-text">This level-3 header is both centered and orange</h2><p class="orange-text">**This paragraph is orange and bolded using markdown syntax (yes, you can combine markdown and html!).**</p>
Admire your updated page!
(Yeah, okay this doesn’t look that great, but I hope you can at least admire your use of CSS to style different HTML elements!)
Quarto also provides its own syntax for applying classes to elements
You can create both divs (block-level regions of content) and spans (inline content) using Quarto’s syntax. For example:
Divs
# Quarto syntax::: {.my-selector}Some element (e.g. text) to style:::# HTML syntax<div class="my-selector"> Some element (e.g. text) to style</div>
Spans
# Quarto syntaxSome text with just [this section]{.my-selector} styled# HTML syntax<p>Some text with just <span class="my-selector">this section</span> styled</p>
You can mix and match syntaxes in .qmd files
An example:
resources.qmd
---title: "All my favorite resources!"---<p class="orange-text">Here is some orange text.</p><p>And here is some normal text beneath it.</p>[Here is more orange text written using Quarto's syntax]{.orange-text}Also note that I do not need to wrap this text in the `<p>` tag in order for it to render as normal text. `.qmd` files allow us to seamlessly blend markdown syntax with HTML.
Let’s close out this section with just a couple more tips…
Want to use more than one font family?
Recall that we:
(a) imported two font families from Google Fonts – Nunito and Sen (though you can import and use as many as you’d like), and
(b) set Nunito as our mainfont in _quarto.yml (which applies Nunito as the default font for all text elements).
To also apply Sen, we can:
(a) create a Sass variable for Sen, then
(b) write a CSS rule(s) to apply Sen to our desired text elements.
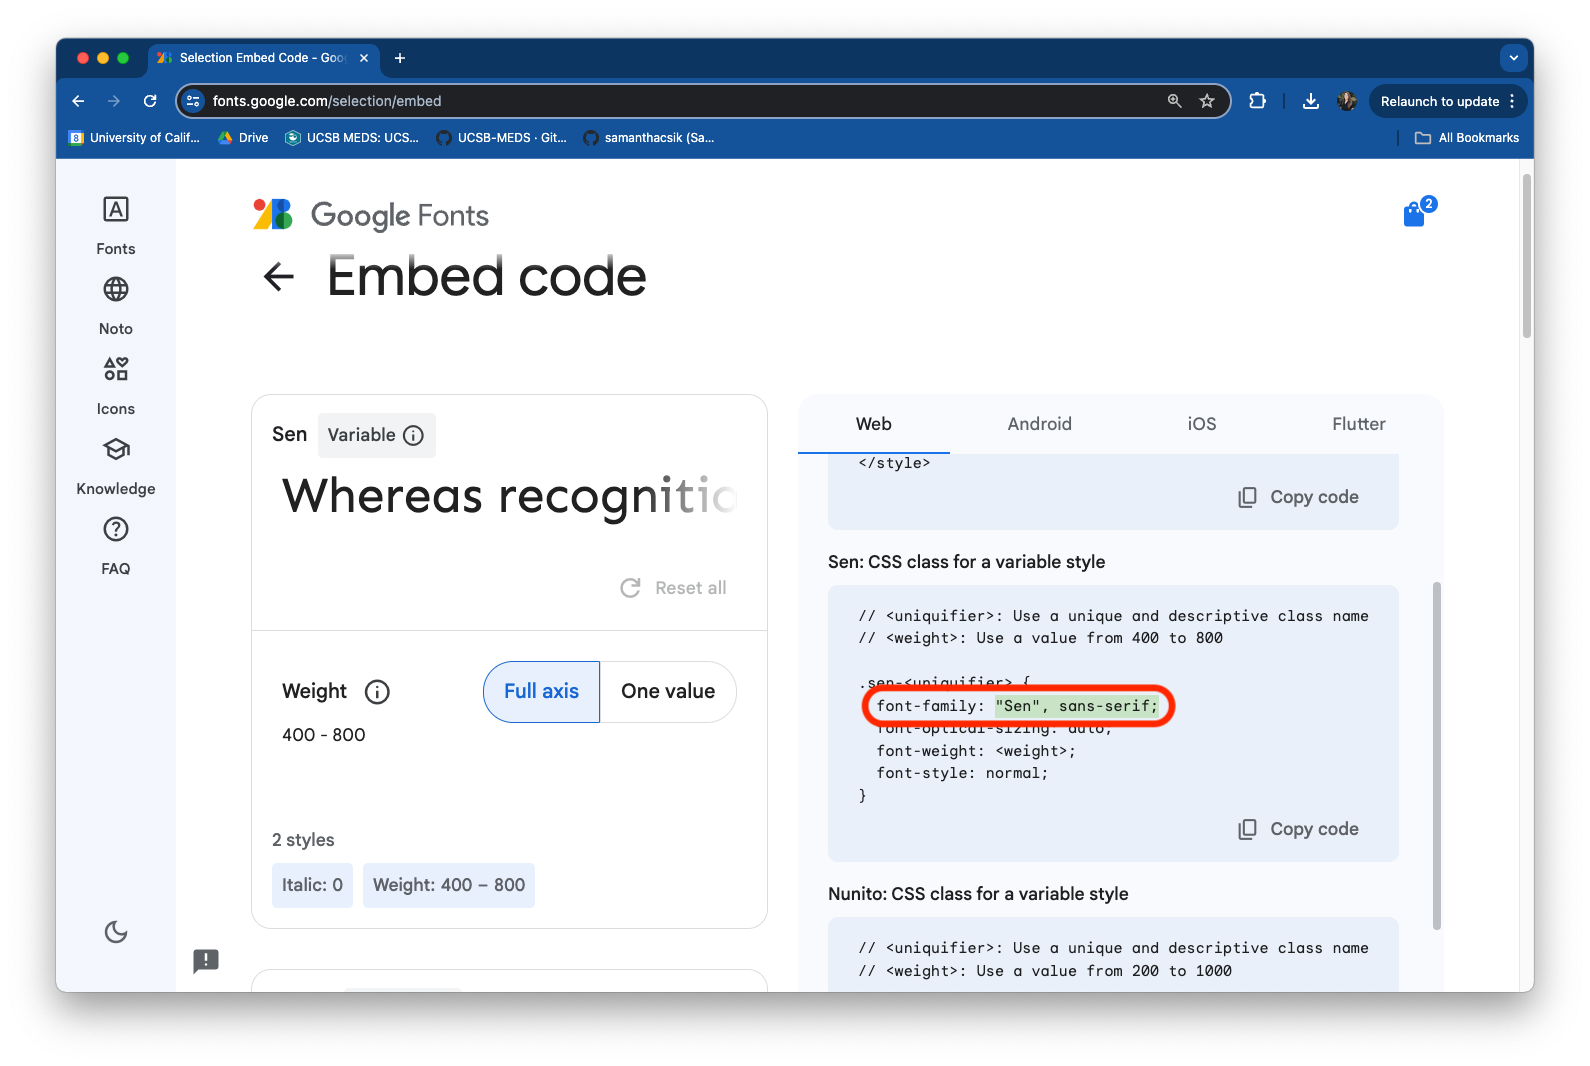
Google Fonts provides us with helpful code
Look for the code chunk titled, Sen: CSS class for a variable style on the Embed code page. We’ll want to grab the value specified after the font-family property (here, that value is, "Sen", sans-serif;).
Create a Sass variable, then craft some CSS
Here, we create a CSS grouping selector, which applies Sen to any HTML header (<h1> - <h6>):
Let’s add a CSS rule to increase the size of our logo. Be sure to add this rule beneath your /*-- scss:rules --*/ region decorator, and note that you may need to adjust the max-height value to best suit your own personal logo:
Great question! I adapted it from someone else’s open source code, which was available on GitHub This process often involves some trial and error, but it’s one of the best ways to learn from the many awesome folks who openly share their work.
More specifically, I stumbled upon Robert Mitchell’s personal website (built with Quarto) and noticed that he too had a logo, and that it was perfectly sized to fit the navbar space:
Figuring things out requires some trial and error
Here’s what that looked like:
I inspected the logo using Google Chrome’s DevTools (right click > Inspect).
DevTools opened to some HTML which linked to the logo PNG file and had the class navbar-logo (this seemed like a reasonable place to start).
I hopped over to Robert’s custom.scss file and searched for navbar-logo. This didn’t yield any matches.
I returned to the DevTools pane and hovered over the HTML directly above my first attempt (hovering over this new HTML still highlighted the website logo, so I assumed it was targeting the right element). Here, I noticed the class navbar-brand.
I jumped back to the custom.scss file – this time, a search for navbar-brand led me to the CSS rule used to adjust the size of the logo.
(Not shown in gif) Finally, I tried copying this rule over to my own stylesheet to test it out (and hope that it actually works)! I had to tweak the max-height to work for my logo.
A gif of the process is shown on the next slide.
This is also the perfect segue into our very last section…
Get inspired
Styling your website can be challenging
^ How I feel most of the time while trying to write CSS
For me, it’s a lot of it is trial and error. Inspecting your website can take patience and persistence to figure out how exactly to target your desired element. Some things that have helped me:
re-rendering often to ensure your Sass / CSS is working as expected
Google! (lots of queries that look like, “CSS underline text”, “CSS rounded corners”, etc.)
W3 Schools – seriously such a valuable resource (especially their interactive tutorials)
drawing inspiration (and borrowing source code) from other web pages
Jump into the source code of a site(s) you really admire
Exploring the source code for other websites, presentations, etc. is, in my opinion, critical for learning this new skill and applying it to your own work.
You don’t need to limit yourself to just Quarto websites – check out the stylesheets for Quarto docs, presentations (cough cough like this very presentation), Shiny apps / dashboards, Distill sites, and more.
Temporarily “edit” CSS using the DevTools pane
Play around with selectors and update declaration values while inspecting your website. This allows you to try out styles before actually hard-coding them, and also helps you identify exactly which elements different selectors are manipulating. It can sometimes take a little digging in the Inspect pane to find what you’re looking for.
Take advantage of interactive tutorials
W3Schools (or alternatively, MDN Web Docs, by Mozilla) has tons of great examples and interactive tutorials for learning CSS. Touching (and breaking) code is one of the best ways to learn!


 ) to render your HTML in the browser: