~ END Installation Guide ~
![]()
Incoming MEDS students should follow the steps detailed in this software installation guide before summer orientation – there will be a dedicated troubleshooting session during orientation, should you need help completing any of the installations.
Please carefully read through the computing requirements & recommendations section before deciding on what computer to purchase / use ahead of MEDS.
Download the latest version of R for your operating system at cloud.r-project.org. If you already have R installed, simply reinstall to update.
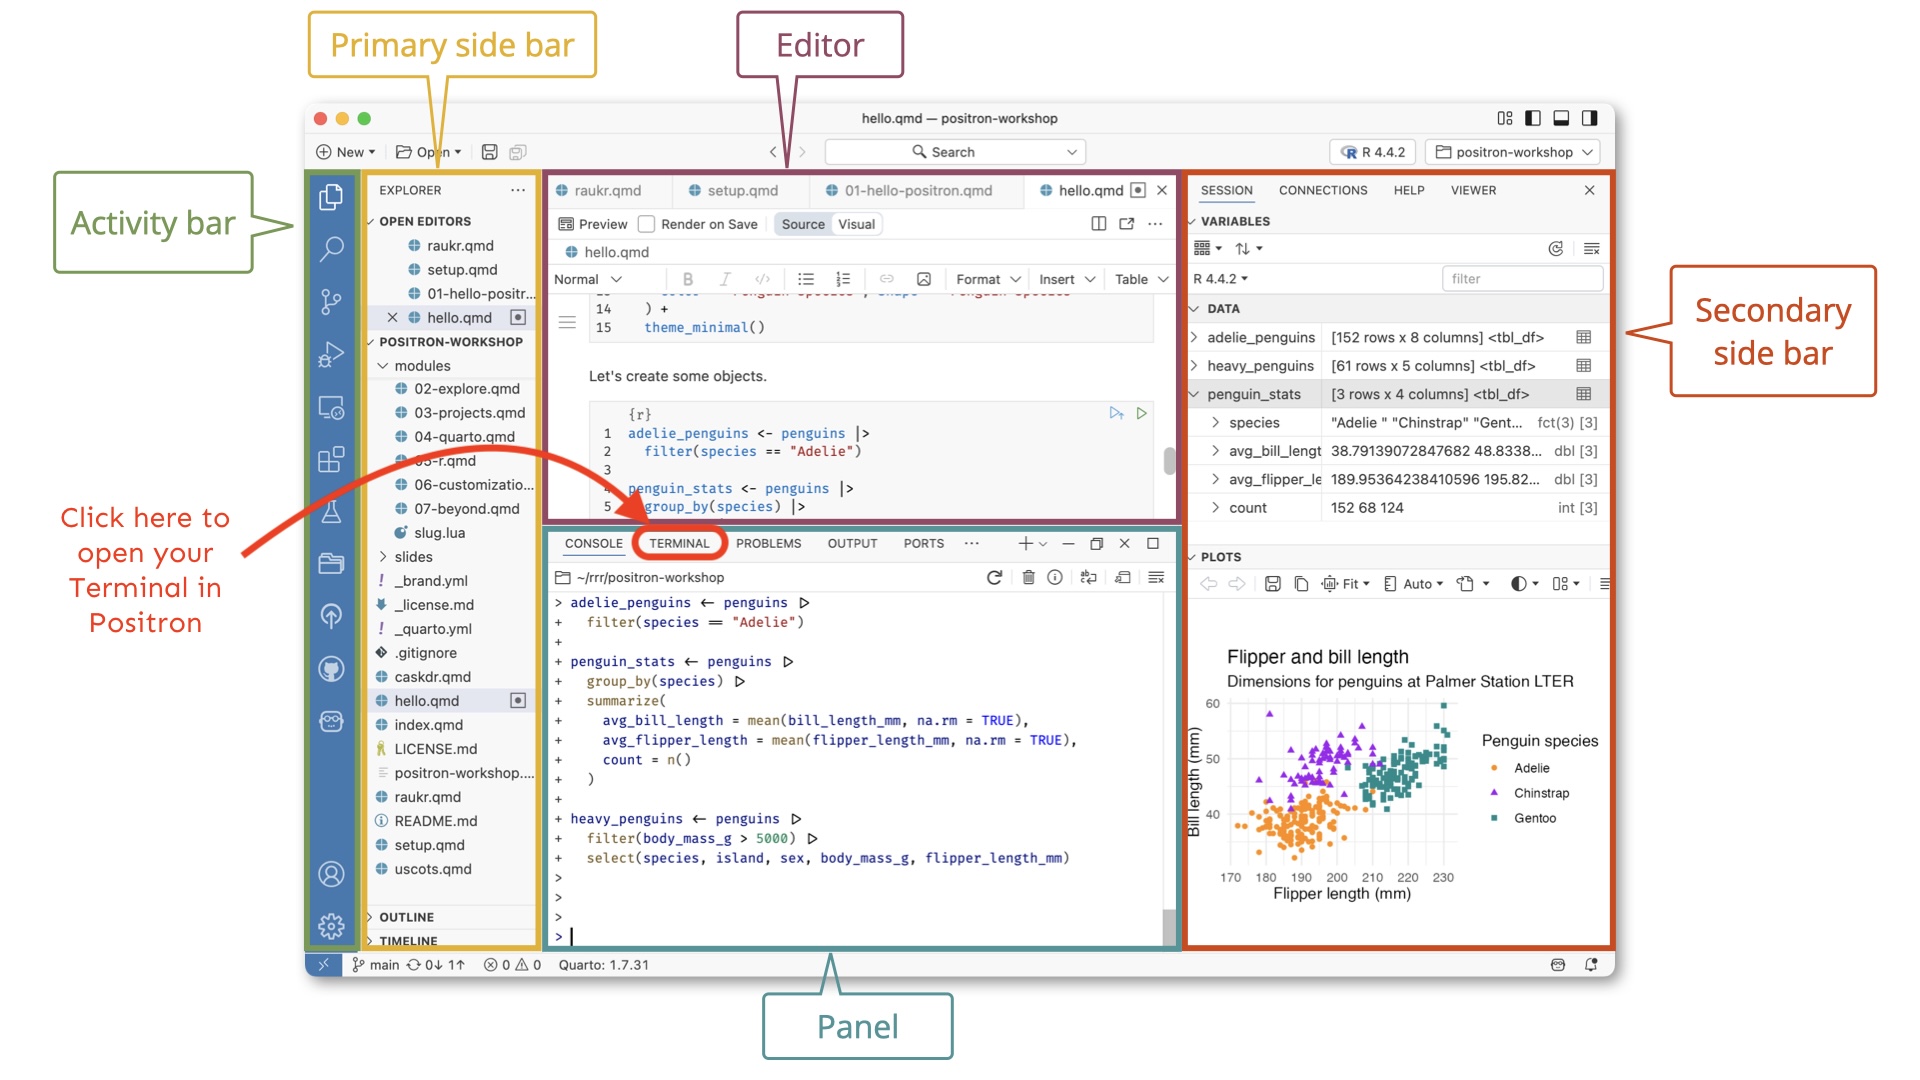
While R is a programming language, Positron is a software application (often referred to as an IDE, Integrated Development Environment) that provides a user-friendly workspace for writing and running code. In addition to R, Positron also supports Python and other programming languages, making it a flexible tool for data science and scientific computing. If you’ve used RStudio in the past, you’ll notice a lot of similar features in Positron (it was created by the company behind RStudio, Posit), as well as improved support for multiple languages and newer development tools.
To install Positron, visit positron.posit.co/install and follow the instructions. If you already have Positron installed, it’ll automatically check for updates from Posit’s channel of monthly releases and install the new version in the background. To open Positron, click on the app logo that looks like:
![]()
Several of the following installation steps will ask you to run commands in the Positron Terminal. You can find it next to the Console in Positron’s Panel (bottom center of the IDE):
Mac users should install the following tools, which are required for some R package installations:
xcode-select --install in the Positron TerminalWindows users: Command Line Tools are pre-installed and XQuartz is not required.
Anaconda is a distribution of the Python programming language that aims to simplify package management and deployment. You’ll need to download the Graphical Installer, which provides a graphical user interface (GUI) to facilitate writing code. Choose the option for your operating system:
Download the Graphical Installer for MacOS.
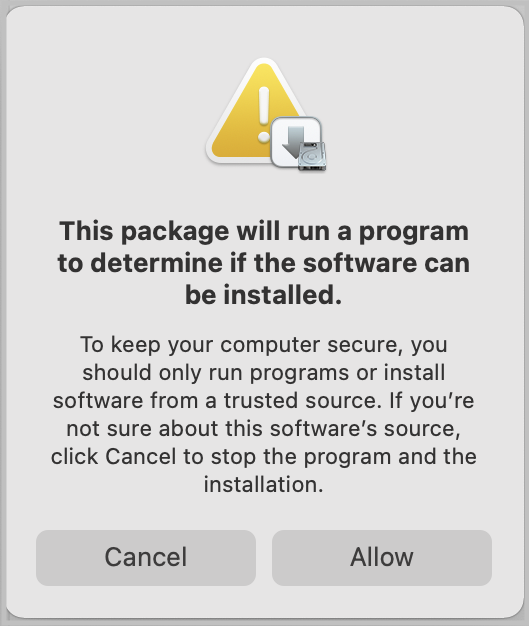
This might pop open a new tab with a “redirecting you to…” phrase, but Anaconda should be downloading at the same time. It might take a couple minutes. After it’s downloaded, click it and hit “Allow” if you see the following:
Follow the installation steps to complete Anaconda installation. You will accept all default settings.
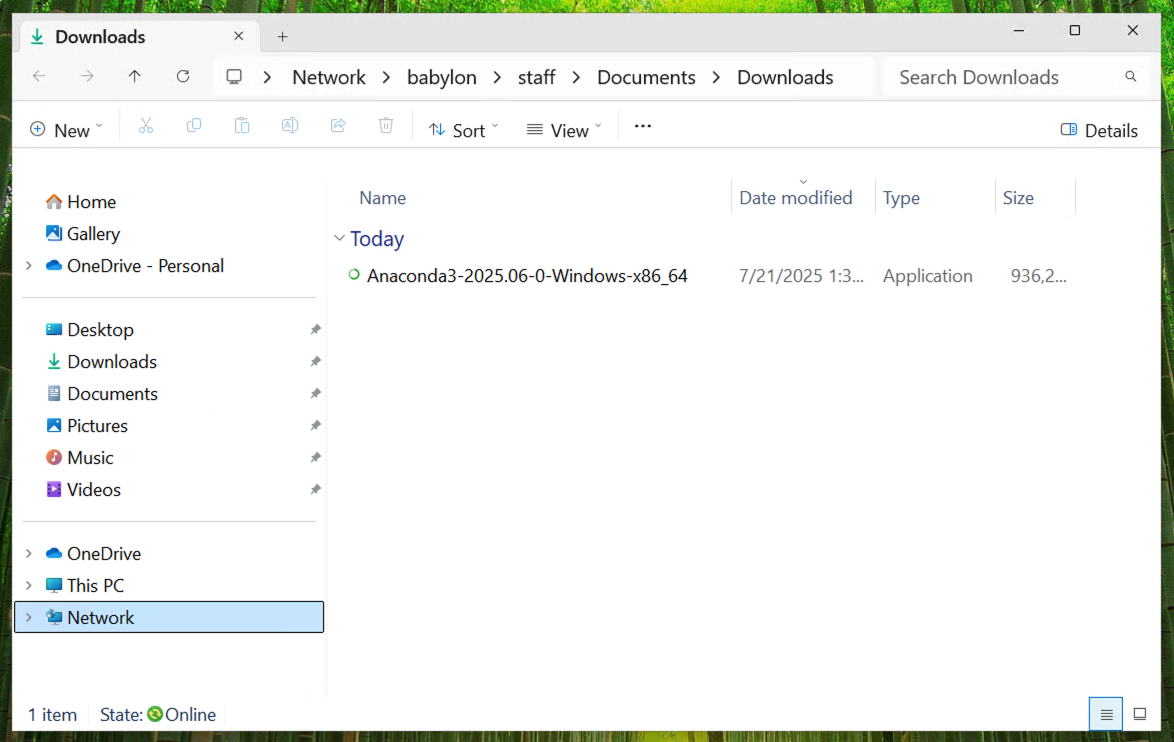
Download the Graphical Installer for Windows. Run the executable to install, which will look something like this:
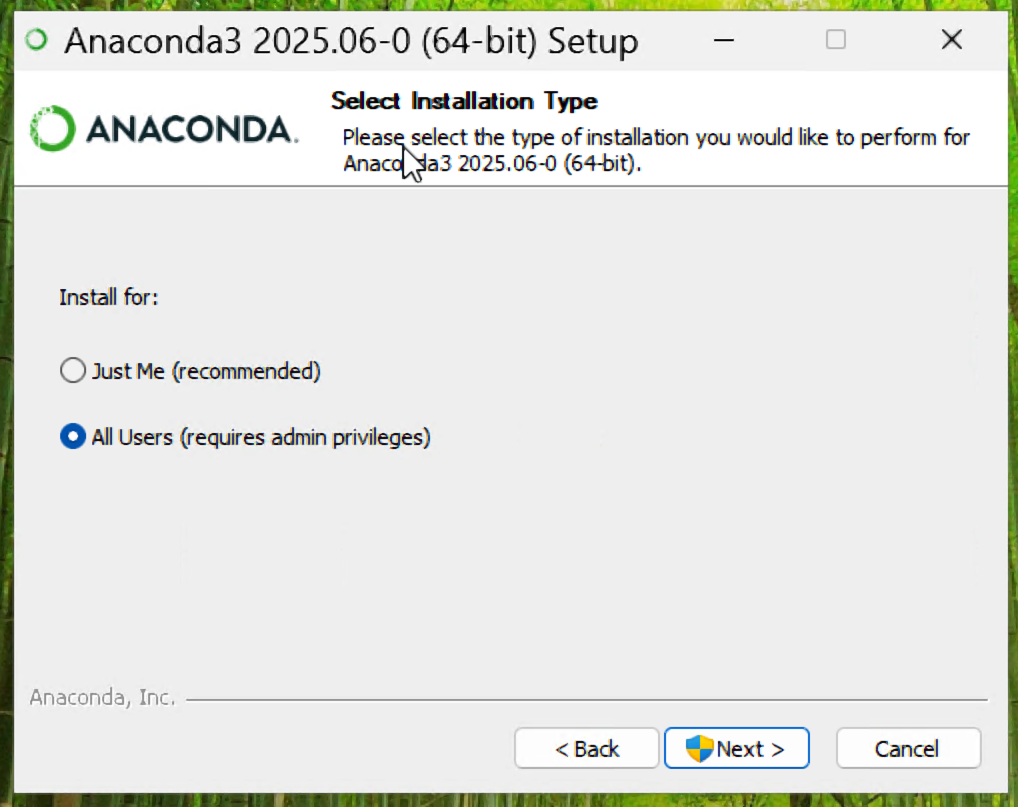
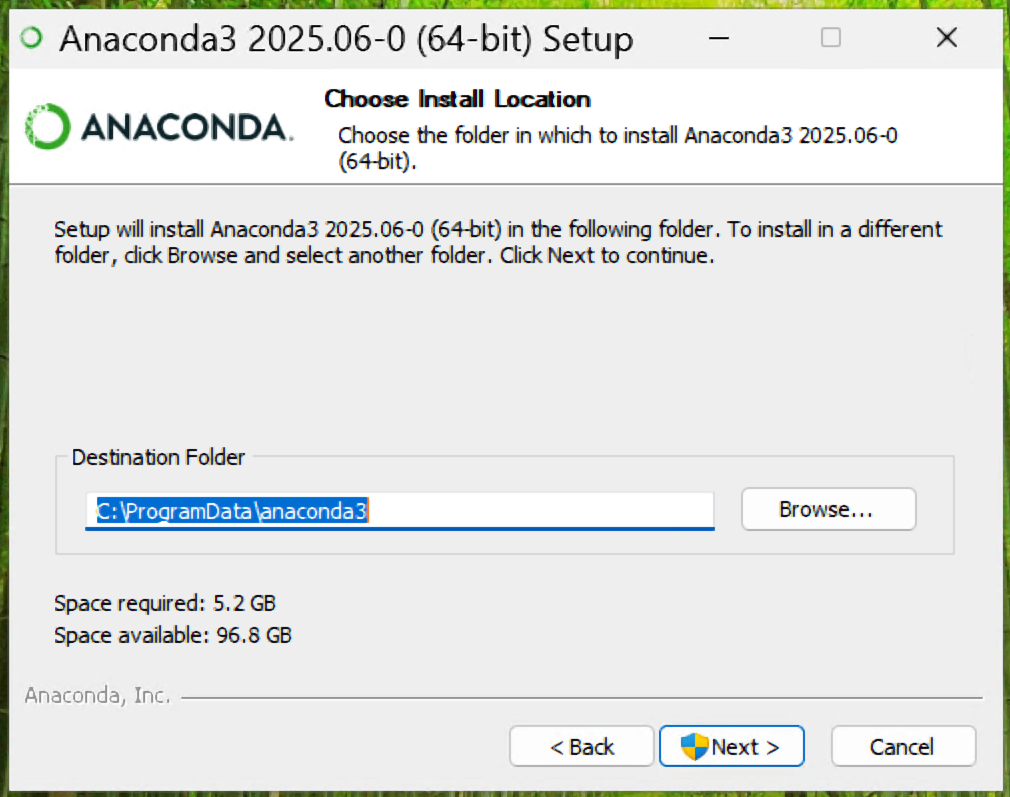
Make sure to install Anaconda for “All Users” like this:
It is important that Anaconda is installed in the Program Data folder located in your C: drive. It should look like this:
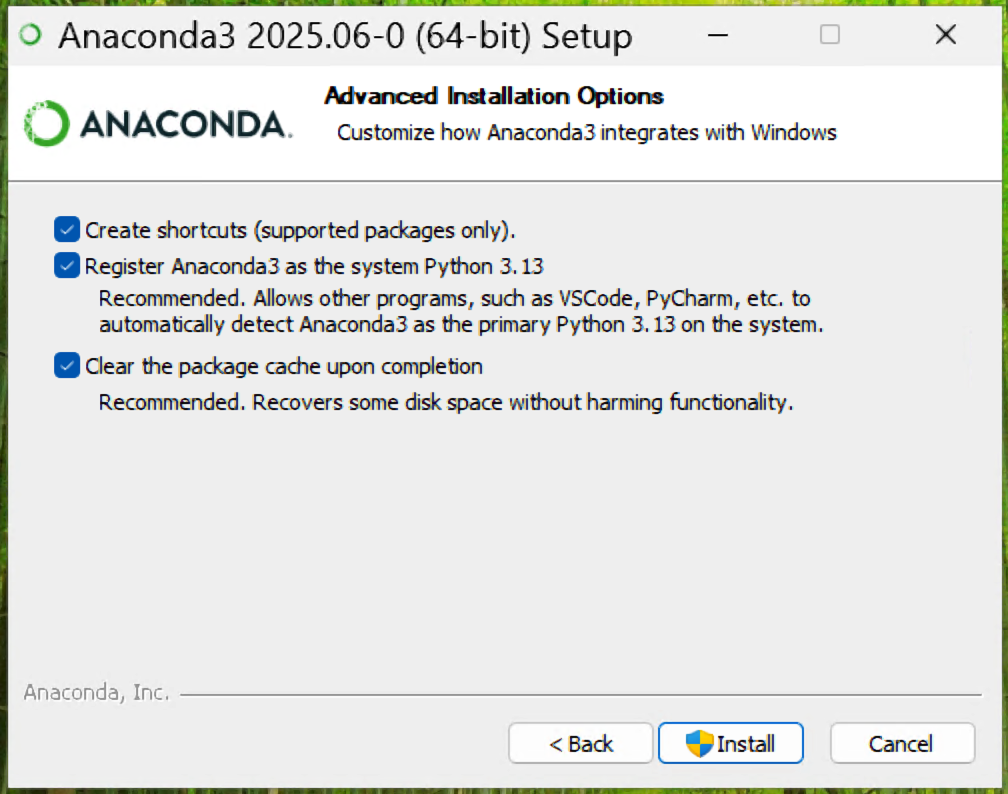
You’ll want to register Anaconda3 as your system Python and clear your cache when the installation is complete. Select those boxes and then install Anaconda:
By default, installation should add “conda” to your system path so you should not have any issues. Open Positron and run the following in the Terminal to confirm:
Positron Terminal
conda infoIf it returns any information, you’re all set.
If it returns bash: conda: command not found, conda was not added to your system path. You’ll need to modify your shell profile to add conda to your system path by following the steps below.
Open Positron and run the following in the Terminal to initialize conda. This will add “conda” to your shell profile:
Positron Terminal
~/opt/anaconda3/bin/conda init It should return a list of modifications. If successful, move onto the next commands:
Positron Terminal
source ~/.bash_profile
conda
If it returns any information, you’re all set. If it still doesn’t recognize it, ask for help.
Open Positron and run the following in the Terminal to initialize conda. This will add “conda” to your shell profile:
Positron Terminal
/c/ProgramData/anaconda3/Scripts/conda.exe init bashIt should return a list of modifications. If successful, move onto the next commands:
Positron Terminal
source ~/.bash_profile
conda
If it returns any information, you’re all set. If it still doesn’t recognize it, ask for help.
Visual Studio Code (aka VS Code) is another language-agnostic IDE. It works and looks a lot like Positron (Positron is actually built off VS Code), and is still widely-used by many Python developers. You’ll practice using VS Code in some of your classes. Download VS Code for your operating system.
GitHub is a cloud-based platform where data scientists and developers can store, share, and collaborate on code. If you don’t already have a GitHub account, go to https://github.com and create one. Check out Jenny Bryan’s Happy Git with R, Ch. 4 for some helpful considerations when choosing a username. We suggest that you use a personal email, rather than a school or work email (which may become deactivated after you graduate or change jobs).
Git is a version control system that lives on our local computer(s) and is used to track and manage changes to files (mostly source code). You should already have git on your device, but let’s check for it anyway.
Positron Terminal
which gitPositron Terminal
where git/usr/local/bin/git on a Mac, C:\Program Files\Git\mingw64\bin\git.exe on Windows, though it could differ slightly on your computer), then you have git installed. If you instead get no response at all, you should download & install git here: git-scm.com/downloadsPositron Terminal
git config --global user.name "Jane Doe"
git config --global user.email janedoe@example.comPositron Terminal
git config --list --globalOur Bren servers are workbench-1.bren.ucsb.edu and workbench-2.bren.ucsb.edu.
Positron Terminal
git config --global credential.helper 'cache --timeout=10000000'This prevents important credentials (e.g. a GitHub Personal Access Token, PAT, which you’ll set in step #9) from being removed from the server’s memory. You do not need to complete this step when configuring git on your local computer.
First: What even is a personal access token? From GitHub’s documentation:
Personal access tokens (PATs) are an alternative to using passwords for authentication to GitHub when using the GitHub API or the command line.
This means that in order to push your work (files, scripts, etc.) from your laptop (or any other computer) to GitHub, you’ll need to first to generate a PAT. Importantly, you’ll need to generate a PAT for each computer you wish to work from. For example, we will complete the following steps to create a PAT for your personal laptop, but you’ll also need to create a PAT if/when you choose to work on a second computer at home or any of the Bren servers. Good news is that you can follow these same steps when you’re ready to set up additional PATs on other machines. For now, let’s get a PAT for our personal laptop squared away:
{usethis} package in R by running the following in the Positron Console:Positron Console
install.packages(“usethis”)A lot of scary looking red text will show up while this is installing - don’t panic. If you get to the end and see something like below (with no error) it’s installed successfully.

Positron Console
usethis::create_github_token() 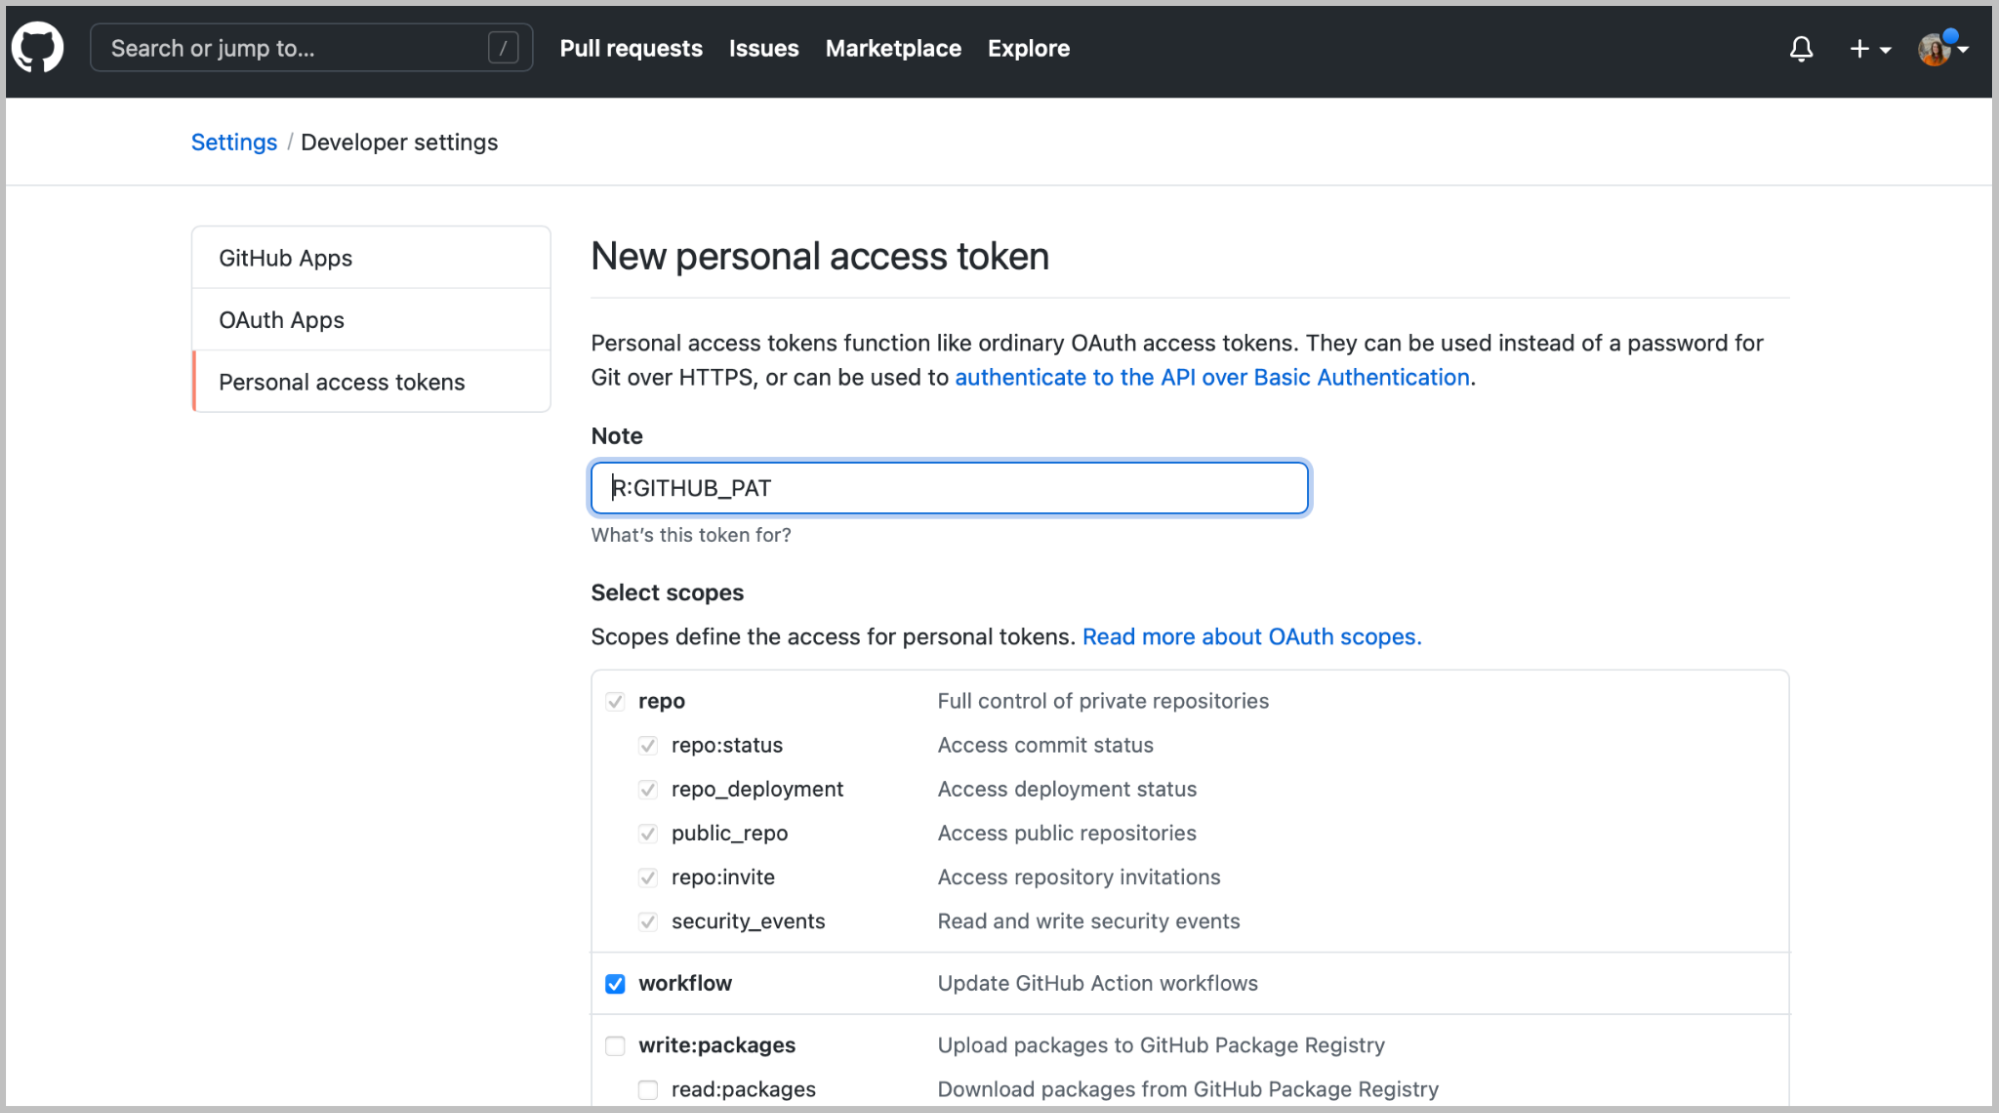
In the Note field, you should see some autopopulated text: R:GITHUB_PAT. We suggest changing this to something that signifies what machine it’s being used for. For example, if you are generating a PAT for your laptop, you might choose to rename it, My Personal Laptop.
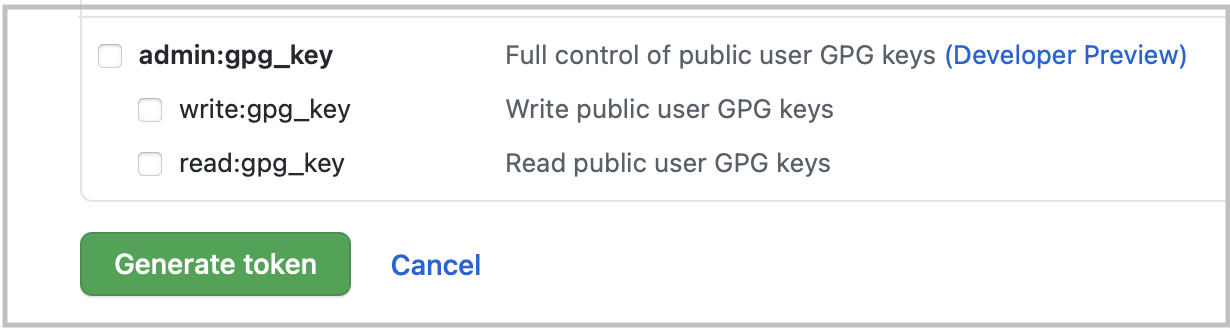
Next, you’ll see a section called Select scopes with reasonable options already selected for you. Do not change anything. Just scroll down to the bottom of that page and click the green Generate token button:
Copy the generated PAT to your clipboard
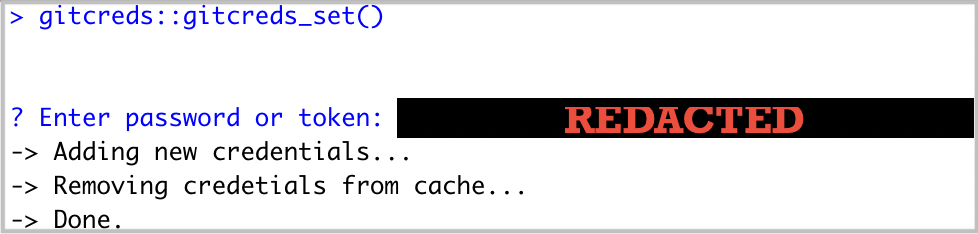
Back in Positron, run the following in the Console:
Positron Console
gitcreds::gitcreds_set()This will prompt you to paste the PAT you just copied from GitHub. Paste the PAT, press Enter to run. You should see something like this show up if all is well so far (you’ll have pasted your PAT where the example below says “REDACTED”):
Positron Console
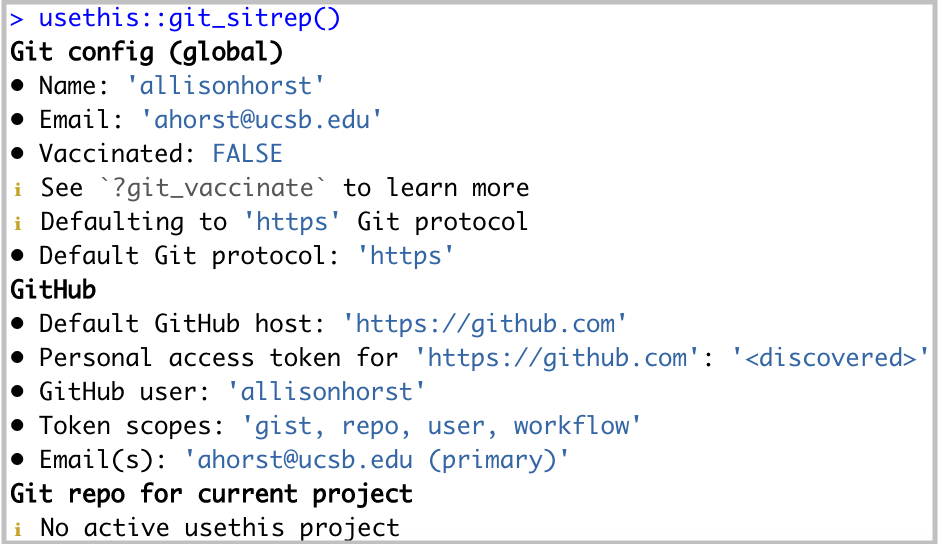
usethis::git_sitrep()Does it return information about your connected GitHub account that looks something like below? Great! You’ve configured git and successfully stored your PAT.
Setting an expiration date on personal access tokens is highly recommended in order to keep your information secure. GitHub will send you an email when it’s time to regenerate a token that’s about to expire. Follow the email prompts, then use gitcreds::gitcreds_set() to reset your token.
Cyberduck is a program that allows you to browse files on a remote server. Download here.
For secure remote access to the UCSB’s campus network when you’re not physically present on campus, you’ll need to download and install the Ivanti VPN client. This will allow you to access UCSB’s technology resources (including servers, journal subscriptions, etc.) anytime and from anywhere.
See this UCSB Information Technology article for directions on how to get started.
Click here to join our UCSB-MEDS Slack Workspace
Customize your profile with your name and photo (adding a photo helps instructors and TAs learn your names more quickly!).
Join the summer course channels (#eds-212, #eds-221, #eds-214, #eds-217)
Once enrolled and your UCSBnetID is activated, you will have access to your UCSB Connect Account which provides email, calendaring, and collaboration services. You must use this account (UCSBnetID@ucsb.edu) to log in and access all of your Google Apps (including Google Calendar, Google Drive, etc.).
The MEDS Google Calendar contains all classes and events relevant for our MEDS students. Feel free to add this to your calendar if you find it helpful. To do so, log in to Google Calendar using your @ucsb.edu credentials > Click on the + next to “Other calendars” on the left-hand side of your screen and choose “Browse resources” > Click the drop down arrow next to “bren” and check the box next to “bren-calendar-meds”
New students must request an Access ID Card (aka your UCSB photo identification), which are available for pickup at the UCEN 24 hours after your request is made. We recommend submitting your request before summer orientation, so that it’s ready for pickup during your first day on campus.
Once you receive your Access ID Card, you must complete this form to gain key card access to Bren (after hours) and NCEAS (all hours).
~ END Installation Guide ~
The MEDS program requires all students to have a personal laptop to use during the program. Our curriculum is designed to work across different operating systems and computers, as long as they meet some minimum requirements.
If you already have a laptop that you plan to use in MEDS, be sure to install the latest operating system before the program begins:
We recommend:
You can purchase a Macbook Air using the higher education discount starting at $999, before tax and AppleCare. The new Macbook Neo ($499-599) could also work. Since it is a newer model, we have not tested it through an entire curriculum yet. A PC can cost anywhere from $500 to more than $3,000; you generally get what you pay for.
If your computer breaks or dies, we can typically loan you a Windows laptop for up to a month (which should be long enough to have your computer repaired or to purchase a new one).
You may consider having a dedicated computer setup that includes an external monitor, keyboard, and / or mouse at home. A stable at-home WiFi connection is necessary for completing work remotely (i.e. off-campus).
~ END Computing Requirements & Recommendations ~